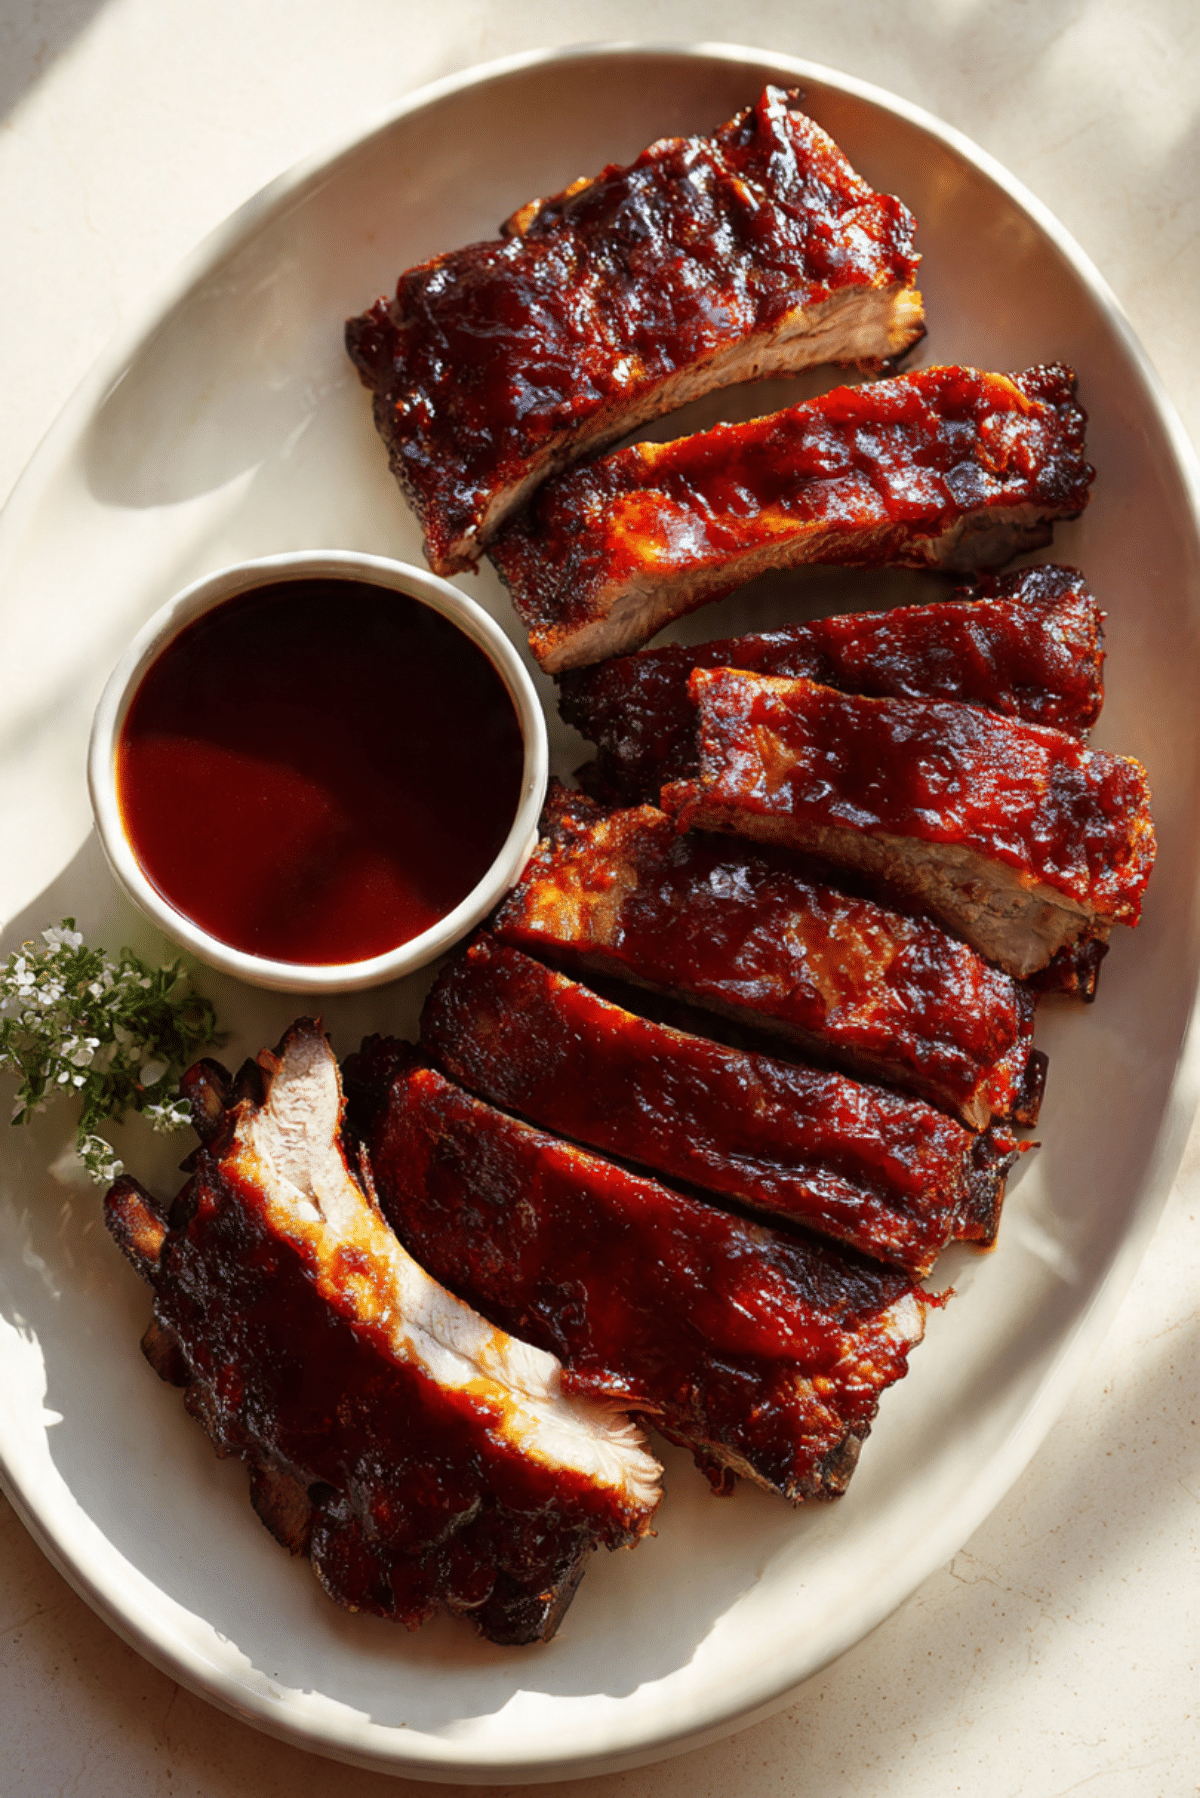
Baby Back Ribs
There is something about a tray of tender, sticky ribs that instantly makes the whole kitchen feel warmer. The smell of smoky paprika, brown sugar, and barbecue sauce drifting through the oven is the kind of thing that makes people wander in and ask what is cooking. Trust me, you’re going to love this. These ribs come out juicy, deeply seasoned, and glazed with a glossy finish that feels like a weekend treat, even if you make them on a regular night.
Why These Ribs Always Steal the Show
Some recipes are good, and then some recipes make everyone go quiet at the table for the first few bites. This is one of those. Baby back ribs have that perfect balance of tenderness and rich pork flavor, and when they are coated in a sweet, smoky rub and finished with a sticky layer of barbecue sauce, they turn into something seriously hard to resist.
What makes them even better is how approachable they are. You do not need a smoker or a backyard setup to make them shine. The oven does most of the work, slowly transforming the meat until it is tender enough to pull cleanly from the bone, while still holding together beautifully for serving. This one’s a total game-changer when you want something comforting, crowd pleasing, and a little dramatic in the best way.
A Little Backyard Barbecue History on Your Plate
Ribs have a long and delicious story behind them, especially in American barbecue culture where slow cooking, spice rubs, and sauce have become a tradition all their own. Baby back ribs come from the upper part of the rib cage, near the loin, which is why they are smaller, leaner, and especially tender when cooked low and slow.
Over time, ribs became a favorite at cookouts, family gatherings, and neighborhood feasts because they feel generous and celebratory. Every region seems to have its own spin, some sweet, some spicy, some dry rubbed, and some drenched in sauce. This version leans into that classic sweet smoky oven baked style, which means you get all that barbecue comfort without needing to fire up a grill.
Why You Can Count on This Recipe Every Time
Before we get into the details, let me tell you why this recipe deserves a spot in your regular rotation. It is dependable, forgiving, and packed with flavor from the first bite to the last.
Versatile: These ribs work for casual family dinners, game day spreads, or even a laid-back celebration meal. You can keep the sides simple or build a full barbecue feast around them.
Budget-Friendly: A couple of racks can feed several people really well, especially when paired with easy sides like slaw, potatoes, or cornbread. It feels generous without needing a long shopping list.
Quick and Easy: The actual prep is wonderfully simple. Once the rub is mixed and the ribs are wrapped, the oven takes over and does the heavy lifting.
Customizable: You can keep the seasoning sweet and smoky, or nudge it in a spicier direction with a little more heat. You can also use your favorite barbecue sauce to make the final flavor your own.
Crowd-Pleasing: These are the kind of ribs that disappear fast. The tender texture and glossy finish make them almost impossible to resist.
Make-Ahead Friendly: You can season the ribs ahead of time, refrigerate them, and bake when you are ready. That makes entertaining so much easier.
Great for Leftovers: Any extra meat can be tucked into sandwiches, loaded onto baked potatoes, or chopped into a hearty rice bowl the next day.
Pro Tips That Make a Big Difference
Now that you know why these ribs are such a keeper, let’s get into the little details that make them even better. A few smart moves can take them from good to unforgettable.
- Remove the membrane: This thin layer on the back of the ribs can turn chewy during baking. Sliding a knife under it and pulling it off helps the ribs become much more tender.
- Season generously: Ribs can handle bold seasoning, so do not be shy with the rub. You want every bite to have that sweet, smoky, savory balance.
- Wrap tightly in foil: Keeping the ribs sealed helps trap moisture, which is what gives you that tender, almost melt-in-your-mouth texture.
- Sauce near the end: Adding barbecue sauce too early can make it burn. Brushing it on toward the finish gives you that glossy glaze without bitterness.
- Rest before slicing: Giving the ribs a few minutes to settle helps the juices stay where they belong, right in the meat.
The Kitchen Tools That Make It Easy
Good ribs do not require fancy equipment, which is part of their charm. A few reliable kitchen basics are all you need to make the magic happen.
Baking Sheet or Roasting Pan: This supports the ribs while they bake and catches any juices that escape the foil.
Aluminum Foil: This is essential for wrapping the ribs tightly so they steam gently and become tender.
Small Mixing Bowl: You will use this to stir together the spice rub until everything is evenly blended.
Pastry Brush: Perfect for brushing on the olive oil and later layering on the barbecue sauce.
Tongs: These help you move the ribs without tearing the meat once they are tender.
Sharp Knife: You will want this for trimming and slicing the ribs cleanly between the bones before serving.
Everything You Need for Flavor Packed Ribs
And now we get to the ingredients, which is where the story really starts to smell amazing. Each item here pulls its weight, building layers of sweetness, smokiness, warmth, and that classic barbecue richness.
- Baby Back Ribs: 2 racks, about 4 pounds total, these are the star of the show and become tender, juicy, and beautifully flavorful during the long bake.
- Olive Oil: 2 tablespoons, this helps the spice rub cling to the surface and adds a little richness.
- Brown Sugar: 1/4 cup, this brings sweetness and helps create that deep caramelized finish.
- Smoked Paprika: 1 1/2 tablespoons, this adds smoky depth and a gorgeous warm red color.
- Kosher Salt: 1 tablespoon, this seasons the meat all the way through and wakes up every other flavor.
- Black Pepper: 1 1/2 teaspoons, this gives the rub a gentle heat and savory backbone.
- Garlic Powder: 1 teaspoon, this adds mellow garlicky flavor that blends beautifully into the rub.
- Onion Powder: 1 teaspoon, this rounds out the seasoning with a soft savory sweetness.
- Dry Mustard: 1 teaspoon, this adds a subtle tangy edge that makes the flavor more layered.
- Barbecue Sauce: 1 cup, this gets brushed on near the end for that sticky, glossy coating everyone loves.
Easy Swaps When You Need Flexibility
The beauty of a recipe like this is that it can bend a little without losing its soul. So if you are missing an ingredient or want to tweak the flavor, here are a few easy substitutions.
Olive Oil: Avocado oil.
Brown Sugar: Coconut sugar.
Smoked Paprika: Sweet paprika plus a tiny pinch of extra black pepper.
Kosher Salt: Fine sea salt, use a little less.
Dry Mustard: Dijon mustard, use a small amount and rub it lightly over the ribs before seasoning.
Barbecue Sauce: A tomato based sauce with a sweet smoky profile.
The Ingredients That Do the Heavy Lifting
A few ingredients deserve a little spotlight because they really shape the final flavor in a big way.
Baby Back Ribs: These are naturally tender compared with larger rib cuts, which makes them ideal for oven baking. They cook into juicy, pull-apart perfection while still keeping a satisfying bite.
Smoked Paprika: This spice gives the ribs much of their barbecue personality even without a smoker. It adds warmth, color, and that subtle smoky note that makes the kitchen smell incredible.
Let’s Get These Ribs in the Oven
This is the part where the kitchen starts to feel exciting. The steps are simple, and each one builds toward that final tray of glossy, deeply seasoned ribs that look like they came from your favorite barbecue spot.
- Preheat Your Equipment: Preheat your oven to 275°F. Line a baking sheet or roasting pan with foil so cleanup is easier and the ribs have a sturdy place to cook.
- Combine Ingredients: In a small bowl, mix the brown sugar, smoked paprika, kosher salt, black pepper, garlic powder, onion powder, and dry mustard until evenly blended.
- Prepare Your Cooking Vessel: Remove the membrane from the back of the ribs if it is still attached. Rub both racks with the olive oil, then coat them all over with the spice mixture, pressing gently so it sticks well.
- Assemble the Dish: Wrap each rack tightly in foil and place them on the prepared baking sheet. Keep the seam side facing up so the juices stay tucked inside while they cook.
- Cook to Perfection: Bake for 3 hours, or until the ribs are very tender when pierced with a knife. Carefully unwrap them, brush the tops with barbecue sauce, and return them to the oven uncovered for 10 minutes.
- Finishing Touches: Switch the oven to broil for 3 to 5 minutes, just until the sauce bubbles and turns glossy around the edges. Watch closely so it does not burn.
- Serve and Enjoy: Let the ribs rest for 10 minutes, then slice between the bones and serve with extra barbecue sauce if you like. Let me tell you, it’s worth every bite.
The Texture and Flavor Payoff
Once these ribs are done, the texture tells you everything you need to know. The meat turns tender and juicy, with just enough structure to hold together when sliced, while the outside develops a sticky glaze that clings to every curve. You get that soft pull from the meat, then a little caramelized chew from the sauce right at the edges.
Flavor wise, it is all about contrast. The brown sugar brings sweetness, the smoked paprika adds warmth and depth, the mustard gives a subtle tang, and the barbecue sauce ties it all together with a glossy finish. Every bite feels rich, savory, sweet, and smoky all at once, which is exactly what makes this dish so satisfying.
Little Tricks for Even Better Results
By now, the ribs are already sounding pretty irresistible, but a few extra tips can make the process smoother and the result even tastier.
- Let the rub sit briefly: Even 15 to 20 minutes of resting time helps the seasoning settle into the meat before baking.
- Use a good quality sauce: Since the final glaze is so noticeable, pick a barbecue sauce you really enjoy eating.
- Slice after resting: This keeps the juices in the meat and gives you cleaner slices.
- Serve with something fresh: A bright slaw or cucumber salad balances the richness beautifully.
Common Rib Mistakes and How to Dodge Them
Even an easy recipe has a few places where things can go sideways, so here are the most common rib issues and how to avoid them.
- Skipping the membrane: This can leave the back of the ribs tough and chewy. Take the extra minute to remove it.
- Cooking at too high a temperature: Ribs need gentle heat to become tender. A hotter oven can make them dry before they soften.
- Adding sauce too soon: Sauce can burn during a long bake, so wait until the final stretch.
- Not wrapping tightly enough: Loose foil lets steam escape, which can slow down tenderizing and dry the ribs out.
A Quick Look at the Nutrition
It is always helpful to know what to expect before you dig in, especially with a hearty main dish like this. These numbers are approximate, but they give you a practical snapshot.
Servings: 4
Calories per serving: 620
Note: These are approximate values.
Time Breakdown Before You Cook
One of the nicest things about this recipe is that the hands-on time stays pretty low. Most of the process is slow, gentle oven cooking, which means you can prep the ribs and let the oven do the rest.
Prep Time: 20 minutes
Cook Time: 3 hours 15 minutes
Total Time: 3 hours 35 minutes
Make Ahead, Store, and Reheat Without Losing Quality
These ribs are wonderfully make-ahead friendly, which is a lifesaver when you are planning a dinner or just trying to stay ahead during the week. You can season and wrap the ribs up to a day in advance, then keep them chilled until you are ready to bake.
For storage, let any leftovers cool completely before transferring them to an airtight container. They will keep in the refrigerator for up to 4 days. For longer storage, wrap portions well and freeze for up to 2 months. To reheat, place the ribs in a covered baking dish with a spoonful of extra sauce and warm them in a 300°F oven until heated through. This helps them stay moist and tender instead of drying out.
How to Turn Them Into a Full Meal
Once the ribs are ready, you can keep things classic or have a little fun with the plate. They are fantastic with creamy coleslaw, baked beans, cornbread, roasted potatoes, or a crisp green salad. That mix of rich meat and fresh or tangy sides makes every bite feel balanced.
You can also lean into a casual barbecue spread with pickles, corn on the cob, and a chilled pasta salad. If you want something cozier, buttery mashed potatoes and roasted vegetables make a great match too.
Smart and Tasty Ways to Use Leftovers
Leftover ribs are never a problem in my kitchen because they are so easy to turn into something new. Once the meat is chilled, it slips right off the bone and becomes a goldmine for quick meals.
Try tucking the chopped meat into toasted sandwiches with crunchy slaw, or pile it over baked potatoes with a spoonful of extra sauce. It is also delicious folded into mac and cheese, added to fried rice, or layered into a grain bowl with roasted vegetables. A good leftover situation like this feels like a little reward.
Extra Advice That Makes Cooking Feel Easier
A recipe like this is already pretty forgiving, but a few thoughtful habits make the whole experience more relaxed and delicious. Keep your foil ready before you start seasoning so the ribs can go straight into their wraps without mess. Measure the spices into one bowl first, then mix thoroughly so the flavor is even across every inch.
Another helpful trick is to let the ribs rest at room temperature for about 15 minutes before they go into the oven. That tiny step helps them cook more evenly. And when it is time to sauce them, use a light hand for the first coat, then add a little more after broiling if you want an extra sticky finish.
Make Your Ribs Look as Good as They Taste
Presentation really matters with a dish this dramatic, and the good news is that it does not take much effort to make them look incredible. Slice the ribs cleanly and arrange them on a platter with the glossy side facing up so that glaze catches the light. A small bowl of extra barbecue sauce on the side adds a restaurant style touch.
You can also frame the platter with simple sides like corn, slaw, or potato wedges if you are serving guests. The contrast of rich dark glaze against a clean white plate or board always looks inviting. These are the kind of ribs that deserve a proper entrance.
Fun Variations Worth Trying
Once you make the classic version, it is hard not to start imagining other ways to play with the flavor. That is where things get really fun.
Spicy Chili Ribs: Add 1/2 teaspoon chili powder and a pinch of cayenne to the rub for a little extra heat.
Honey Glazed Finish: Stir 1 tablespoon honey into the barbecue sauce for a sweeter, shinier glaze.
Mustardy Barbecue Style: Add 1 teaspoon Dijon mustard to the sauce before brushing it on for a tangier finish.
Maple Smoky Version: Swap the brown sugar for maple sugar or add 1 tablespoon maple syrup to the sauce for deeper sweetness.
Garlic Forward Ribs: Increase the garlic powder to 1 1/2 teaspoons if you want a more savory, bold profile.
FAQ’s
1. Can I make these ribs without barbecue sauce?
Yes, absolutely. You can serve them as dry rubbed ribs and skip the sauce entirely if you prefer a more spice forward finish.
2. How do I know when the ribs are done?
They should feel very tender when pierced with a knife, and the meat should have pulled back slightly from the ends of the bones.
3. Can I use spare ribs instead?
Yes, but they are larger and usually need more cooking time to become tender, so plan on baking them a bit longer.
4. Do I have to remove the membrane?
It is highly recommended because it improves the final texture and helps the seasoning reach the meat better.
5. Can I season the ribs the night before?
Yes, and that actually works beautifully. The extra time lets the rub settle into the meat for even more flavor.
6. What kind of barbecue sauce works best?
A sweet smoky sauce is classic here, but any sauce you love will work. Just choose one with a flavor you enjoy eating on its own.
7. Can I finish these on the grill instead of under the broiler?
Yes, once they are tender from the oven, you can grill them briefly over medium heat to set the sauce and add a little char.
8. Why are my ribs tough?
They probably need more time. Ribs become tender through slow cooking, so a little patience makes a big difference.
9. Can I freeze cooked ribs?
Yes, cooked ribs freeze very well when wrapped tightly. Reheat them gently with a little extra sauce to keep them moist.
10. What should I serve with them for a party?
Coleslaw, cornbread, baked beans, roasted potatoes, and a crisp salad make a great spread that feels generous and complete.
Conclusion
These baby back ribs are the kind of recipe that turns an ordinary meal into something memorable. They are tender, sticky, deeply seasoned, and packed with that sweet smoky flavor that keeps everyone reaching for one more piece. From the easy prep to the glossy final glaze, the whole process feels satisfying in the best possible way. Trust me, once you make them, they are going to earn a permanent place in your dinner rotation.
Print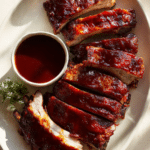
Baby Back Ribs
- Prep Time: 20 minutes
- Cook Time: 3 hours 15 minutes
- Total Time: 3 hours 35 minutes
- Yield: 4 servings 1x
- Category: Main Course
- Method: Oven Baked
- Cuisine: American
- Diet: Low Lactose
Description
Tender oven-baked baby back ribs coated in a smoky brown sugar spice rub and finished with a glossy layer of barbecue sauce. These ribs are juicy, flavorful, and perfect for a comforting family dinner or casual gathering.
Ingredients
- 2 racks baby back ribs, about 4 pounds total
- 2 tablespoons olive oil
- 1/4 cup brown sugar
- 1 1/2 tablespoons smoked paprika
- 1 tablespoon kosher salt
- 1 1/2 teaspoons black pepper
- 1 teaspoon garlic powder
- 1 teaspoon onion powder
- 1 teaspoon dry mustard
- 1 cup barbecue sauce
Instructions
- Preheat the oven to 275°F and line a baking sheet or roasting pan with foil.
- In a small bowl, mix the brown sugar, smoked paprika, kosher salt, black pepper, garlic powder, onion powder, and dry mustard.
- Remove the membrane from the back of the ribs if needed. Rub the ribs with olive oil, then coat them evenly with the spice mixture.
- Wrap each rack tightly in foil and place them on the prepared baking sheet.
- Bake for 3 hours, or until the ribs are very tender.
- Carefully unwrap the ribs, brush them with barbecue sauce, and return them to the oven uncovered for 10 minutes.
- Broil for 3 to 5 minutes, watching closely, until the sauce is bubbling and glossy.
- Let the ribs rest for 10 minutes, then slice between the bones and serve.
Notes
- Remove the membrane for the most tender texture.
- Wrap the ribs tightly in foil so they stay moist while baking.
- Wait until the end to add the barbecue sauce so it does not burn.
- Leftovers can be refrigerated for up to 4 days or frozen for up to 2 months.
Nutrition
- Serving Size: 1/2 rack
- Calories: 620
- Sugar: 16g
- Sodium: 980mg
- Fat: 38g
- Saturated Fat: 13g
- Unsaturated Fat: 21g
- Trans Fat: 0g
- Carbohydrates: 22g
- Fiber: 1g
- Protein: 42g
- Cholesterol: 145mg
Keywords: baby back ribs, oven baked ribs, barbecue ribs, pork ribs, easy rib recipe, smoky ribs