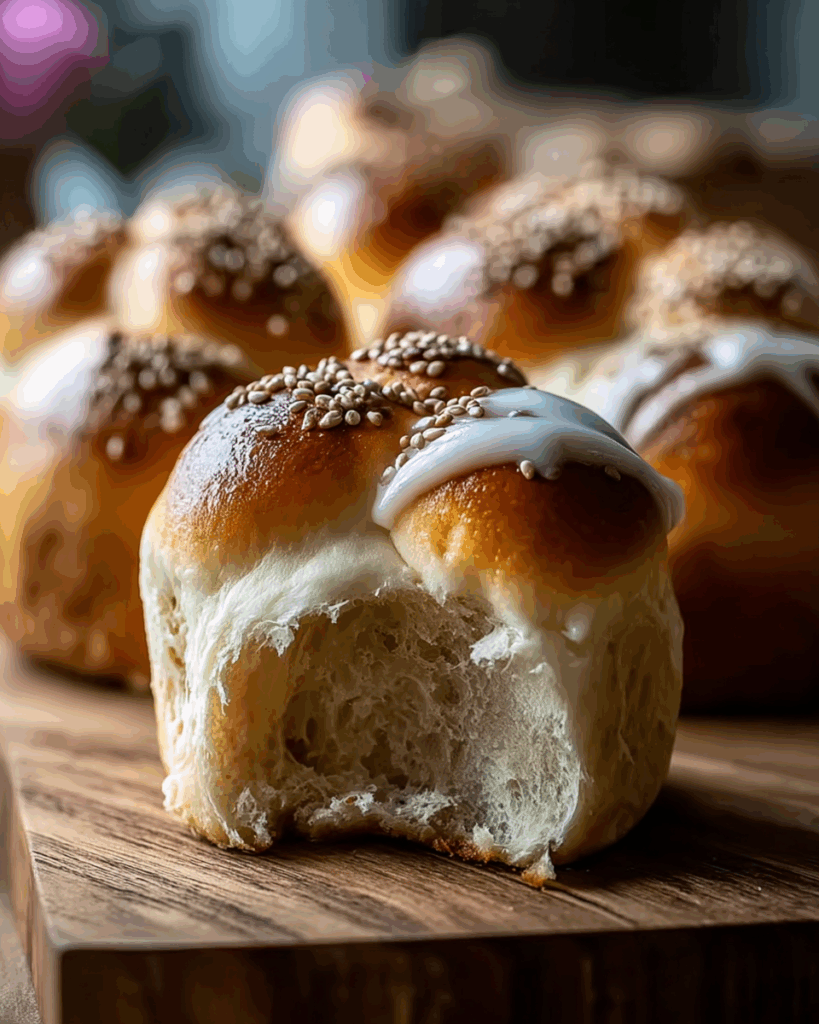
Bunny Buns
There’s something magical about pulling a tray of golden, fluffy Bunny Buns out of the oven. The soft aroma of freshly baked bread fills the kitchen, and their adorable bunny shape makes everyone’s face light up. Imagine biting into one: pillowy on the inside, slightly crisp on the outside, with a comforting warmth that makes you want just one more. Trust me, you’re going to love this.
Behind the Recipe
Bunny Buns aren’t just bread rolls, they carry a sense of whimsy and joy. I remember making these for the first time for an Easter brunch, and the way children and adults alike gathered around the table was unforgettable. Shaped like sweet little rabbits, they bring playful charm to any meal, turning something simple into something memorable.
Recipe Origin or Trivia
While bunny-shaped buns are often associated with spring and Easter traditions, shaping bread into animals and symbols has roots in many cultures. In some regions of Europe, bread shaped like animals was believed to bring good fortune. Over time, Bunny Buns have become especially popular as festive treats during spring celebrations, symbolizing renewal, life, and joy.
Why You’ll Love Bunny Buns
These little rolls are more than just adorable—they’re versatile, comforting, and perfect for sharing.
Versatile: Serve them at Easter, kids’ parties, or even just as a fun family dinner side.
Budget-Friendly: Simple pantry staples come together to make something special.
Quick and Easy: The dough is straightforward, and the shaping is easier than it looks.
Customizable: You can fill them with chocolate, jam, or even savory cheese.
Crowd-Pleasing: Their cute design guarantees smiles from everyone at the table.
Make-Ahead Friendly: Prepare the dough a day in advance and bake fresh the next morning.
Great for Leftovers: Warm them up or use them as sandwich buns the next day.
Chef’s Pro Tips for Perfect Results
A few secrets go a long way in making these Bunny Buns unforgettable:
- Use lukewarm milk to activate the yeast properly.
- Knead until the dough is smooth and elastic for a light texture.
- Let the buns rise fully before baking for maximum fluffiness.
- Brush with egg wash for that golden, shiny finish.
- Add tiny raisin or chocolate chip eyes before baking to complete the bunny look.
Kitchen Tools You’ll Need
To make Bunny Buns, you don’t need anything fancy, just a few essentials:
Mixing Bowl: For combining and kneading your dough.
Measuring Cups and Spoons: Accuracy makes all the difference in baking.
Baking Sheet: To give your bunnies space to rise and bake evenly.
Parchment Paper: Prevents sticking and helps with easy cleanup.
Pastry Brush: For applying the egg wash that creates a golden crust.
Sharp Knife or Scissors: To snip bunny ears into shape.
Ingredients in Bunny Buns
Each ingredient plays its part in creating soft, fluffy buns with just the right touch of sweetness.
- All-Purpose Flour: 4 cups gives the structure and body of the buns.
- Whole Milk: 1 cup, warm activates the yeast and adds richness.
- Active Dry Yeast: 2 ¼ teaspoons makes the dough rise light and airy.
- Granulated Sugar: ¼ cup adds subtle sweetness and feeds the yeast.
- Salt: 1 teaspoon balances the flavors.
- Unsalted Butter: ¼ cup, melted adds softness and flavor.
- Eggs: 2 large enrich the dough and help with texture.
- Raisins or Chocolate Chips: small handful for the bunny eyes.
- Egg Yolk + 1 tablespoon Milk (for egg wash) gives a glossy, golden finish.
Ingredient Substitutions
Because sometimes you need a backup plan:
Whole Milk: Use oat milk or almond milk for a dairy-free option.
Butter: Swap with coconut oil for a subtle flavor twist.
Granulated Sugar: Honey or maple syrup works if you prefer natural sweeteners.
All-Purpose Flour: Bread flour can be used for chewier results.
Ingredient Spotlight
Yeast: This tiny ingredient is what brings the buns to life, making them rise and giving them that fluffy interior.
Butter: Not only does it add richness, but it also gives the dough a tender bite that melts in your mouth.
Instructions for Making Bunny Buns
This is where the fun begins, from mixing the dough to shaping those adorable bunny ears.
- Preheat Your Equipment: Set your oven to 350°F (175°C) so it’s ready when the buns are.
- Combine Ingredients: In a mixing bowl, dissolve yeast and sugar in warm milk, let it sit for 5 minutes. Add eggs, melted butter, salt, and flour. Mix until a dough forms.
- Prepare Your Cooking Vessel: Line a baking sheet with parchment paper and lightly dust with flour.
- Assemble the Dish: Knead dough for 8–10 minutes until smooth. Cover and let rise in a warm spot for 1 hour, or until doubled. Divide dough into small balls, shape into bunnies by adding small dough rounds for tails and snipping ears with scissors. Place on the baking sheet. Add raisins or chocolate chips for eyes.
- Cook to Perfection: Brush with egg wash and bake for 15–20 minutes until golden brown.
- Finishing Touches: Remove from oven, cool slightly, and admire their cuteness.
- Serve and Enjoy: Best enjoyed warm with a pat of butter or a drizzle of honey.
Texture & Flavor Secrets
The contrast is delightful—fluffy, cloud-like insides against a thin, golden crust that adds just enough bite. The buttery flavor mingles with the natural sweetness of the dough, and if you add fillings, you’ll discover a hidden burst of richness with every bite.
Cooking Tips & Tricks
To make your Bunny Buns even better, keep these in mind:
- Use room temperature eggs so they blend seamlessly.
- Don’t overcrowd the baking sheet, the bunnies need space to rise.
- Cover cooling buns with a towel to keep them extra soft.
What to Avoid
A few pitfalls to watch for:
- Skipping the rise time, which will make buns dense.
- Overbaking, which leads to dry, tough bread.
- Adding too much flour, which prevents the dough from staying fluffy.
Nutrition Facts
Servings: 12
Calories per serving: 210
Note: These are approximate values.
Preparation Time
Prep Time: 20 minutes
Cook Time: 20 minutes
Total Time: 1 hour 40 minutes (including rising time)
Make-Ahead and Storage Tips
You can prepare the dough the night before and let it rise slowly in the fridge. Once baked, Bunny Buns can be stored in an airtight container at room temperature for up to 3 days. They also freeze beautifully—just thaw and warm before serving.
How to Serve Bunny Buns
These buns pair perfectly with a pat of butter, fruit jam, or a drizzle of honey. For a festive touch, serve them alongside Easter ham or a spring salad. They also shine as part of a breakfast spread with tea or coffee.
Creative Leftover Transformations
If you’ve got extras, here’s how to make them exciting again:
- Slice and toast with butter and cinnamon sugar for a quick treat.
- Turn them into mini sandwich buns.
- Cube them and use in a sweet bread pudding.
Additional Tips
Add a touch of vanilla or citrus zest to the dough for a subtle flavor boost. If making with kids, let them decorate with icing or sprinkles once cooled for extra fun.
Make It a Showstopper
Arrange the Bunny Buns on a platter lined with fresh greens or pastel napkins for a spring-themed centerpiece. Dust lightly with powdered sugar for a whimsical, storybook look.
Variations to Try
- Cheese-Filled Bunny Buns: Tuck a cube of cheddar inside each roll.
- Chocolate Bunny Buns: Add cocoa powder to the dough and fill with chocolate chips.
- Herb Bunny Buns: Mix fresh rosemary or thyme into the dough for a savory version.
- Jam-Filled Bunny Buns: Place a teaspoon of berry jam in the center before shaping.
FAQ’s
Q1: Can I make Bunny Buns without yeast?
A1: You can use baking powder, but the texture will be more biscuit-like than fluffy.
Q2: How do I make them dairy-free?
A2: Swap milk for almond milk and butter for coconut oil.
Q3: Can I freeze the dough before baking?
A3: Yes, freeze after shaping, then thaw and let rise before baking.
Q4: How do I keep the bunnies soft?
A4: Store in an airtight container and cover with a cloth while cooling.
Q5: Can I make them gluten-free?
A5: Use a good gluten-free flour blend with xanthan gum for structure.
Q6: What can I use for bunny eyes besides raisins?
A6: Chocolate chips, black sesame seeds, or currants work well.
Q7: Do I need a stand mixer?
A7: No, you can knead by hand until the dough is elastic.
Q8: Can kids help with this recipe?
A8: Absolutely, shaping the bunnies is the most fun part for little hands.
Q9: Why didn’t my buns rise?
A9: Your yeast may have been expired or the milk too hot.
Q10: Can I make them sweeter?
A10: Yes, increase the sugar slightly or glaze with honey after baking.
Conclusion
Bunny Buns are the perfect blend of playful charm and comforting flavor. Whether you’re making them for a festive occasion or just to brighten up a family meal, these little rolls have a way of turning ordinary moments into delightful ones. Let me tell you, it’s worth every bite.
Print
Bunny Buns
- Prep Time: 20 minutes
- Cook Time: 20 minutes
- Total Time: 1 hour 40 minutes (including rising time)
- Yield: 12 buns 1x
- Category: Bread
- Method: Baking
- Cuisine: European-inspired
- Diet: Vegetarian
Description
Soft, golden, bunny-shaped dinner rolls with a tender, buttery crumb and a shiny, golden crust, perfect for festive brunches or fun family snacks.
Ingredients
- 4 cups all-purpose flour
- 1 cup whole milk, warm
- 2 1/4 teaspoons active dry yeast
- 1/4 cup granulated sugar
- 1 teaspoon salt
- 1/4 cup unsalted butter, melted
- 2 large eggs
- 2 tablespoons raisins or chocolate chips (for eyes)
- 1 egg yolk mixed with 1 tablespoon milk (for egg wash)
Instructions
- In a small bowl, dissolve 2 1/4 teaspoons active dry yeast and 1/4 cup granulated sugar in 1 cup warm whole milk. Let sit 5 minutes until foamy.
- In a large mixing bowl, whisk together 2 large eggs and 1/4 cup melted unsalted butter. Add the foamy yeast mixture and 1 teaspoon salt, stir to combine.
- Add 4 cups all-purpose flour gradually, mixing until a rough dough forms. Turn the dough onto a floured surface and knead 8 to 10 minutes until smooth and elastic.
- Place the dough in a lightly oiled bowl, cover, and let rise in a warm spot for about 1 hour or until doubled in size.
- Punch down the dough and divide into 12 equal pieces. Shape each piece into a round for the body, add a small round for the tail, and snip two ear shapes with scissors or a sharp knife to form the bunnies. Place shaped buns on a parchment-lined baking sheet, spacing them apart.
- Press 2 tablespoons of raisins or chocolate chips into each bun for eyes. Cover and let the shaped buns rise 20 to 30 minutes until puffy.
- Preheat the oven to 350°F (175°C). Brush each bun with the egg yolk and milk wash to get a glossy, golden finish.
- Bake for 15 to 20 minutes until the buns are golden brown and sound hollow when tapped. Remove from oven and cool slightly on a wire rack.
- Serve warm, plain or with butter, jam, or honey.
Notes
- Use lukewarm milk to properly activate the yeast, not hot milk which can kill the yeast.
- Knead until the dough is smooth and elastic for the lightest, fluffiest texture.
- Do not overcrowd the baking sheet, allow space for the buns to expand while baking.
- For a dairy-free version, substitute almond milk and coconut oil for the milk and butter.
Nutrition
- Serving Size: 1 bun
- Calories: 210
- Sugar: 4 g
- Sodium: 180 mg
- Fat: 8 g
- Saturated Fat: 3 g
- Unsaturated Fat: 4 g
- Trans Fat: 0 g
- Carbohydrates: 28 g
- Fiber: 1 g
- Protein: 5 g
- Cholesterol: 55 mg
Keywords: bunny buns, Easter buns, soft rolls, homemade bread, kids recipe, dinner rolls