Chili Cheese Nachos
There is something about a hot tray of cheesy, loaded nachos that instantly makes a table feel more fun. The chips stay crisp around the edges, the chili adds that hearty, cozy bite, and the melted cheese pulls everything together in the most satisfying way. Trust me, you’re going to love this, because every layer brings a little crunch, a little heat, and a lot of comfort.
Why This Cozy Tray Always Disappears First
This is the kind of dish that makes people gather around before you even call them over. It is warm, messy in the best way, and packed with bold flavor from the very first bite. Let me tell you, it’s worth every bite, especially when the cheese melts right into the chili and catches on all those crispy corners.
A Little Backstory Behind This Game Day Favorite
Nachos have roots in northern Mexico, where the original version was created as a quick snack made with tortilla chips, cheese, and jalapeños. Over time, the dish traveled and evolved, especially in American kitchens, where heartier versions started showing up with beans, chili, fresh toppings, and big party-style presentation. And now, this one feels like the best of both worlds, classic comfort with a loaded, crowd-ready twist.
Why You Can Count on This Recipe Every Time
This tray has a lot going for it, and once you make it, you will probably keep it in regular rotation.
Versatile: You can serve it as a party appetizer, a casual dinner, or even a movie-night treat. It fits just about any laid-back occasion without feeling fussy.
Budget-Friendly: Most of the ingredients are easy to find and pretty affordable. A bag of chips, a few pantry staples, and some cheese go a long way here.
Quick and Easy: The whole process moves fast, especially if your chili is already simmered and ready. It is one of those recipes that feels generous without taking over your evening.
Customizable: You can add extra heat, swap toppings, or keep things mild depending on who is at the table. That flexibility makes it a total game-changer.
Crowd-Pleasing: Crispy chips, savory chili, and melted cheese are hard to resist. Even picky eaters usually come back for another scoop.
Make-Ahead Friendly: You can cook the chili in advance, shred the cheese early, and chop your toppings before guests arrive. That makes assembly feel wonderfully easy later on.
Great for Leftovers: Extra chili can be tucked into wraps, spooned over rice, or reheated for another snack. Nothing goes to waste, which always feels good.
Smart Kitchen Secrets for Better Layers and Better Crunch
Before we get into the full process, here are a few little tricks that make a big difference.
- Use thick tortilla chips: Thin chips can turn soft too quickly under the chili. Go for sturdy corn chips that can hold their shape.
- Keep the chili thick: A soupy chili will make the base soggy. Let it simmer until it is rich and spoonable.
- Shred your own cheese: Freshly shredded cheese melts more smoothly and gives you those lovely gooey strands.
- Layer twice, not once: A double layer helps distribute the chili and cheese more evenly, so every serving gets plenty of flavor.
- Add cold toppings last: Sour cream, tomatoes, and green onions should go on after baking so they stay fresh and bright.
The Kitchen Tools That Make Everything Easier
Getting set up first makes the whole experience smoother, and now we can dive into the tools that help this tray come together without stress.
Large skillet or saucepan: This is where the chili cooks and thickens until rich and flavorful.
Sheet pan or oven-safe baking tray: A wide surface helps the chips bake evenly and gives you room for proper layering.
Wooden spoon: Perfect for stirring the chili and gently mixing ingredients without smashing the beans.
Chef’s knife: Handy for chopping onions, jalapeños, tomatoes, and green onions cleanly.
Cutting board: Keeps prep organized and makes topping assembly much easier.
Cheese grater: Freshly grated cheese melts better and gives the tray a more natural texture.
Measuring cups and spoons: These keep the chili balanced, especially when working with spices and toppings.
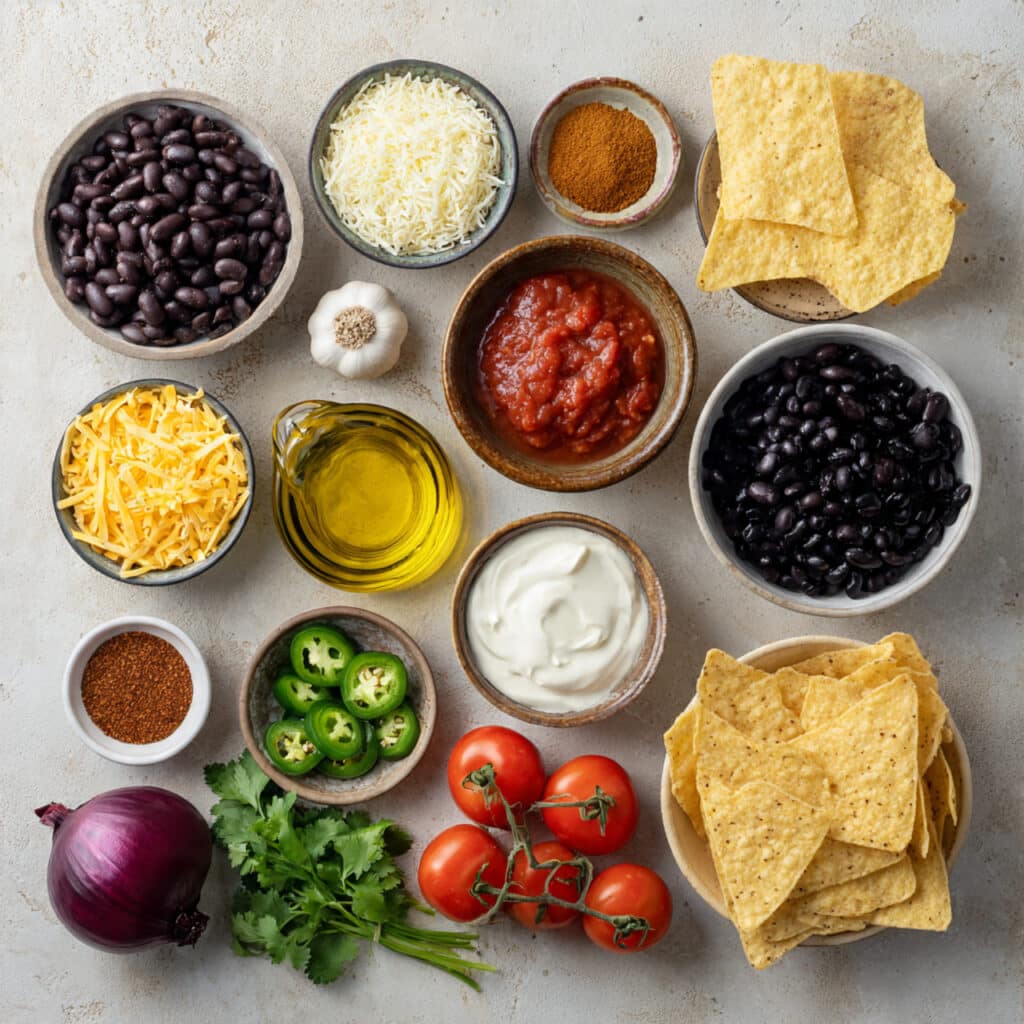
Everything That Goes Into This Flavor-Packed Tray
The beauty of this dish is how every ingredient brings its own little spark. Some add heat, some add creaminess, and some keep things crisp and bright, so the final tray feels layered instead of heavy.
- Olive oil: 1 tablespoon, used to soften the onion and garlic while building the base of the chili.
- Yellow onion: 1 small, finely diced, adds sweetness and depth as it cooks down.
- Garlic: 2 cloves, minced, brings that warm savory aroma that makes the whole kitchen smell amazing.
- Black beans: 1 can, 15 ounces, drained and rinsed, gives the chili heartiness and a creamy texture.
- Kidney beans: 1 can, 15 ounces, drained and rinsed, adds structure and makes the filling extra satisfying.
- Tomato sauce: 1 cup, creates a smooth rich base for the chili.
- Diced tomatoes: 1 cup, adds body and a little natural acidity.
- Chili powder: 1 tablespoon, brings that classic earthy flavor that makes the filling feel bold and cozy.
- Ground cumin: 1 teaspoon, gives the chili warmth and a deeper savory note.
- Smoked paprika: 1 teaspoon, adds gentle smokiness and rounds out the spice blend.
- Salt: 1/2 teaspoon, sharpens the flavors without overpowering the toppings.
- Black pepper: 1/4 teaspoon, adds a little edge and balance.
- Tortilla chips: 10 ounces, sturdy and crisp, form the crunchy base that holds all the toppings.
- Sharp cheddar cheese: 2 cups, shredded, melts beautifully and gives the tray its bold cheesy bite.
- Monterey Jack cheese: 1 cup, shredded, adds a smoother melt and soft creamy finish.
- Jalapeño: 1 small, thinly sliced, adds fresh heat and a bright pop of flavor.
- Roma tomatoes: 2 small, diced, bring freshness and juicy contrast after baking.
- Green onions: 2, thinly sliced, add color and a mild onion bite that wakes everything up.
- Sour cream: 1/2 cup, dolloped on top for cool creamy contrast.
- Fresh cilantro: 2 tablespoons, chopped, gives the final tray a fresh herbal lift.
Easy Swaps That Still Taste Amazing
One of the nicest things about this recipe is how forgiving it is. You can tweak it based on what is in your fridge and still end up with a tray that feels exciting and full of flavor.
Black beans: Pinto beans.
Kidney beans: More black beans.
Sharp cheddar cheese: Colby Jack.
Monterey Jack cheese: Mozzarella.
Sour cream: Plain Greek yogurt.
Roma tomatoes: Pico de gallo.
Fresh cilantro: Fresh parsley.
Jalapeño: Pickled jalapeño slices.
The Ingredients That Really Make It Shine
A few ingredients do most of the heavy lifting here, and they deserve a little attention before we get cooking.
Sharp cheddar cheese: This is where a lot of the bold cheesy flavor comes from. It melts into the chips and chili with that rich, familiar taste everyone loves.
Bean chili: The chili turns these from simple snack food into something hearty and deeply satisfying. It fills the gaps between the chips and makes every bite feel substantial.
Let’s Build the Ultimate Tray, Step by Step
And now we get to the fun part, where the kitchen starts smelling warm and savory and everything begins to come together. These steps are simple, and once the layers hit the oven, the whole tray transforms fast.
- Preheat Your Equipment: Preheat your oven to 400°F. Set out a large sheet pan or oven-safe baking tray so you are ready to build everything without delay.
- Combine Ingredients: Heat the olive oil in a large skillet over medium heat. Add the diced onion and cook for 3 to 4 minutes until softened. Stir in the garlic and cook for 30 seconds, then add the black beans, kidney beans, tomato sauce, diced tomatoes, chili powder, cumin, smoked paprika, salt, and black pepper. Simmer for 10 minutes, stirring occasionally, until the chili is thick and hearty.
- Prepare Your Cooking Vessel: Lightly line the sheet pan with parchment paper if you like easier cleanup, or leave it bare if your pan is well seasoned. Make sure the surface is large enough for the chips to spread into a mostly even layer.
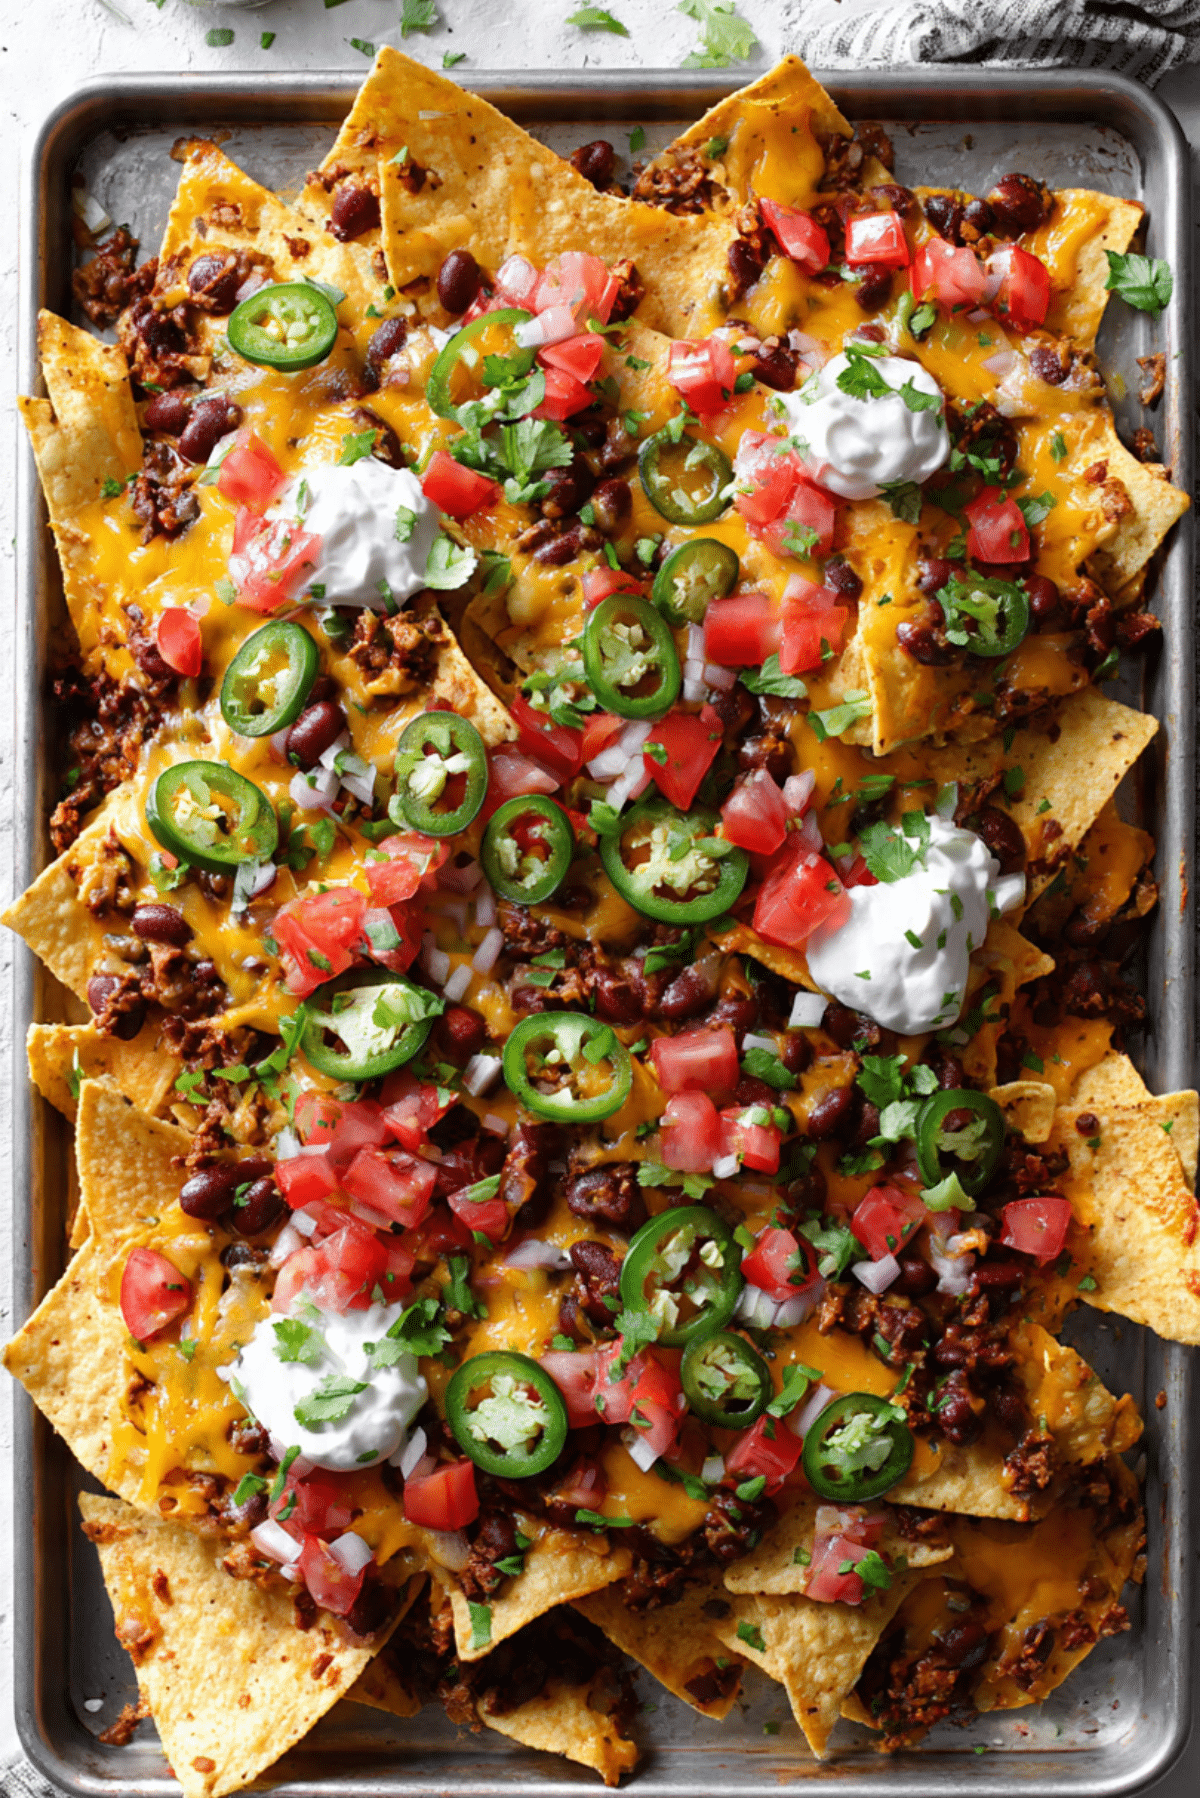
- Assemble the Dish: Spread half of the tortilla chips on the tray. Spoon over half of the chili, then sprinkle with half of the cheddar and Monterey Jack. Repeat with the remaining chips, chili, and cheese so the layers stay balanced and every section gets plenty of topping.
- Cook to Perfection: Bake for 8 to 10 minutes, until the cheese is fully melted and bubbling around the edges. Keep an eye on it near the end so the chips stay crisp and the cheese does not overcook.
- Finishing Touches: Remove the tray from the oven and immediately top with sliced jalapeño, diced tomatoes, green onions, dollops of sour cream, and chopped cilantro. The contrast of hot and cool toppings is what really makes this one sing.
- Serve and Enjoy: Bring the tray straight to the table while it is still warm and gooey. Serve right away so the chips keep their best texture and every bite stays crisp, creamy, and loaded.
What Makes Every Bite So Good
As these layers bake together, the edges of the chips stay crisp while the center pieces soften just enough to catch all that melted cheese and rich chili. The cheddar brings bold savory depth, the Monterey Jack makes everything extra silky, and the tomatoes and green onions wake it all up with freshness. Then the sour cream slides in with cool creaminess, which balances the heat from the jalapeño. It is a really satisfying mix of crunchy, melty, hearty, and bright.
A Few Helpful Tricks for the Best Results
Once you have the basic method down, these little details help push the final tray from good to unforgettable.
- Warm the chili before layering: Hot chili helps the cheese melt faster and more evenly.
- Use two layers of chips and toppings: This keeps the bottom from feeling plain and gives you better coverage.
- Serve immediately: These are at their absolute best while the cheese is still stretchy and the chips are crisp.
- Keep extra toppings on the side: That way everyone can make their portion exactly how they like it.
Common Mistakes That Are Easy to Avoid
This recipe is simple, but a few small things can affect the final texture. The good news is they are all easy to fix.
- Using watery chili: Let it simmer until thick, otherwise the chips can go soft too fast.
- Overloading the tray: Too much topping can weigh down the chips, so keep the layers generous but balanced.
- Skipping layers: One thick top layer means uneven bites. Layering helps every serving taste complete.
- Baking too long: Once the cheese is melted and bubbly, it is ready. Too much time in the oven can dry things out.
A Quick Look at the Nutrition
This is the kind of comfort food that feels indulgent, but it also brings protein and fiber from the beans, which makes it more filling than it looks at first glance.
Servings: 6
Calories per serving: 430
Note: These are approximate values.
Time Breakdown Before You Start
This is one of those recipes that feels generous and party-ready without asking for a huge time commitment.
Prep Time: 15 minutes
Cook Time: 20 minutes
Total Time: 35 minutes
Prep Ahead and Store It the Smart Way
If you want to get ahead, make the chili up to 2 days in advance and store it in the fridge in a sealed container. You can also shred the cheese and chop the tomatoes and green onions earlier in the day. When it is time to bake, just reheat the chili slightly, layer everything, and pop the tray in the oven.
For leftovers, store the extra chili separately whenever possible, since assembled nachos soften as they sit. The chili keeps well in the refrigerator for up to 4 days. You can also freeze the chili for up to 2 months and thaw it overnight in the fridge before reheating. Warm leftover chili on the stove or in the microwave, then spoon it over fresh chips with cheese for the best second round.
The Best Ways to Bring It to the Table
These loaded chips are great on their own, but they also play nicely with a few simple sides. Serve them with extra sour cream, salsa, or guacamole if you want more dipping options. A crisp green salad on the side can make the whole meal feel a little fresher, and a bowl of extra chopped tomatoes and green onions lets everyone finish their plate the way they like.
Fun Ways to Turn Leftovers Into Something New
That extra chili is pure gold, so do not let it sit forgotten in the fridge. Spoon it over baked potatoes for a super cozy dinner, fold it into quesadillas with cheese, or tuck it into burritos with rice and lettuce. You can even use it over toast or roasted sweet potatoes when you want something fast but satisfying.
Little Extras That Make a Big Difference
Sometimes the smallest details are what make a homemade tray feel restaurant-worthy. A squeeze of lime right before serving can brighten the whole thing. Freshly grated cheese melts better than packaged shredded cheese, and letting the chili reduce properly gives the finished tray a richer, less messy texture. This one’s a total game-changer when you keep the layers balanced and the toppings fresh.
How to Make It Look Extra Impressive
Presentation matters, especially with a dish this colorful. Use a large tray so the layers spread out nicely and do not look crowded. Add the sour cream in little dollops instead of one big spoonful, and scatter the green onions, jalapeños, and tomatoes evenly so every section looks vibrant. A final sprinkle of cilantro gives the tray that fresh finish that makes people reach for it instantly.
Delicious Variations to Keep Things Interesting
Once you make the base version, it is easy to start playing around with it and creating new favorites.
Extra Spicy Version: Add more jalapeño and a pinch of cayenne to the chili for a bolder kick.
Corn and Bean Version: Stir 1 cup of corn kernels into the chili for extra sweetness and texture.
Creamier Version: Add a few small spoonfuls of cream cheese into the chili while it simmers for a richer finish.
Pico Topping Version: Swap the diced tomatoes for fresh pico de gallo to add even more brightness.
Lighter Version: Use a little less cheese and add extra tomatoes and green onions for a fresher feel.
FAQ’s
1. Can I make the chili ahead of time?
Yes, absolutely. The chili can be made up to 2 days ahead and stored in the refrigerator, which makes assembly much faster later.
2. How do I keep the chips from getting soggy?
Use sturdy tortilla chips and make sure the chili is thick, not watery. Baking just until the cheese melts also helps preserve crunch.
3. Can I use only one kind of cheese?
Yes. Sharp cheddar alone works well, though the Monterey Jack adds a creamier melt and softer finish.
4. Is this good for parties?
It is perfect for parties because it is easy to assemble, easy to scale up, and always disappears quickly.
5. Can I make it less spicy?
Of course. Just reduce or skip the jalapeño and keep the chili seasoning mild.
6. Can I add more toppings after baking?
Yes, and that is actually the best time to add fresh toppings like tomatoes, green onions, cilantro, and sour cream.
7. What is the best pan to use?
A large sheet pan works best because it gives the chips enough room to bake evenly and keeps the layers from piling too high.
8. Can I reheat assembled leftovers?
You can, but the chips will soften. For the best texture, store extra chili separately and build a fresh tray later.
9. Can I use store-bought chili?
Yes, as long as it is thick and flavorful. You may want to simmer it for a few minutes first if it seems too loose.
10. What should I serve with it?
A fresh salad, salsa, guacamole, or extra sour cream all work really well. It is also filling enough to stand on its own.
Conclusion
This is the kind of comfort food that feels relaxed, generous, and just plain fun to eat. Between the crisp chips, the rich bean chili, and all that melted cheese, every bite feels warm and satisfying, with just enough freshness from the toppings to keep things lively. Trust me, you’re going to love this, whether you make it for game day, a laid-back dinner, or one of those nights when only something cheesy and cozy will do.
Print
Chili Cheese Nachos
- Prep Time: 15 minutes
- Cook Time: 20 minutes
- Total Time: 35 minutes
- Yield: 6 servings 1x
- Category: Appetizer
- Method: Baking
- Cuisine: Tex-Mex
- Diet: Vegetarian
Description
Crispy tortilla chips layered with thick vegetarian bean chili, sharp cheddar, Monterey Jack, and fresh toppings, then baked until melty and bubbling for a comforting crowd-pleasing tray.
Ingredients
- 1 tablespoon olive oil
- 1 small yellow onion, finely diced
- 2 cloves garlic, minced
- 1 (15-ounce) can black beans, drained and rinsed
- 1 (15-ounce) can kidney beans, drained and rinsed
- 1 cup tomato sauce
- 1 cup diced tomatoes
- 1 tablespoon chili powder
- 1 teaspoon ground cumin
- 1 teaspoon smoked paprika
- 1/2 teaspoon salt
- 1/4 teaspoon black pepper
- 10 ounces tortilla chips
- 2 cups sharp cheddar cheese, shredded
- 1 cup Monterey Jack cheese, shredded
- 1 small jalapeño, thinly sliced
- 2 small Roma tomatoes, diced
- 2 green onions, thinly sliced
- 1/2 cup sour cream
- 2 tablespoons fresh cilantro, chopped
Instructions
- Preheat the oven to 400°F and set out a large sheet pan or oven-safe baking tray.
- Heat the olive oil in a large skillet over medium heat. Add the diced onion and cook for 3 to 4 minutes until softened.
- Stir in the garlic and cook for 30 seconds.
- Add the black beans, kidney beans, tomato sauce, diced tomatoes, chili powder, cumin, smoked paprika, salt, and black pepper. Simmer for 10 minutes, stirring occasionally, until the chili is thick and hearty.
- Spread half of the tortilla chips on the tray. Spoon over half of the chili, then sprinkle with half of the cheddar and Monterey Jack.
- Repeat with the remaining chips, chili, and cheese.
- Bake for 8 to 10 minutes, until the cheese is fully melted and bubbling.
- Remove from the oven and top with sliced jalapeño, diced Roma tomatoes, green onions, dollops of sour cream, and chopped cilantro.
- Serve immediately while warm and crisp.
Notes
- Use sturdy tortilla chips so the layers hold up better under the chili and cheese.
- Keep the chili thick, not watery, to prevent soggy chips.
- Freshly shredded cheese melts more smoothly than pre-shredded cheese.
- Store leftover chili separately and assemble fresh nachos later for the best texture.
Nutrition
- Serving Size: 1/6 of recipe
- Calories: 430
- Sugar: 5g
- Sodium: 780mg
- Fat: 24g
- Saturated Fat: 11g
- Unsaturated Fat: 11g
- Trans Fat: 0g
- Carbohydrates: 37g
- Fiber: 8g
- Protein: 16g
- Cholesterol: 45mg
Keywords: chili cheese nachos, vegetarian nachos, loaded nachos, sheet pan nachos, cheesy nachos, game day appetizer