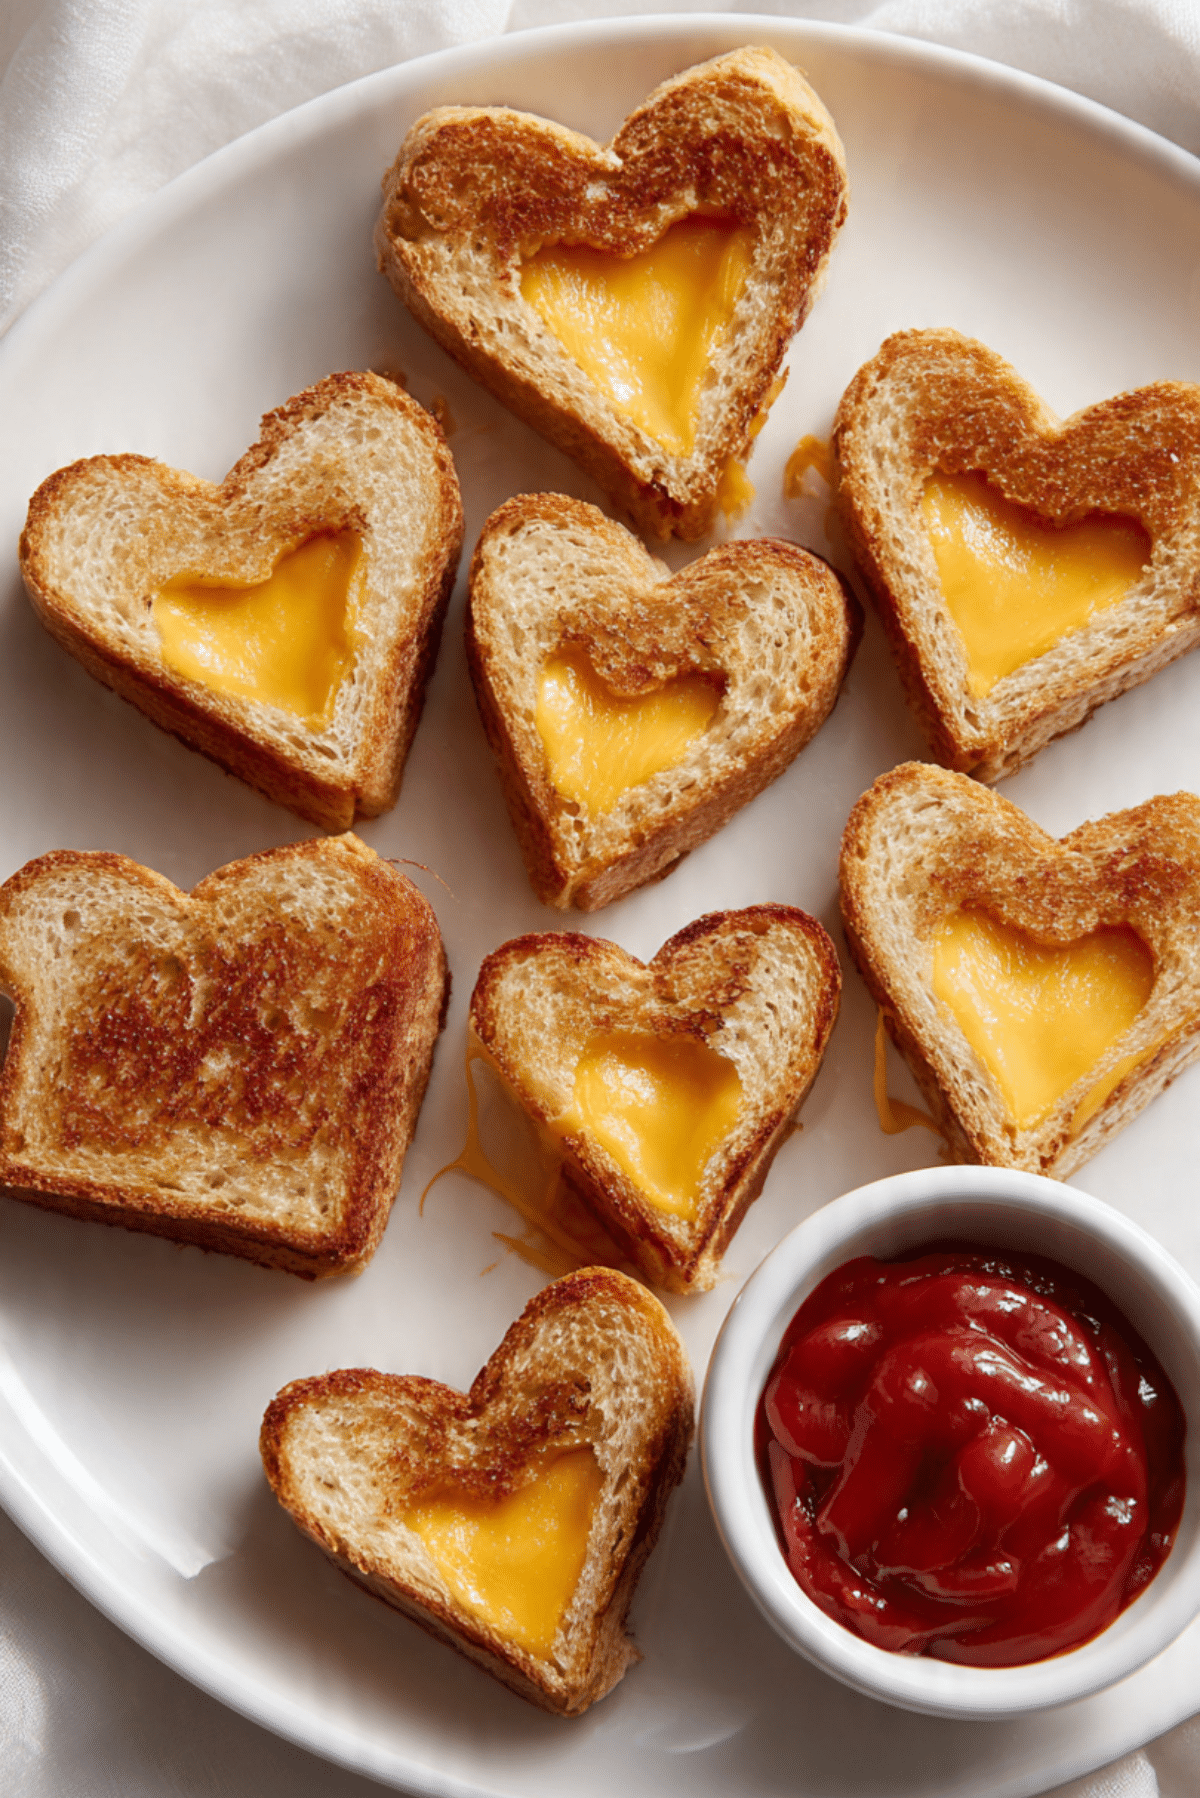
Mini Grilled Cheese Hearts Recipe
There’s something undeniably comforting about the classic grilled cheese sandwich, but when you give it a little love—literally—it turns into something even more special. Mini Grilled Cheese Hearts are the kind of treat that brings big smiles with every bite. Think buttery, golden-crisp bread hugging warm, gooey cheddar cheese, all cut into adorable heart shapes that melt hearts as quickly as they melt in your mouth. Whether you’re making a lunchbox surprise, a Valentine’s Day snack, or just adding a playful twist to an afternoon craving, these tiny treasures are sure to hit the spot.
Behind the Recipe
It all started one chilly afternoon when the house smelled like toasted bread and melting cheese. I had just found an old heart-shaped cookie cutter tucked in the back of a kitchen drawer, and I knew it was time to put it to good use. With a loaf of bread and a block of cheddar calling my name, the idea of mini grilled cheese hearts was born. They were meant to be a fun little snack for the kids, but honestly, we all ended up devouring them before the plate hit the table. Since then, they’ve become a go-to favorite, perfect for sharing and celebrating love in the simplest, tastiest way.
Recipe Origin or Trivia
While the grilled cheese sandwich has roots that stretch back to the 1920s in America, when sliced bread and processed cheese became widely available, it has evolved into a comfort food classic across the world. From British toasties to Italian panini, there’s a version for everyone. This playful twist—cutting them into hearts—adds a charming spin that’s perfect for holidays like Valentine’s Day or anniversaries. It’s a modern, homemade nod to timeless comfort with a whimsical presentation that feels both nostalgic and fresh.
Why You’ll Love Mini Grilled Cheese Hearts
This bite-sized version of a beloved classic has everything going for it, from flavor to fun. Here’s why it’s worth whipping up:
Versatile: Great as a snack, party appetizer, lunch treat, or even a breakfast side.
Budget-Friendly: Made with just a few pantry staples, it keeps both your taste buds and wallet happy.
Quick and Easy: From start to finish, you’ll have these on the plate in under 15 minutes.
Customizable: Swap in different cheeses or add fillings like tomato slices or pesto.
Crowd-Pleasing: Adults and kids alike can’t resist these crispy, cheesy little hearts.
Make-Ahead Friendly: Prepare and refrigerate ahead, then simply grill when ready to serve.
Great for Leftovers: Leftover bread or cheese? This is the perfect way to use them up deliciously.
Chef’s Pro Tips for Perfect Results
There’s an art to getting these little sandwiches just right. Here are a few tricks that make all the difference:
- Use softened butter: It spreads more evenly across the bread, giving you that golden, even toast.
- Don’t skimp on the cheese: A generous layer ensures the filling melts perfectly and doesn’t dry out.
- Cut the hearts before grilling: This keeps the edges clean and helps the shapes stay crisp.
- Use medium-low heat: It prevents the bread from burning while giving the cheese enough time to melt.
- Cover the pan: For even better melting, pop a lid on the skillet briefly while cooking.
Kitchen Tools You’ll Need
You don’t need much to bring these cuties to life, but here are a few essentials:
Heart-shaped cookie cutter: For creating those perfect mini hearts.
Non-stick skillet or griddle: Ensures even cooking and easy cleanup.
Spatula: For flipping the sandwiches without squashing them.
Butter knife: For spreading softened butter evenly.
Small bowls: To hold ingredients like shredded cheese or ketchup for dipping.
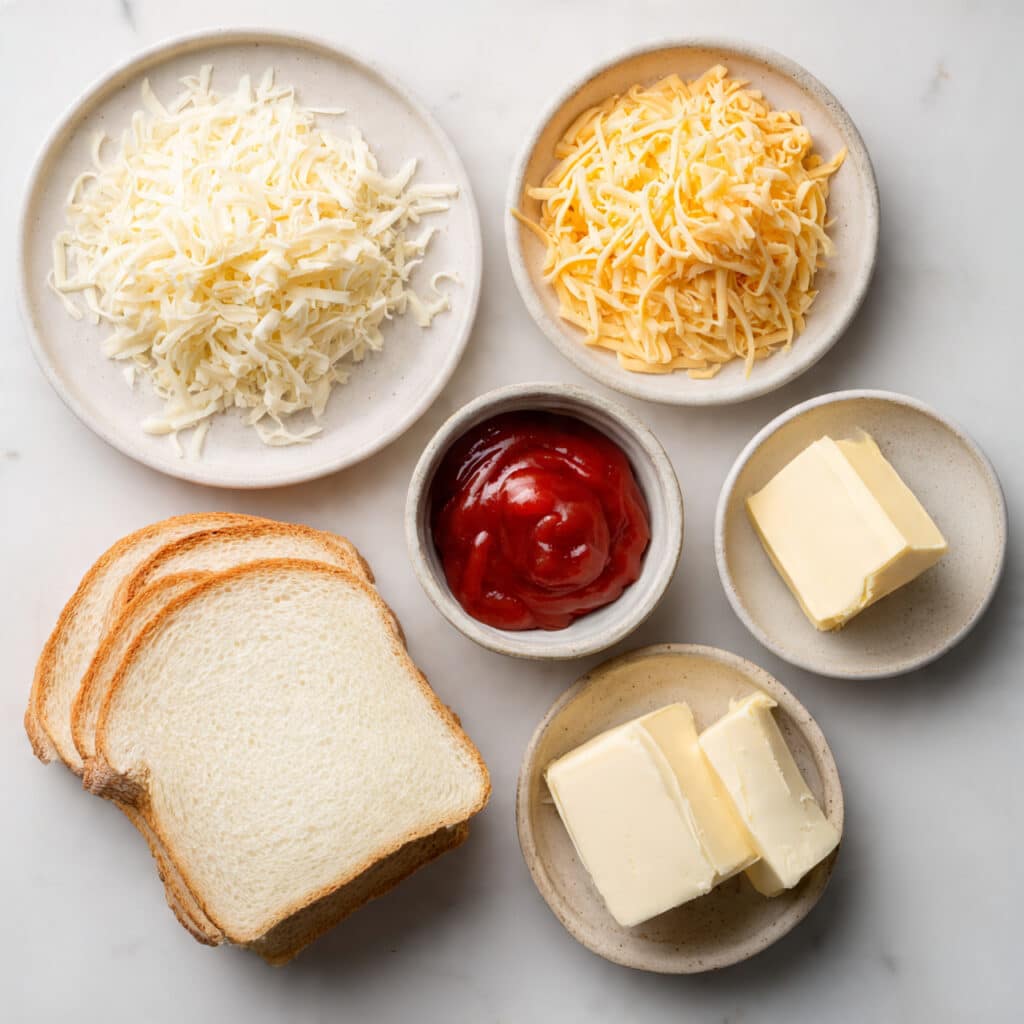
Ingredients in Mini Grilled Cheese Hearts
These ingredients work together to deliver warm, gooey, crispy perfection in every bite. Here’s what you’ll need:
- Sliced White Bread: 8 slices – Soft and sturdy, this is the perfect base for crispy, golden hearts.
- Shredded Cheddar Cheese: 1 cup – Melts beautifully and adds that classic sharp, cheesy flavor.
- Unsalted Butter: 4 tablespoons, softened – Gives the bread a crisp, golden finish.
- Ketchup: For dipping – Optional, but adds a sweet, tangy contrast to the rich cheese.
Ingredient Substitutions
Need to switch things up? No problem. Here are a few easy swaps:
White Bread: Whole wheat, sourdough, or gluten-free slices.
Cheddar Cheese: Mozzarella, Swiss, provolone, or American cheese.
Butter: Mayonnaise works well for spreading and toasting.
Ketchup: Try tomato soup, ranch dressing, or marinara sauce.
Ingredient Spotlight
Cheddar Cheese: This is the heart and soul of your sandwich. It melts smoothly, offers bold flavor, and adds that irresistible cheesy pull when you take a bite.
White Bread: Soft and uniform in texture, it crisps up just right when buttered and grilled, holding its shape beautifully after cutting.
Instructions for Making Mini Grilled Cheese Hearts
Get ready to fall in love with every step of this fun and delicious recipe. Here are the simple steps to follow:
- Preheat Your Equipment:
Heat a non-stick skillet or griddle over medium-low heat so it’s ready when you are. - Combine Ingredients:
Lay out your bread slices and cut heart shapes using a cookie cutter. Sprinkle a generous amount of cheddar on half the hearts. - Prepare Your Cooking Vessel:
Lightly butter one side of each heart-shaped bread piece. Place the cheese-covered halves on a plate, butter-side down. Top with remaining heart pieces, butter-side up. - Assemble the Dish:
Gently press each sandwich together so the cheese is snug inside. - Cook to Perfection:
Place the sandwiches in the preheated skillet. Grill each side for about 2–3 minutes or until golden and the cheese is melted. Use a spatula to flip carefully. - Finishing Touches:
Let them cool slightly for a minute. This makes them easier to handle and helps the cheese set a bit. - Serve and Enjoy:
Plate them up with a side of ketchup or dipping sauce of your choice. These little bites are best served warm and toasty.
Texture & Flavor Secrets
The real magic of these mini hearts lies in the contrast. The outer layer is perfectly crisp and golden from the buttered skillet, while the inside oozes with creamy, melted cheddar. Each bite brings a balance of crunchy edges, soft centers, and savory richness that’s hard to resist. When dipped in ketchup, you also get that sweet tangy hit that ties everything together.
Cooking Tips & Tricks
Don’t be afraid to make these your own! Here are some helpful tips:
- Try adding a pinch of garlic powder or Italian herbs to the butter for an extra flavor kick.
- Use day-old bread for a sturdier hold that crisps even better.
- If using a toaster oven, place a weight on top (like another tray) to keep them evenly pressed.
What to Avoid
It’s easy to get excited and rush through, but keep these things in mind:
- Don’t cook on high heat, or you’ll burn the bread before the cheese melts.
- Avoid overfilling with cheese. Too much and it may ooze out and burn.
- Don’t cut after grilling. Cut the hearts first for a cleaner shape and easier handling.
Nutrition Facts
Servings: 4
Calories per serving: 320
Note: These are approximate values.
Preparation Time
Prep Time: 7 minutes
Cook Time: 6 minutes
Total Time: 13 minutes
Make-Ahead and Storage Tips
These mini grilled cheese hearts are best enjoyed fresh, but they’re also great for prepping ahead. You can assemble the sandwiches and store them in the fridge for up to 24 hours before grilling. Leftovers can be stored in an airtight container for up to 2 days and reheated in a toaster oven or skillet to restore crispiness. Freezing isn’t ideal, as the texture may change, but they’re so quick to make, fresh is usually best.
How to Serve Mini Grilled Cheese Hearts
These adorable bites are perfect served with a warm bowl of tomato soup, a small salad, or simply with your favorite dipping sauces. They’re a hit at parties, holiday brunches, or school lunches. You can even serve them on skewers for a cute appetizer twist.
Creative Leftover Transformations
Got a few leftover hearts? Don’t toss them out! Here’s what you can do:
- Slice them into mini croutons and bake for a cheesy salad topping.
- Use them in a savory bread pudding.
- Reheat and dip into a warm marinara or cheese sauce for a new snack spin.
Additional Tips
- Use two cookie cutters (one smaller than the other) to create heart cutouts in the top bread piece and let the cheese peek through.
- Sprinkle a tiny bit of paprika or chili flakes inside for a kick of heat.
- Store any extra heart-shaped bread cutouts in a baggie and use for breadcrumbs or mini toasts.
Make It a Showstopper
Presentation makes everything more magical. Arrange the mini hearts on a large white platter in a heart shape. Add small bowls of dipping sauces like ranch, ketchup, or honey mustard in the center. Garnish the plate with fresh parsley or tiny edible flowers for an extra sweet touch.
Variations to Try
- Ham and Cheese Hearts: Add a thin slice of deli ham with the cheese for a savory twist.
- Italian Style: Use mozzarella and a smear of pesto inside.
- Spicy Kick: Add a few jalapeño slices or spicy cheddar for heat.
- Breakfast Version: Use scrambled eggs and cheese between the bread hearts.
- Sweet & Savory: Try apple slices and cheddar inside for a fall-inspired flavor.
FAQ’s
Q1: Can I use a panini press instead of a skillet?
Yes, a panini press works great and ensures even browning on both sides.
Q2: What type of cheese melts best for this?
Cheddar is classic, but mozzarella, provolone, or American all melt beautifully too.
Q3: Can I make these gluten-free?
Absolutely, just use your favorite gluten-free bread slices.
Q4: How do I keep them warm for a party?
Place them in a warm oven (around 200°F) on a baking tray until ready to serve.
Q5: Are these freezer friendly?
They’re best fresh, but you can freeze and reheat them in a toaster oven if needed.
Q6: Can I add veggies inside?
Yes, thinly sliced tomatoes or baby spinach work well without overpowering the cheese.
Q7: Can I use cookie cutter after grilling instead?
It’s better to cut before grilling to keep the shape clean and avoid messy edges.
Q8: How do I get an even toast on both sides?
Make sure the butter is evenly spread and cook on medium-low heat for controlled browning.
Q9: Can I serve them cold?
They’re best warm, but if packed for lunch, they’re still tasty at room temperature.
Q10: What can I do with leftover bread scraps?
Turn them into breadcrumbs, mini croutons, or toast them up for dipping.
Conclusion
Mini Grilled Cheese Hearts are more than just a fun twist on a classic. They’re a bite-sized way to share joy, warmth, and a little bit of whimsy at the table. Whether you’re serving them at a party, tucking them into a lunchbox, or just treating yourself, they bring comfort and charm in every crispy, cheesy heart. Trust me, they’re worth every bite.
Print
Mini Grilled Cheese Hearts Recipe
- Prep Time: 7 minutes
- Cook Time: 6 minutes
- Total Time: 13 minutes
- Yield: 4 servings 1x
- Category: Snack
- Method: Stovetop
- Cuisine: American
- Diet: Vegetarian
Description
Mini Grilled Cheese Hearts are a fun and tasty twist on the classic sandwich, featuring buttery toasted bread and gooey melted cheddar, cut into adorable heart shapes perfect for any occasion.
Ingredients
- 8 slices white bread
- 1 cup shredded cheddar cheese
- 4 tablespoons unsalted butter, softened
- Ketchup, for dipping (optional)
Instructions
- Preheat a non-stick skillet or griddle over medium-low heat.
- Using a heart-shaped cookie cutter, cut hearts from each slice of bread.
- Sprinkle cheddar cheese on half the hearts, then top with remaining pieces to form sandwiches.
- Butter the outer sides of each sandwich evenly.
- Place the sandwiches in the skillet and cook for 2–3 minutes per side until golden and the cheese is melted.
- Let cool slightly before serving with ketchup or your favorite dip.
Notes
- Use medium-low heat to prevent burning the bread before the cheese melts.
- Cut the bread into heart shapes before grilling for clean edges.
- Cover the skillet while cooking for extra melty cheese.
Nutrition
- Serving Size: 2 mini sandwiches
- Calories: 320
- Sugar: 3g
- Sodium: 480mg
- Fat: 21g
- Saturated Fat: 12g
- Unsaturated Fat: 7g
- Trans Fat: 0g
- Carbohydrates: 22g
- Fiber: 1g
- Protein: 10g
- Cholesterol: 45mg
Keywords: grilled cheese hearts, mini grilled cheese, Valentine’s Day snack, fun kid-friendly food, heart-shaped sandwiches