Pistachio Tart with Creamy Pistachio Paste
There is something about pistachio desserts that feels instantly special, and this tart proves it in the most delicious way. The crust bakes up golden and crisp, the filling turns smooth and softly creamy, and every bite brings that rich nutty flavor that makes you pause for a second just to enjoy it. Trust me, you’re going to love this, especially if you want a dessert that looks elegant but still feels completely doable at home.
Why This Tart Feels Like Pure Dessert Bliss
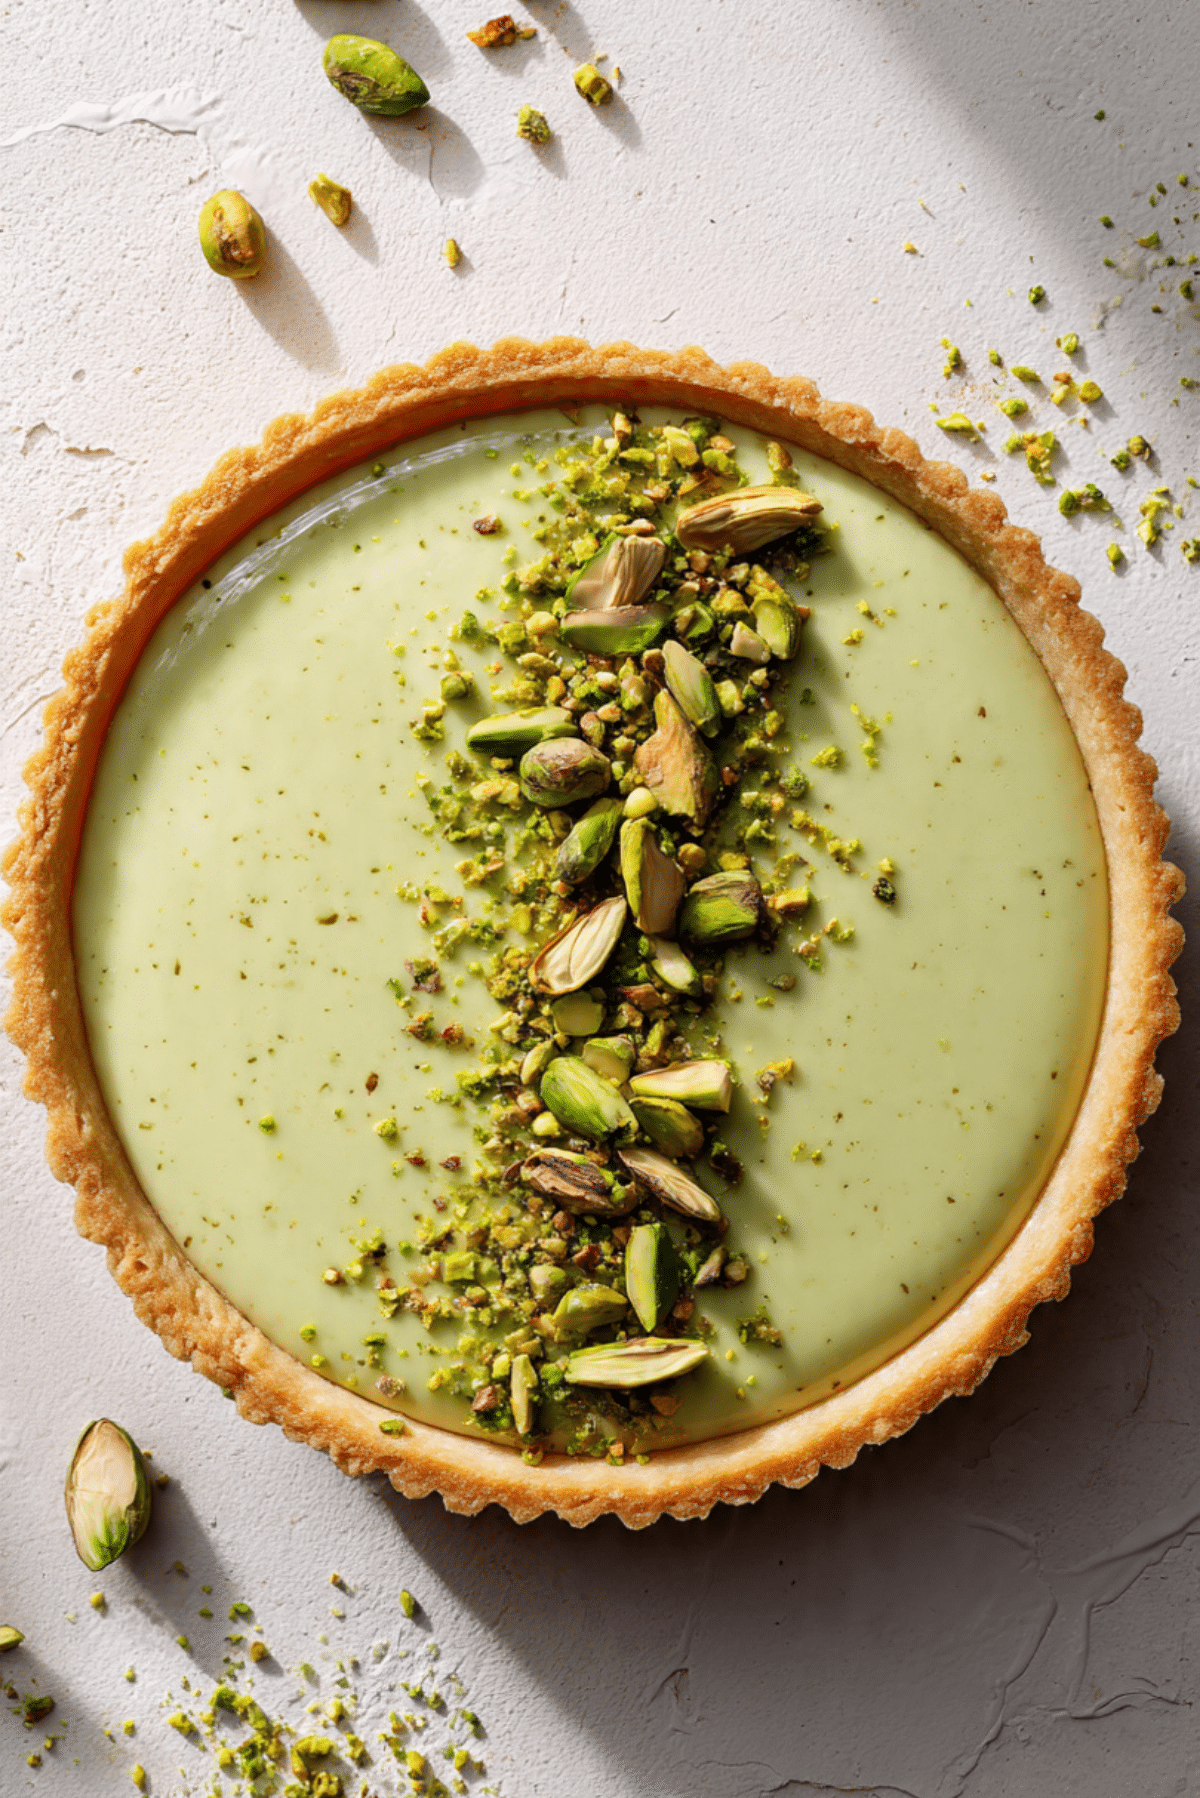
The first thing you notice is the color. That soft green filling tucked into a buttery shell looks gorgeous without needing much decoration at all. Then comes the texture, which is where this tart really wins people over. The base is tender but crisp, and the center stays creamy, rich, and full of pistachio flavor without feeling heavy.
It is the kind of dessert that works beautifully for holidays, dinner parties, spring tables, or just one of those weekends when you want to bake something that feels a little fancy. Let me tell you, it’s worth every bite.
A Little Pistachio Dessert Story Worth Knowing
Pistachios have long been loved in desserts across Mediterranean and Middle Eastern kitchens, where their buttery texture and naturally sweet, earthy flavor make them perfect for pastries, creams, and cakes. That deep affection for pistachios has slowly made its way into modern tarts, where classic pastry techniques meet bold nutty flavor in the best possible way.
And now that pistachio paste is easier to find, making a tart like this feels far more approachable. You still get that bakery-style finish, but with ingredients and steps that feel friendly enough for a home kitchen.
Reasons You’ll Keep Coming Back to This One
Before we get into the practical side, let me just say, this tart earns its place fast. It is pretty, dependable, and packed with flavor.
Versatile: It fits right in at brunch, dessert, tea time, or a holiday table. You can serve it plain or dress it up with berries, whipped cream, or extra chopped pistachios.
Budget-Friendly: Pistachios can feel luxurious, but this recipe stretches that flavor beautifully through pistachio paste and a simple homemade shell.
Quick and Easy: It looks impressive, but the steps are straightforward and manageable. This one’s a total game-changer when you want a polished dessert without a complicated process.
Customizable: You can brighten it with citrus zest, add a touch of almond extract, or finish it with fruit for a slightly different vibe.
Crowd-Pleasing: Pistachio lovers will be obsessed, and even people who usually reach for chocolate desserts tend to fall for the creamy texture and balanced sweetness.
Make-Ahead Friendly: The tart holds up well after baking, which makes it a lovely option when you want to prep dessert before guests arrive.
Great for Leftovers: A chilled slice the next day is still dreamy, maybe even better, because the filling settles into an even silkier texture.
Smart Baker Secrets for the Best Results
A tart like this does not ask for complicated technique, but a few little choices make a big difference.
- Use room temperature dairy and eggs: This helps the filling blend smoothly, which means no lumps and a more even texture after baking.
- Do not overmix the dough: Mix just until the crust comes together so it stays tender instead of tough.
- Blind bake the shell lightly: That early bake keeps the crust from turning soggy once the filling goes in.
- Bake just until the center has a slight wobble: The tart keeps setting as it cools, so pulling it at the right moment protects that creamy finish.
- Let it cool completely before slicing: This is the step that gives you those clean slices and that luscious texture.
Kitchen Tools That Make This Easy
Before we dive into the ingredients, here are the tools that help everything move smoothly from bowl to oven.
9-inch tart pan: A removable-bottom tart pan makes unmolding much easier and gives the tart its neat, fluted edge.
Mixing bowls: You will need one for the crust and another for the filling, which keeps the process simple and organized.
Whisk: Perfect for blending the filling until smooth and creamy.
Rolling pin: Helps you roll the crust evenly so it bakes up with a consistent texture.
Fork: Useful for docking the crust before blind baking.
Parchment paper and pie weights or dried beans: These help the shell keep its shape during the first bake.
Cooling rack: Gives the tart a chance to cool evenly, which is important for texture.
Everything That Goes Into This Beautiful Tart
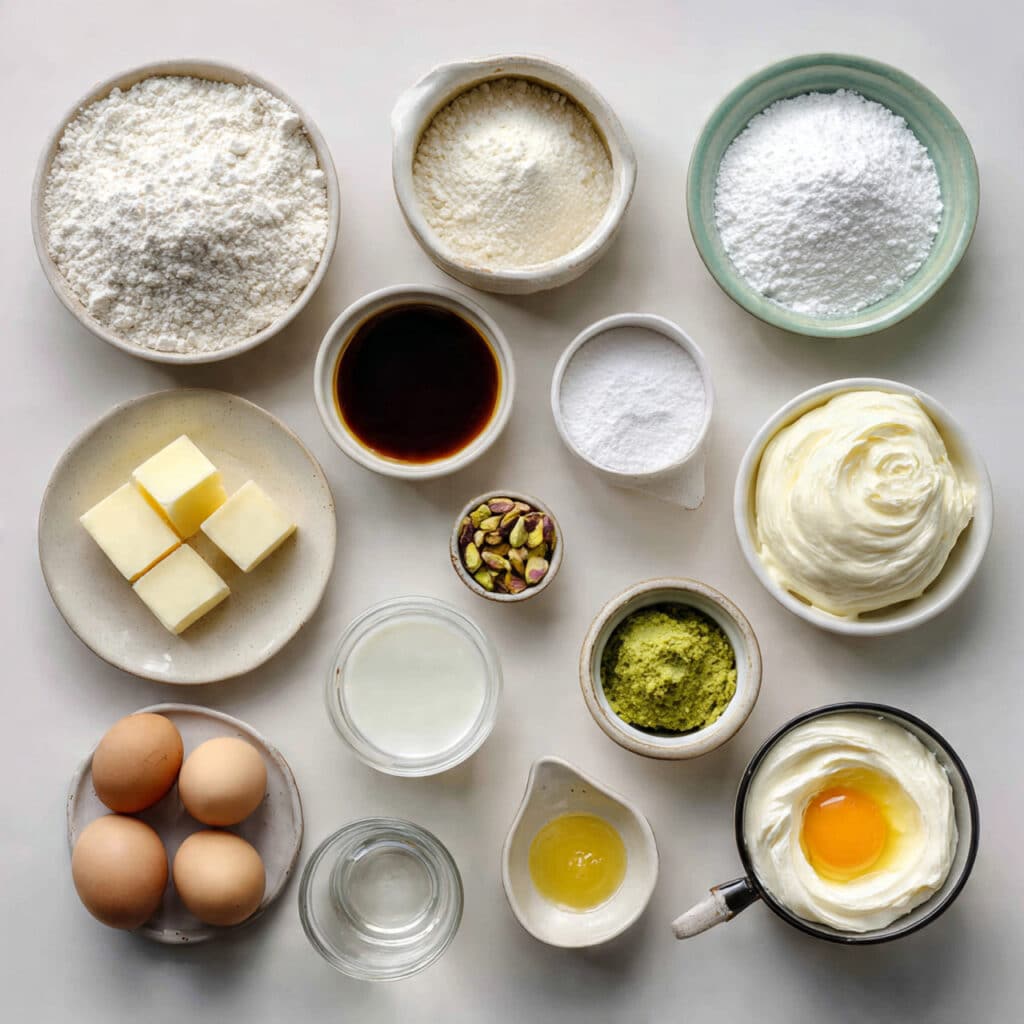
Now let’s get to the heart of it, because every ingredient here has a job to do. Nothing feels random, and together they create that buttery, nutty, creamy balance that makes this tart so memorable.
- All-purpose flour: 1 1/4 cups, this forms the base of the tart shell and gives it structure while still keeping it tender.
- Powdered sugar: 1/4 cup, this sweetens the crust gently and helps create a delicate texture.
- Unsalted butter: 1/2 cup, cold and cubed, this brings richness and gives the shell that classic buttery bite.
- Egg yolk: 1 large, this helps bind the dough and adds a little richness to the crust.
- Cold water: 1 to 2 tablespoons, this helps the dough come together without making it sticky.
- Salt: 1/4 teaspoon, this sharpens every flavor and keeps the sweetness balanced.
- Pistachio paste: 3/4 cup, this is the star ingredient and delivers that deep, roasted pistachio flavor and creamy body.
- Mascarpone cheese: 8 ounces, softened, this makes the filling silky, mellow, and luxurious.
- Heavy cream: 1/2 cup, this loosens the filling just enough and keeps it smooth and soft after baking.
- Granulated sugar: 1/3 cup, this sweetens the filling without overpowering the pistachio.
- Eggs: 2 large, these help the filling set into a creamy custard-like texture.
- Vanilla extract: 1 teaspoon, this rounds out the nutty flavor and adds warmth.
- Chopped pistachios: 1/4 cup, these go on top for crunch, color, and a little extra pistachio punch.
Easy Swaps That Still Taste Fantastic
Sometimes you need flexibility, and thankfully this tart gives you a little room to play.
Mascarpone cheese: Cream cheese, for a slightly tangier filling.
Heavy cream: Half-and-half, for a lighter texture.
Powdered sugar: Fine granulated sugar, in the crust if that is what you have on hand.
Vanilla extract: Almond extract, use a small amount for an extra nutty note.
All-purpose flour: A cup-for-cup gluten-free baking blend, if you want a gluten-free version.
The Ingredients That Really Steal the Show
A tart this simple lets a couple of ingredients shine in the best way.
Pistachio paste: This is where the tart gets its signature flavor and color. It brings concentrated nuttiness, a slightly toasted sweetness, and a creamy richness that feels instantly luxurious.
Mascarpone cheese: This soft, mild cheese smooths out the stronger pistachio notes and creates that velvety filling that almost melts as you eat it.
Let’s Bake It Step by Step
And now let’s dive into the part where your kitchen starts smelling amazing. The process is simple, steady, and honestly pretty satisfying from start to finish.
- Preheat Your Equipment: Preheat your oven to 350°F. Lightly grease a 9-inch tart pan and set it aside.
- Combine Ingredients: In a mixing bowl, stir together the flour, powdered sugar, and salt. Cut in the cold butter until the mixture looks like coarse crumbs. Add the egg yolk and 1 tablespoon of cold water, then mix until the dough starts to come together. Add the second tablespoon of water only if needed. In a separate bowl, whisk together the pistachio paste, mascarpone, heavy cream, granulated sugar, eggs, and vanilla extract until smooth.
- Prepare Your Cooking Vessel: Roll the dough out on a lightly floured surface and fit it into the tart pan. Press it gently into the corners and trim the edges. Prick the base with a fork, line it with parchment, and fill with pie weights or dried beans.
- Assemble the Dish: Blind bake the crust for 12 minutes. Remove the parchment and weights, then bake for 5 minutes more until the shell looks lightly set. Pour the pistachio filling into the warm crust and smooth the top. Sprinkle the chopped pistachios evenly over the surface.
- Cook to Perfection: Return the tart to the oven and bake for 18 to 20 minutes, until the edges are set and the center still has a slight wobble.
- Finishing Touches: Cool the tart completely in the pan, then carefully remove it. The filling will continue to settle as it cools, giving you that dreamy creamy texture.
- Serve and Enjoy: Slice and serve at room temperature or slightly chilled. A spoonful of softly whipped cream or a few fresh berries on the side makes it even more irresistible.
How the Texture and Flavor Come Together
What makes this tart so lovely is the contrast. The shell gives you that delicate crispness first, and then the filling follows with a smooth, rich softness that feels almost cloudlike. The pistachio paste brings a deep roasted flavor, while mascarpone adds that mellow creamy note that keeps everything balanced instead of overly sweet.
As it bakes, the filling settles into something between custard and cream, which is exactly where you want it. The chopped pistachios on top add just enough crunch to keep every bite interesting.
Helpful Tricks for a Smoother Bake
A few small habits can make the whole experience easier and even more delicious.
- Chill the dough briefly if it feels too soft: This makes it easier to roll and helps the crust hold its shape.
- Whisk the filling until fully smooth: Pistachio paste can be thick, so take an extra minute here.
- Rotate the tart halfway through baking if needed: That helps the filling bake evenly.
- Use a sharp knife for slicing: Clean slices make the tart look extra polished.
Mistakes to Skip for the Best Tart
Even an easy tart has a few little traps, but they are easy to avoid once you know them.
- Do not skip blind baking: Without that first bake, the bottom crust can stay too soft.
- Do not overbake the filling: If the center is fully firm in the oven, it may turn dense once cooled.
- Do not use cold mascarpone straight from the fridge: It can make the filling harder to blend smoothly.
- Do not rush the cooling time: A warm tart is delicious, but it will not slice neatly yet.
A Quick Look at the Nutrition
Here is the basic nutrition snapshot so you know what to expect from each slice.
Servings: 8
Calories per serving: 390
Note: These are approximate values.
Timing So You Can Plan With Ease
This is one of those desserts that feels elegant without taking over your whole day.
Prep Time: 40 minutes
Cook Time: 37 minutes
Total Time: 1 hour 17 minutes
Make-Ahead and Storage Tips That Actually Help
One of the nicest things about this tart is how well it fits into a real schedule. You can make the dough ahead and keep it wrapped in the fridge for up to 2 days before rolling it out. You can also bake the full tart a day ahead, let it cool completely, and refrigerate it until serving time.
For storage, keep leftover slices covered in the refrigerator for up to 4 days. The texture stays lovely, and the pistachio flavor actually settles in even more. For freezing, wrap slices tightly and freeze for up to 1 month. Thaw them overnight in the fridge. For reheating, this tart is best enjoyed chilled or brought back to room temperature rather than warmed.
The Best Ways to Serve It
This tart is beautiful all on its own, but a few simple serving ideas make it feel even more special. Serve it with fresh raspberries, sliced strawberries, or a little whipped cream for contrast. A dusting of powdered sugar can make it look extra pretty, and a cup of coffee or strong tea next to it feels like pure comfort.
For a dinner party, try adding a few orange segments or a tiny spoonful of berry compote on the plate. That fresh brightness works so well with the rich pistachio filling.
Smart and Delicious Leftover Ideas
If you happen to have leftovers, you are in luck because they can turn into something new without much effort.
Try tucking slices into a brunch spread with fruit and yogurt. You can also crumble a small piece over vanilla ice cream for a quick plated dessert. Another fun option is to cut the tart into smaller bite-sized squares and serve them as part of a dessert board.
Extra Tips to Make It Even Better
Sometimes it is the tiny details that make a dessert go from good to unforgettable.
Use a good-quality pistachio paste if you can, because it carries most of the flavor. Toast the chopped pistachios lightly before topping if you want an even deeper nutty finish. And if you want a brighter edge, a little lemon zest in the filling can lift everything beautifully without taking over.
How to Make It Look Bakery-Worthy
This tart already has natural charm, so the finishing touches can stay simple. Keep the top mostly clean and smooth, then scatter the chopped pistachios lightly rather than piling them on. That way the pale green filling still shows through.
For the prettiest slices, chill the tart briefly before cutting and wipe your knife clean between each cut. A few berries around the edge of the serving plate can make the whole thing look polished without much effort.
Delicious Twists You Can Try Next Time
Once you make it once, you may want to play with it a little, and this recipe handles variation really well.
- Berry Topped Version: Add raspberries or sliced strawberries after the tart cools for a fresh, juicy contrast.
- Chocolate Layer: Spread a thin layer of melted dark chocolate over the crust before adding the filling.
- Citrus Brightened Tart: Add 1 teaspoon of finely grated lemon or orange zest to the filling.
- Mini Tartlets: Divide the dough and filling among small tart pans for individual servings.
- Almond Pistachio Blend: Replace 2 tablespoons of pistachio paste with almond butter for a softer nut profile.
FAQ’s
1. Can I use store-bought tart dough?
Yes, you can. It saves time and still gives you a lovely result, though the homemade shell has a more buttery texture.
2. What kind of pistachio paste works best?
Use a smooth pistachio paste made primarily from pistachios and sugar. The flavor should be rich and nutty, not artificial.
3. Can I make this tart the day before?
Absolutely. In fact, it slices especially well the next day once fully chilled and rested.
4. Does the filling need to be chilled before baking?
No, once the filling is mixed, it can go straight into the pre-baked shell.
5. Can I use cream cheese instead of mascarpone?
Yes, though the flavor will be a little tangier and slightly less delicate.
6. How do I know when the tart is done baking?
The edges should look set, and the center should still have a slight wobble when gently shaken.
7. Can I add fruit on top before baking?
It is better to add fruit after baking so the filling stays smooth and the fruit stays fresh-looking.
8. Why did my crust shrink?
That usually happens if the dough was overworked or not pressed evenly into the pan.
9. Can I freeze the whole tart?
Yes, once cooled, wrap it well and freeze it for up to 1 month. Thaw in the refrigerator before serving.
10. Is this tart very sweet?
Not overly. It has a balanced sweetness that lets the pistachio flavor stay front and center.
Conclusion
This tart has that rare mix of elegance and comfort that makes a recipe feel instantly worth keeping. The buttery shell, the creamy pistachio center, and the crunchy finish on top all come together in a way that feels both impressive and wonderfully cozy. Trust me, once you slice into it and see that silky green filling, you’ll know exactly why this one deserves a spot in your dessert rotation.
Print
Pistachio Tart with Creamy Pistachio Paste
- Prep Time: 40 minutes
- Cook Time: 37 minutes
- Total Time: 1 hour 17 minutes
- Yield: 8 servings 1x
- Category: Dessert
- Method: Baking
- Cuisine: Mediterranean-inspired
- Diet: Vegetarian
Description
A rich and elegant pistachio tart with a buttery homemade crust and a creamy pistachio mascarpone filling, finished with chopped pistachios for the perfect crunchy topping.
Ingredients
- 1 1/4 cups all-purpose flour
- 1/4 cup powdered sugar
- 1/2 cup unsalted butter, cold and cubed
- 1 large egg yolk
- 1 to 2 tablespoons cold water
- 1/4 teaspoon salt
- 3/4 cup pistachio paste
- 8 ounces mascarpone cheese, softened
- 1/2 cup heavy cream
- 1/3 cup granulated sugar
- 2 large eggs
- 1 teaspoon vanilla extract
- 1/4 cup chopped pistachios
Instructions
- Preheat the oven to 350°F and lightly grease a 9-inch tart pan.
- In a bowl, mix the flour, powdered sugar, and salt. Cut in the cold butter until the mixture looks like coarse crumbs. Add the egg yolk and 1 tablespoon of cold water, mixing until the dough comes together. Add the second tablespoon of water only if needed.
- Roll the dough out on a lightly floured surface and fit it into the tart pan. Trim the edges, prick the base with a fork, line with parchment, and fill with pie weights or dried beans.
- Blind bake the crust for 12 minutes. Remove the parchment and weights, then bake for 5 minutes more.
- In another bowl, whisk together the pistachio paste, mascarpone cheese, heavy cream, granulated sugar, eggs, and vanilla extract until smooth.
- Pour the filling into the warm crust and smooth the top. Sprinkle the chopped pistachios evenly over the surface.
- Bake for 18 to 20 minutes, until the edges are set and the center still has a slight wobble.
- Cool completely before removing from the pan, slicing, and serving.
Notes
- Use room temperature mascarpone and eggs for the smoothest filling.
- Do not overbake the tart, the center should still wobble slightly when it comes out of the oven.
- For cleaner slices, chill the tart briefly before cutting.
- Fresh berries or whipped cream make a lovely serving option.
Nutrition
- Serving Size: 1 slice
- Calories: 390
- Sugar: 16g
- Sodium: 95mg
- Fat: 28g
- Saturated Fat: 13g
- Unsaturated Fat: 13g
- Trans Fat: 0g
- Carbohydrates: 28g
- Fiber: 2g
- Protein: 7g
- Cholesterol: 105mg
Keywords: pistachio tart, creamy pistachio tart, pistachio paste dessert, mascarpone tart, nut tart, elegant dessert