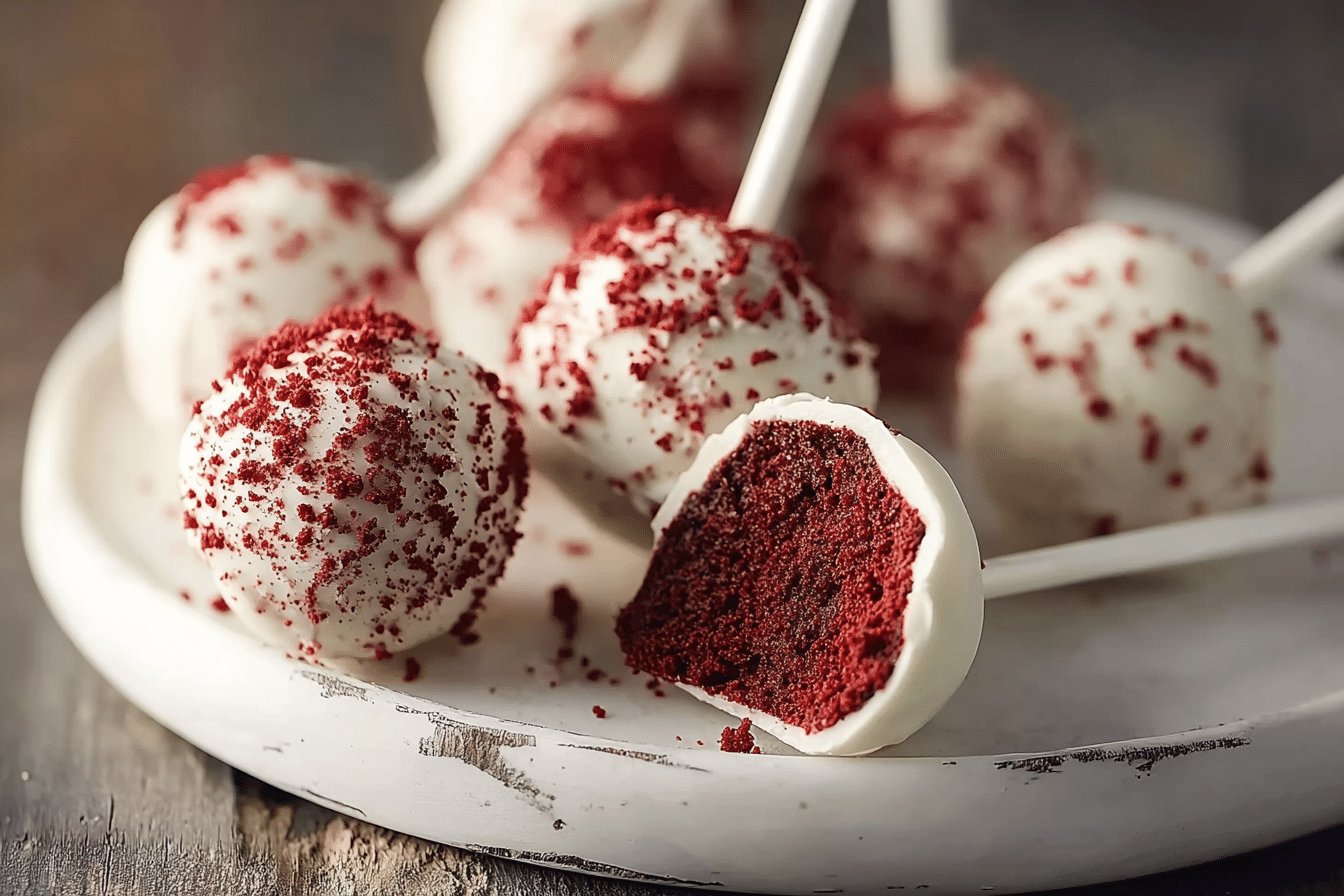
Red Velvet Cake Pops
If you’ve ever found yourself daydreaming about the tender crumbs of red velvet cake and the sweet snap of chocolate, all wrapped into one delightful bite—then welcome to the magic of red velvet cake pops. These little globes of joy are the perfect marriage of rich cocoa flavor, a hint of tanginess, and creamy frosting, all sealed with a chocolaty shell. One bite, and you’re treated to a soft, moist interior that melts in your mouth, with just the right amount of crunch from the coating. Trust me, you’re going to love this.
Behind the Recipe
This recipe was born out of leftover cake and a craving for something whimsical. I remember making a red velvet cake for a family dinner, and there was a bit too much left over. Rather than let it go to waste, I crumbled it up, mixed it with frosting, and turned it into little pops for the kids. What I didn’t expect was that the adults would love them even more. That’s how these cake pops earned their permanent spot in my dessert rotation—born from resourcefulness, and now a total showstopper.
Recipe Origin or Trivia
Red velvet cake has roots that trace back to the early 1900s, gaining popularity during the Great Depression when beets were used to enhance color and moisture. The deep red hue and signature soft texture quickly won hearts across the U.S., especially in the South. Cake pops, on the other hand, are a much more recent invention—widely attributed to baker Angie Dudley, also known as Bakerella, who popularized them in the late 2000s. Combining these two delights results in a playful, decadent treat that blends classic comfort with modern flair.
Why You’ll Love Red Velvet Cake Pops
These aren’t just cute treats—they’re flavorful, fun, and full of surprises. Here’s why you’ll adore them:
Versatile: Perfect for parties, holidays, weddings, or just a sweet weekday snack.
Budget-Friendly: Uses simple ingredients and can even recycle leftover cake or frosting.
Quick and Easy: With a few steps and no baking if using pre-made cake, it’s a breeze.
Customizable: Decorate with sprinkles, drizzle with white chocolate, or color the coating to match themes.
Crowd-Pleasing: A total hit with kids and adults alike—watch them disappear fast.
Make-Ahead Friendly: You can prep them in advance and store until needed.
Great for Leftovers: A delicious way to give new life to cake scraps.
Chef’s Pro Tips for Perfect Results
A little expert know-how goes a long way with cake pops. Here are my insider secrets:
- Chill before dipping: Letting the shaped balls chill ensures they don’t fall apart when coated.
- Use quality chocolate: Good melting chocolate or candy coating gives a smoother, tastier finish.
- Dip the sticks first: Dip your lollipop stick in melted chocolate before inserting into the cake ball to help it anchor better.
- Don’t overmix: Blend the frosting and cake just until it sticks—too much will make it mushy.
- Work in batches: Keep half the pops chilled while you dip the others to prevent them from softening.
Kitchen Tools You’ll Need
You won’t need a lot of fancy gear, just a few essentials:
Mixing Bowls: To crumble and mix the cake and frosting.
Cookie Scoop or Spoon: For even sizing of the cake balls.
Lollipop Sticks: For that classic cake pop presentation.
Baking Sheet: To chill the pops before and after dipping.
Microwave-Safe Bowl: To melt your chocolate coating.
Styrofoam Block or Cake Pop Stand: For holding the pops upright while the coating sets.
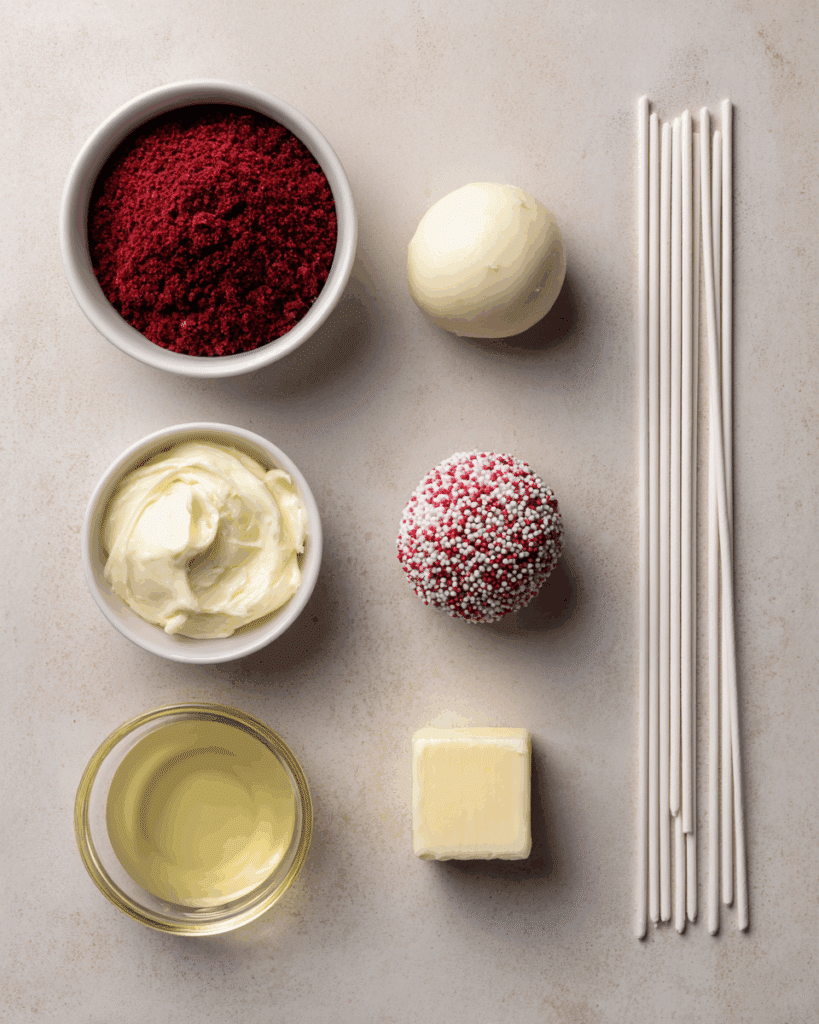
Ingredients in Red Velvet Cake Pops
There’s a beautiful harmony in how these ingredients come together. Each plays a role in flavor and texture—let’s break it down:
- Red Velvet Cake: 1 standard 9-inch round cake, baked and cooled (or store-bought) — provides the soft, cocoa-kissed base.
- Cream Cheese Frosting: 3/4 cup — adds tangy sweetness and helps bind the crumbs.
- Melting Chocolate or Candy Coating: 2 cups — forms the glossy, crisp shell.
- Vegetable Oil: 1 tablespoon — optional, for smoother melted chocolate.
- Sprinkles or Decorations: optional — for flair, texture, and festive touch.
- Lollipop Sticks: about 24 — to transform bites into handheld treats.
Ingredient Substitutions
Here’s how to tweak the recipe if you’re missing an ingredient:
Red Velvet Cake: Use any moist chocolate cake instead.
Cream Cheese Frosting: Substitute with buttercream or chocolate frosting.
Melting Chocolate: White chocolate or colored candy melts work just as well.
Vegetable Oil: Use coconut oil for a slight flavor twist.
Lollipop Sticks: Skewers or even sturdy straws can do in a pinch.
Ingredient Spotlight
Cream Cheese Frosting: Its tangy richness balances the sweetness of the cake and coating perfectly.
Melting Chocolate: A good coating seals in moisture and adds that irresistible snap when you bite.
Instructions for Making Red Velvet Cake Pops
Let’s turn those dreamy ingredients into delicious cake pops. Here are the steps you’ll follow:
- Preheat Your Equipment:
No oven needed if you’re using pre-baked cake, but line a baking sheet with parchment and get your tools ready. - Combine Ingredients:
Crumble the cake into fine crumbs in a bowl. Add frosting and mix gently until the mixture holds together like dough. - Prepare Your Cooking Vessel:
Use a cookie scoop or hands to shape the mixture into balls. Place them on the lined sheet. - Assemble the Dish:
Melt a bit of chocolate and dip the tip of each stick in it before inserting into a cake ball. Chill for 1 hour. - Cook to Perfection:
Melt the rest of the chocolate with a little oil until smooth. Dip each pop, covering completely, and let excess drip off. - Finishing Touches:
Immediately add sprinkles or toppings before the coating sets. Stand them upright in foam or a rack to dry. - Serve and Enjoy:
Once the coating is firm, your cake pops are ready to dazzle. Share, savor, and enjoy every bite.
Texture & Flavor Secrets
These cake pops are all about contrast: the creamy interior is soft and velvety, while the outer shell provides a sweet, satisfying crunch. The slight tang from the cream cheese cuts through the richness, and that signature cocoa flavor lingers beautifully on the tongue.
Cooking Tips & Tricks
Here are some final touches to keep things smooth:
- Add a few drops of oil to chocolate for easy dipping.
- Use gloves when shaping to avoid sticky fingers.
- Freeze pops briefly if they get too soft while decorating.
What to Avoid
A few pitfalls can sneak in—here’s how to dodge them:
- Don’t use too much frosting, or pops will be soggy.
- Avoid overheating chocolate, or it may seize and clump.
- Don’t skip the chill step—firm pops coat better and hold up longer.
Nutrition Facts
Servings: 24
Calories per serving: 180
Note: These are approximate values.
Preparation Time
Prep Time: 30 minutes
Cook Time: 0 minutes
Total Time: 1 hour 30 minutes (includes chilling)
Make-Ahead and Storage Tips
You can make these beauties ahead of time with no stress. Store the shaped, undipped balls in the fridge for up to 2 days or freeze for a month. Once coated, keep them in an airtight container at room temperature for up to 5 days. To freeze, wrap individually and store in a sealed container—just thaw and enjoy.
How to Serve Red Velvet Cake Pops
Serve them standing upright in a decorative holder for parties, or arrange them in a bouquet-style display for a fun twist. Pair with coffee, milk, or a hot cocoa bar for the ultimate indulgence. They also make perfect edible gifts—just wrap in clear cellophane and tie with a ribbon.
Creative Leftover Transformations
Leftover cake pops? Here’s how to reinvent them:
- Crumble into ice cream: Adds chewy, chocolatey goodness.
- Turn into truffles: Roll in cocoa or nuts instead of coating.
- Mini desserts: Place halves on top of cupcakes or puddings.
Additional Tips
- Use gel food coloring in the cake for a deeper red hue.
- Let coating cool slightly before dipping for a thicker shell.
- Add flavored extracts like almond or peppermint to the frosting for seasonal flair.
Make It a Showstopper
Presentation makes all the difference. Use gold dust, edible glitter, or color-matched drizzle to make them pop. A tiered stand or floral foam base lets you display them beautifully. Match colors to your event theme for extra wow.
Variations to Try
- Red Velvet Cheesecake Pops: Add a cube of cream cheese inside each ball for a gooey center.
- White Chocolate Drizzle: After coating, drizzle with contrasting white chocolate lines.
- Holiday Edition: Use green and red sprinkles or themed candy melts.
- Nutty Crunch: Roll in finely crushed pecans or walnuts before the coating sets.
- Gluten-Free: Use gluten-free cake and ensure coating is certified gluten-free.
FAQ’s
Q1. Can I use boxed cake mix for this?
Yes, boxed red velvet cake works perfectly—just bake and cool before starting.
Q2. Can I make these without cream cheese frosting?
Absolutely, any frosting that holds the cake together will work.
Q3. How long do they last?
Up to 5 days at room temp or 1 month in the freezer.
Q4. Can kids help make these?
Yes! It’s a fun, hands-on recipe perfect for little helpers.
Q5. Do I need a cake pop mold?
Nope! You shape them by hand.
Q6. What’s the best way to transport them?
Stand them in a foam block inside a container to keep them upright.
Q7. Can I color the coating?
Yes, use oil-based food coloring for best results.
Q8. How do I fix cracked coating?
Add a little more oil to your chocolate next time and let pops come to room temp before dipping.
Q9. Can I skip the sticks?
Sure, make cake truffles instead!
Q10. What kind of sprinkles work best?
Nonpareils or jimmies—they stick well and add a lovely crunch.
Conclusion
Red velvet cake pops aren’t just a dessert—they’re a bite-sized burst of joy. From their vibrant color to their rich, layered flavor and satisfying texture, they bring a smile to anyone who tries them. So roll up your sleeves, melt some chocolate, and get ready to impress. Let me tell you, it’s worth every bite.
Print
Red Velvet Cake Pops
- Prep Time: 30 minutes
- Cook Time: 0 minutes
- Total Time: 1 hour 30 minutes
- Yield: 24 cake pops
- Category: Dessert
- Method: No-Bake
- Cuisine: American
- Diet: Vegetarian
Description
These Red Velvet Cake Pops are the ultimate bite-sized indulgence—rich, moist cake blended with tangy cream cheese frosting, dipped in silky chocolate, and decorated to perfection.
Ingredients
- Red Velvet Cake: 1 standard 9-inch round cake, baked and cooled
- Cream Cheese Frosting: 3/4 cup
- Melting Chocolate or Candy Coating: 2 cups
- Vegetable Oil: 1 tablespoon (optional, for smoother coating)
- Sprinkles or Decorations: optional
- Lollipop Sticks: about 24
Instructions
- Preheat Your Equipment: Line a baking sheet with parchment paper and gather your tools.
- Combine Ingredients: Crumble the cake into fine crumbs in a large bowl. Mix with frosting until the mixture sticks together like dough.
- Prepare Your Cooking Vessel: Roll the mixture into even-sized balls and place them on the prepared sheet.
- Assemble the Dish: Dip the tip of each lollipop stick in melted chocolate and insert it halfway into a cake ball. Chill for 1 hour.
- Cook to Perfection: Melt the remaining chocolate with oil. Dip each cake pop to coat completely, letting excess drip off.
- Finishing Touches: Decorate immediately with sprinkles and let dry upright in a foam block.
- Serve and Enjoy: Once the coating is set, serve and enjoy!
Notes
- Chill the pops well before dipping to avoid falling apart.
- Use oil-based food coloring if coloring chocolate.
- Store at room temp in an airtight container for up to 5 days.
- Freeze undipped pops for longer storage.
Nutrition
- Serving Size: 1 cake pop
- Calories: 180
- Sugar: 16g
- Sodium: 95mg
- Fat: 9g
- Saturated Fat: 5g
- Unsaturated Fat: 3g
- Trans Fat: 0g
- Carbohydrates: 24g
- Fiber: 0g
- Protein: 2g
- Cholesterol: 20mg
Keywords: red velvet, cake pops, dessert, bite-sized, cream cheese, party treat