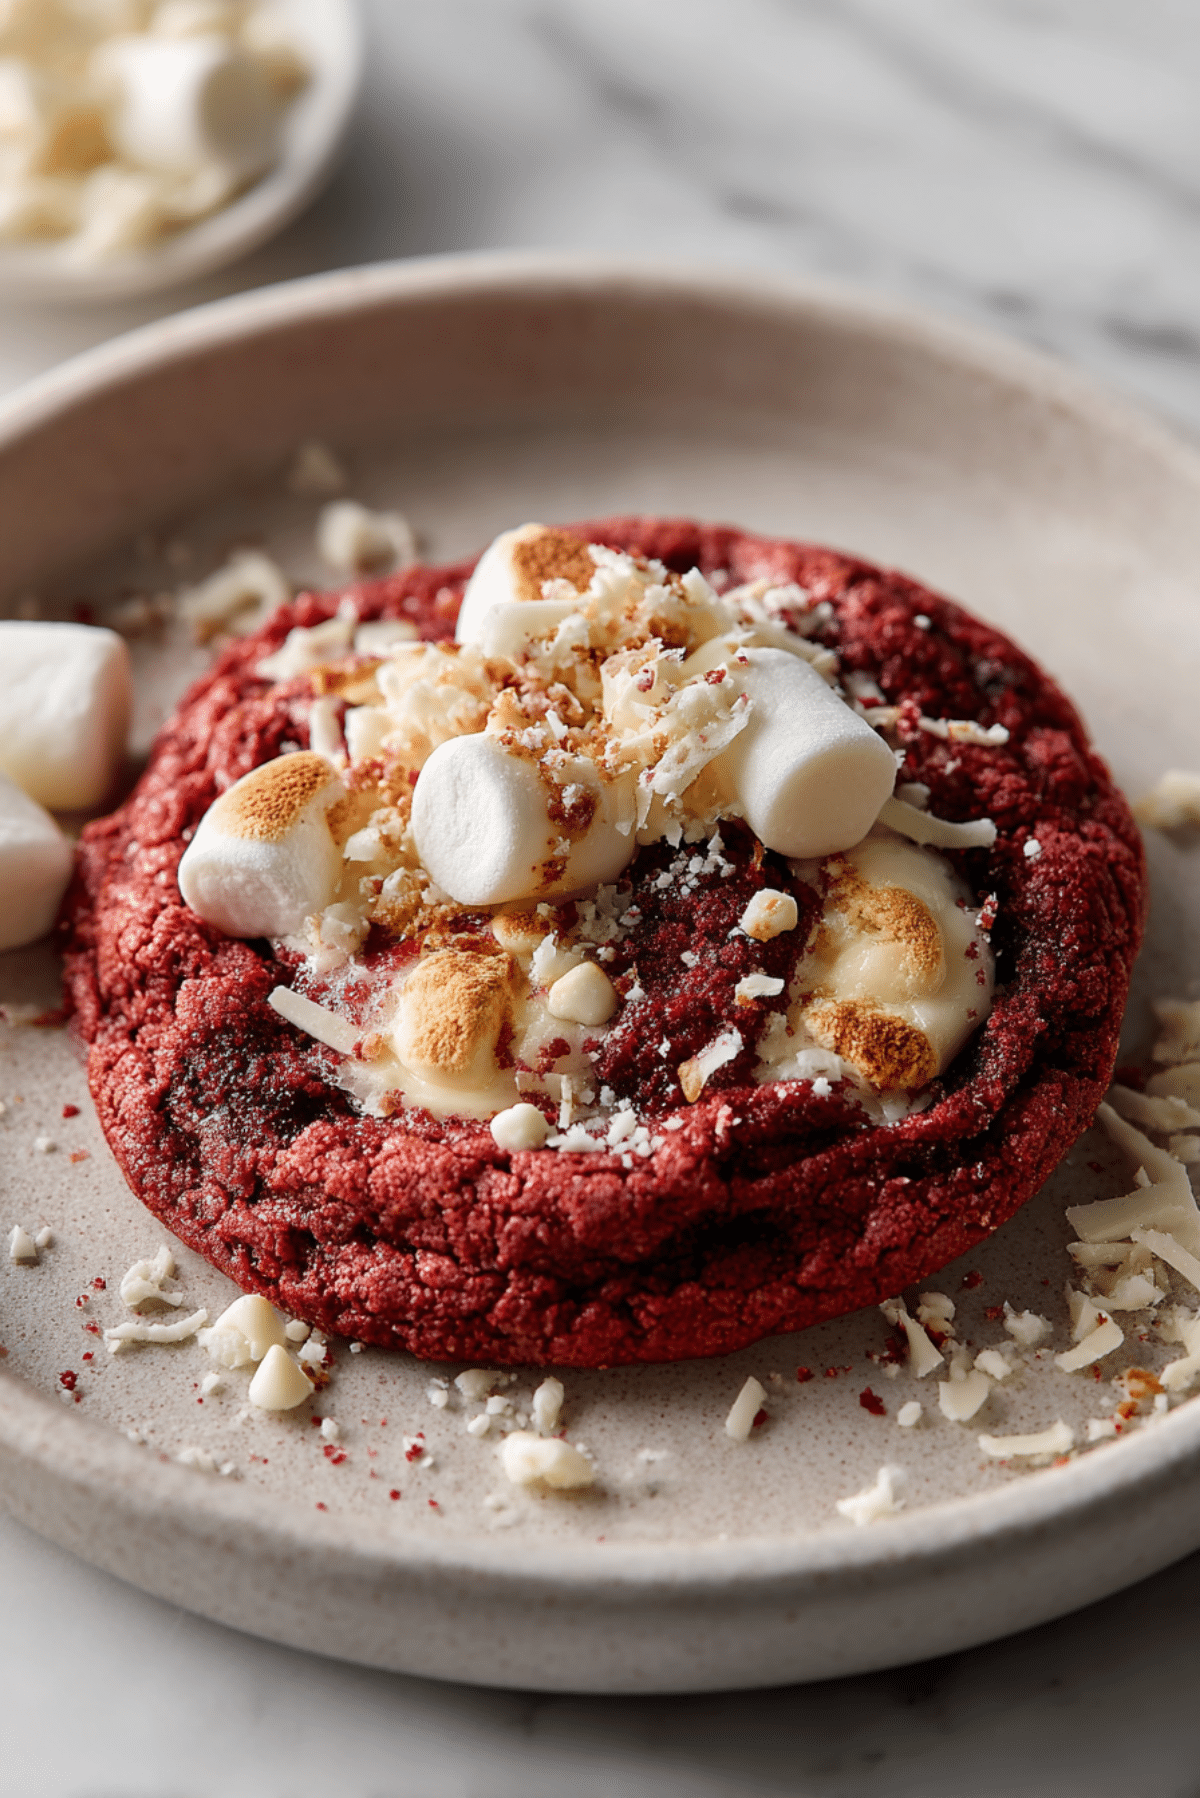
Red Velvet Marble Cookies
There’s something magical about red velvet. It’s rich, bold, and just the right amount of indulgent. Now imagine that iconic flavor swirled into a soft, chewy cookie and marbled with white chocolate and vanilla goodness. These Red Velvet Marble Cookies are everything your sweet tooth craves — comforting, decadent, and delightfully messy in all the right ways. The aroma alone will have everyone hovering near the oven, and that first bite? Oh, it’s pure cookie bliss.
Behind the Recipe
The idea for these cookies came on a chilly afternoon when the oven begged to be turned on and something cozy needed baking. I had leftover red velvet crumbs from a cake and a strong craving for cookies. So I swirled two classic favorites into one treat, creating a cookie that tastes like home and looks like it came straight from a bakery window. The marbled pattern makes each cookie feel unique, like a little edible artwork — and trust me, they disappear fast.
Recipe Origin or Trivia
Red velvet has a fascinating history, believed to have originated in the early 20th century. Originally, the red color came from natural cocoa reacting with acidic ingredients. Over time, bakers started enhancing that hue with food coloring, giving us the vivid red we know and love today. Combining it into a cookie format is a more modern twist, born from the never-ending creativity of home bakers who wanted cake flavor with cookie texture. These cookies marry the elegance of red velvet with the comfort of a chewy dessert.
Why You’ll Love Red Velvet Marble Cookies
These cookies aren’t just pretty, they’re packed with flavor and fun to make. Here’s why you’ll come back to this recipe again and again:
Versatile: Serve them as party treats, holiday cookies, or a sweet surprise in lunchboxes.
Budget-Friendly: Uses pantry staples and a touch of cocoa for a big flavor payoff.
Quick and Easy: No complicated techniques, just mix, swirl, and bake.
Customizable: Add nuts, swap the chocolate type, or make them extra gooey — your call.
Crowd-Pleasing: Everyone loves a cookie that looks fancy but tastes even better.
Make-Ahead Friendly: The dough can chill overnight and still bake up perfectly.
Great for Leftovers: If there are any left, they taste even better the next day.
Chef’s Pro Tips for Perfect Results
Here’s how to ensure your cookies come out bakery-perfect every time:
- Let your butter soften to room temperature for the creamiest dough texture.
- Don’t overmix once the flours are added. This keeps the cookies soft and chewy.
- For dramatic marbling, lightly swirl the red and vanilla doughs together without fully blending.
- Chill the dough before baking for a thicker, bakery-style cookie.
- Bake until edges are just set and centers are still a bit soft for ultimate gooeyness.
Kitchen Tools You’ll Need
Just a few basic tools are all it takes to whip these up.
Mixing Bowls: For combining your red velvet and vanilla dough separately.
Electric Mixer: Makes creaming the butter and sugar effortless.
Measuring Cups and Spoons: Accuracy is key to perfect cookies.
Cookie Scoop or Spoon: For evenly portioned cookies.
Baking Sheet with Parchment: Prevents sticking and ensures even browning.
Wire Rack: Helps the cookies cool without getting soggy on the bottom.
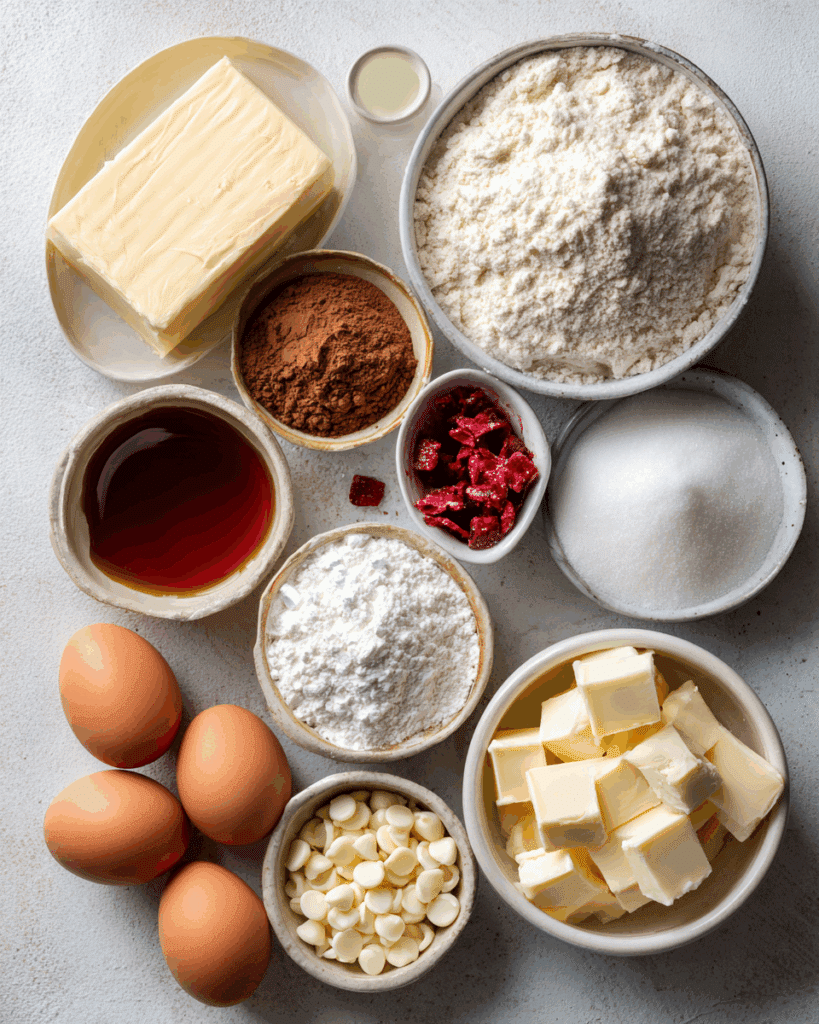
Ingredients in Red Velvet Marble Cookies
The beauty of these cookies lies in the combination of deep cocoa flavor and smooth vanilla. Here’s what you’ll need:
- Unsalted Butter: 1 cup (2 sticks) softened. Provides richness and helps create that chewy texture.
- Granulated Sugar: 1 cup. Adds sweetness and contributes to the crisp edges.
- Brown Sugar: 1/2 cup packed. Adds moisture and a hint of caramel flavor.
- Eggs: 2 large. Binds the dough and gives structure.
- Vanilla Extract: 2 teaspoons. Enhances both the red velvet and marble flavor.
- All-Purpose Flour: 2 3/4 cups. Gives the dough body and structure.
- Unsweetened Cocoa Powder: 1/4 cup. Essential for that classic red velvet taste.
- Baking Soda: 1 teaspoon. Provides lift and helps the cookies spread just right.
- Salt: 1/2 teaspoon. Balances the sweetness and enhances flavor.
- Red Food Coloring: 2 tablespoons. Creates that signature hue in the red velvet portion.
- White Chocolate Chips: 3/4 cup. Melts into the dough for creamy bites in every cookie.
Ingredient Substitutions
Don’t worry if you’re missing something — here are some easy swaps:
Unsalted Butter: Use salted butter and reduce the added salt by half.
Red Food Coloring: Try beet powder or omit for a natural cocoa cookie.
White Chocolate Chips: Swap with dark chocolate or peanut butter chips.
Brown Sugar: Use all white sugar, though cookies will be slightly crispier.
Ingredient Spotlight
Cocoa Powder: Adds richness without overpowering sweetness. Use unsweetened for balance.
White Chocolate Chips: Melt slightly as they bake, giving little bursts of creamy contrast in each bite.
Instructions for Making Red Velvet Marble Cookies
These cookies are fun to make and even more fun to swirl. Here’s how to do it:
- Preheat Your Equipment:
Preheat your oven to 350°F (175°C) and line your baking sheets with parchment paper. - Combine Ingredients:
In a large bowl, cream together the softened butter, granulated sugar, and brown sugar until light and fluffy. Beat in the eggs and vanilla extract. - Prepare Your Cooking Vessel:
In another bowl, whisk together the flour, baking soda, cocoa powder, and salt. Slowly add to the wet ingredients and mix until just combined. - Assemble the Dish:
Divide the dough in half. To one half, add the red food coloring and mix until fully incorporated. Leave the other half plain for the vanilla swirl. Drop spoonfuls of each dough next to each other and gently swirl with a toothpick or knife to create a marbled effect. - Cook to Perfection:
Use a cookie scoop to place dough balls onto prepared baking sheets, leaving space to spread. Bake for 10–12 minutes or until edges are set but centers look slightly underbaked. - Finishing Touches:
Let the cookies cool on the baking sheet for 5 minutes, then transfer to a wire rack to cool completely. - Serve and Enjoy:
Enjoy warm for melty goodness or let them cool for a chewy bite with perfect texture.
Texture & Flavor Secrets
These cookies offer the best of both worlds — a chewy, soft bite from the brown sugar and butter base, and a smooth melt-in-your-mouth feel from the white chocolate. The red velvet brings a cocoa depth with a subtle tang from the vanilla, making each bite complex and indulgent.
Cooking Tips & Tricks
- Chill the dough for 30 minutes for thicker cookies.
- For best marbling, scoop dough without overmixing the swirls.
- Store baked cookies in an airtight container with a slice of bread to keep them soft.
What to Avoid
- Don’t overbake — the cookies firm up as they cool.
- Avoid overmixing the two doughs or you’ll lose the swirl pattern.
- Don’t skip chilling if your dough feels too sticky to handle.
Nutrition Facts
Servings: 24 cookies
Calories per serving: 180
Note: These are approximate values.
Preparation Time
Prep Time: 20 minutes
Cook Time: 12 minutes
Total Time: 32 minutes
Make-Ahead and Storage Tips
You can prepare the dough a day ahead and refrigerate until ready to bake. Once baked, store cookies in an airtight container at room temperature for up to 5 days. They freeze beautifully too — just thaw at room temp or warm slightly in the microwave for a gooey center.
How to Serve Red Velvet Marble Cookies
Serve these beauties on a platter with a glass of cold milk or warm them slightly and top with vanilla ice cream for a decadent dessert. They also make great gifts — stack them in a jar with a ribbon for the perfect homemade surprise.
Creative Leftover Transformations
Crumble leftover cookies into a yogurt parfait. Sandwich ice cream between two cookies for an epic treat. Or use cookie crumbles as a topping for brownies or cheesecake.
Additional Tips
- Sprinkle a pinch of sea salt on top before baking for contrast.
- Use gel food coloring for deeper red color with less liquid.
- Let cookies rest on the tray for a few minutes post-bake to set perfectly.
Make It a Showstopper
Drizzle melted white chocolate on top and add a sprinkle of red velvet crumbs or festive sprinkles. Stack cookies in a pyramid on a cake stand for an eye-catching centerpiece.
Variations to Try
- Red Velvet S’mores Cookies: Add mini marshmallows to the dough.
- Cream Cheese Swirl: Mix in a small swirl of sweetened cream cheese.
- Triple Chocolate: Add dark and milk chocolate chips for more chocolate depth.
- Nutty Delight: Fold in chopped pecans or walnuts.
- Stuffed Surprise: Wrap the dough around a piece of white chocolate for a molten center.
FAQ’s
Q1: Can I make these without food coloring?
A1: Yes, you can skip it for a natural cocoa cookie with the same great flavor.
Q2: Can I freeze the cookie dough?
A2: Absolutely. Scoop into balls, freeze on a tray, then store in a zip bag until ready to bake.
Q3: How long do they stay fresh?
A3: About 4–5 days at room temperature in an airtight container.
Q4: Can I double the recipe?
A4: Yes, it scales well. Just be sure to mix thoroughly and divide the dough evenly.
Q5: Can I use natural food coloring?
A5: Beet powder or juice works but the color will be more muted.
Q6: What’s the best cocoa powder to use?
A6: Unsweetened natural cocoa gives the best balance with the sweetness.
Q7: Can I make them gluten-free?
A7: Yes, substitute with a 1:1 gluten-free flour blend.
Q8: Should I refrigerate the dough before baking?
A8: Chilling is optional but helps cookies hold their shape and bake thicker.
Q9: What’s the texture like?
A9: Soft and chewy with melty white chocolate and crisp edges.
Q10: Can I add more chocolate chips?
A10: Definitely. Up to 1 cup works well for extra richness.
Conclusion
These Red Velvet Marble Cookies are pure joy in every bite. With that signature cocoa depth, marbled charm, and gooey white chocolate bits, they’re a sweet treat that’s hard to beat. Whether you’re baking for a party or just because it’s a Tuesday, this recipe will make your kitchen smell amazing and your heart a little fuller.
Print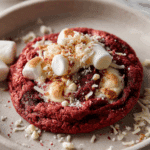
Red Velvet Marble Cookies
- Prep Time: 20 minutes
- Cook Time: 12 minutes
- Total Time: 32 minutes
- Yield: 24 cookies 1x
- Category: Dessert
- Method: Baking
- Cuisine: American
- Diet: Vegetarian
Description
Rich, chewy, and beautifully marbled, these Red Velvet Marble Cookies are a swirl of classic red velvet flavor and creamy white chocolate. Perfect for holidays, gifting, or simply indulging any day of the week.
Ingredients
- 1 cup unsalted butter, softened
- 1 cup granulated sugar
- 1/2 cup brown sugar, packed
- 2 large eggs
- 2 teaspoons vanilla extract
- 2 3/4 cups all-purpose flour
- 1/4 cup unsweetened cocoa powder
- 1 teaspoon baking soda
- 1/2 teaspoon salt
- 2 tablespoons red food coloring
- 3/4 cup white chocolate chips
Instructions
- Preheat your oven to 350°F (175°C) and line baking sheets with parchment paper.
- Cream together butter, granulated sugar, and brown sugar until light and fluffy.
- Beat in eggs and vanilla extract until well combined.
- In a separate bowl, whisk together flour, baking soda, cocoa powder, and salt.
- Gradually add dry ingredients to the wet ingredients and mix until just combined.
- Divide the dough in half. Mix red food coloring into one half, leaving the other plain.
- Take small spoonfuls of each dough, place them together, and gently swirl to create a marbled effect.
- Drop dough balls onto prepared baking sheets, spacing them evenly.
- Bake for 10–12 minutes until edges are set and centers look slightly underbaked.
- Cool on the sheet for 5 minutes, then transfer to a wire rack to cool completely.
Notes
- Chilling the dough for 30 minutes helps with thicker cookies.
- Use gel food coloring for deeper red tones without excess moisture.
- Sprinkle sea salt on top before baking for extra flavor contrast.
Nutrition
- Serving Size: 1 cookie
- Calories: 180
- Sugar: 15g
- Sodium: 95mg
- Fat: 9g
- Saturated Fat: 5g
- Unsaturated Fat: 3g
- Trans Fat: 0g
- Carbohydrates: 24g
- Fiber: 1g
- Protein: 2g
- Cholesterol: 30mg
Keywords: red velvet cookies, marble cookies, holiday baking, easy cookie recipe, white chocolate cookies