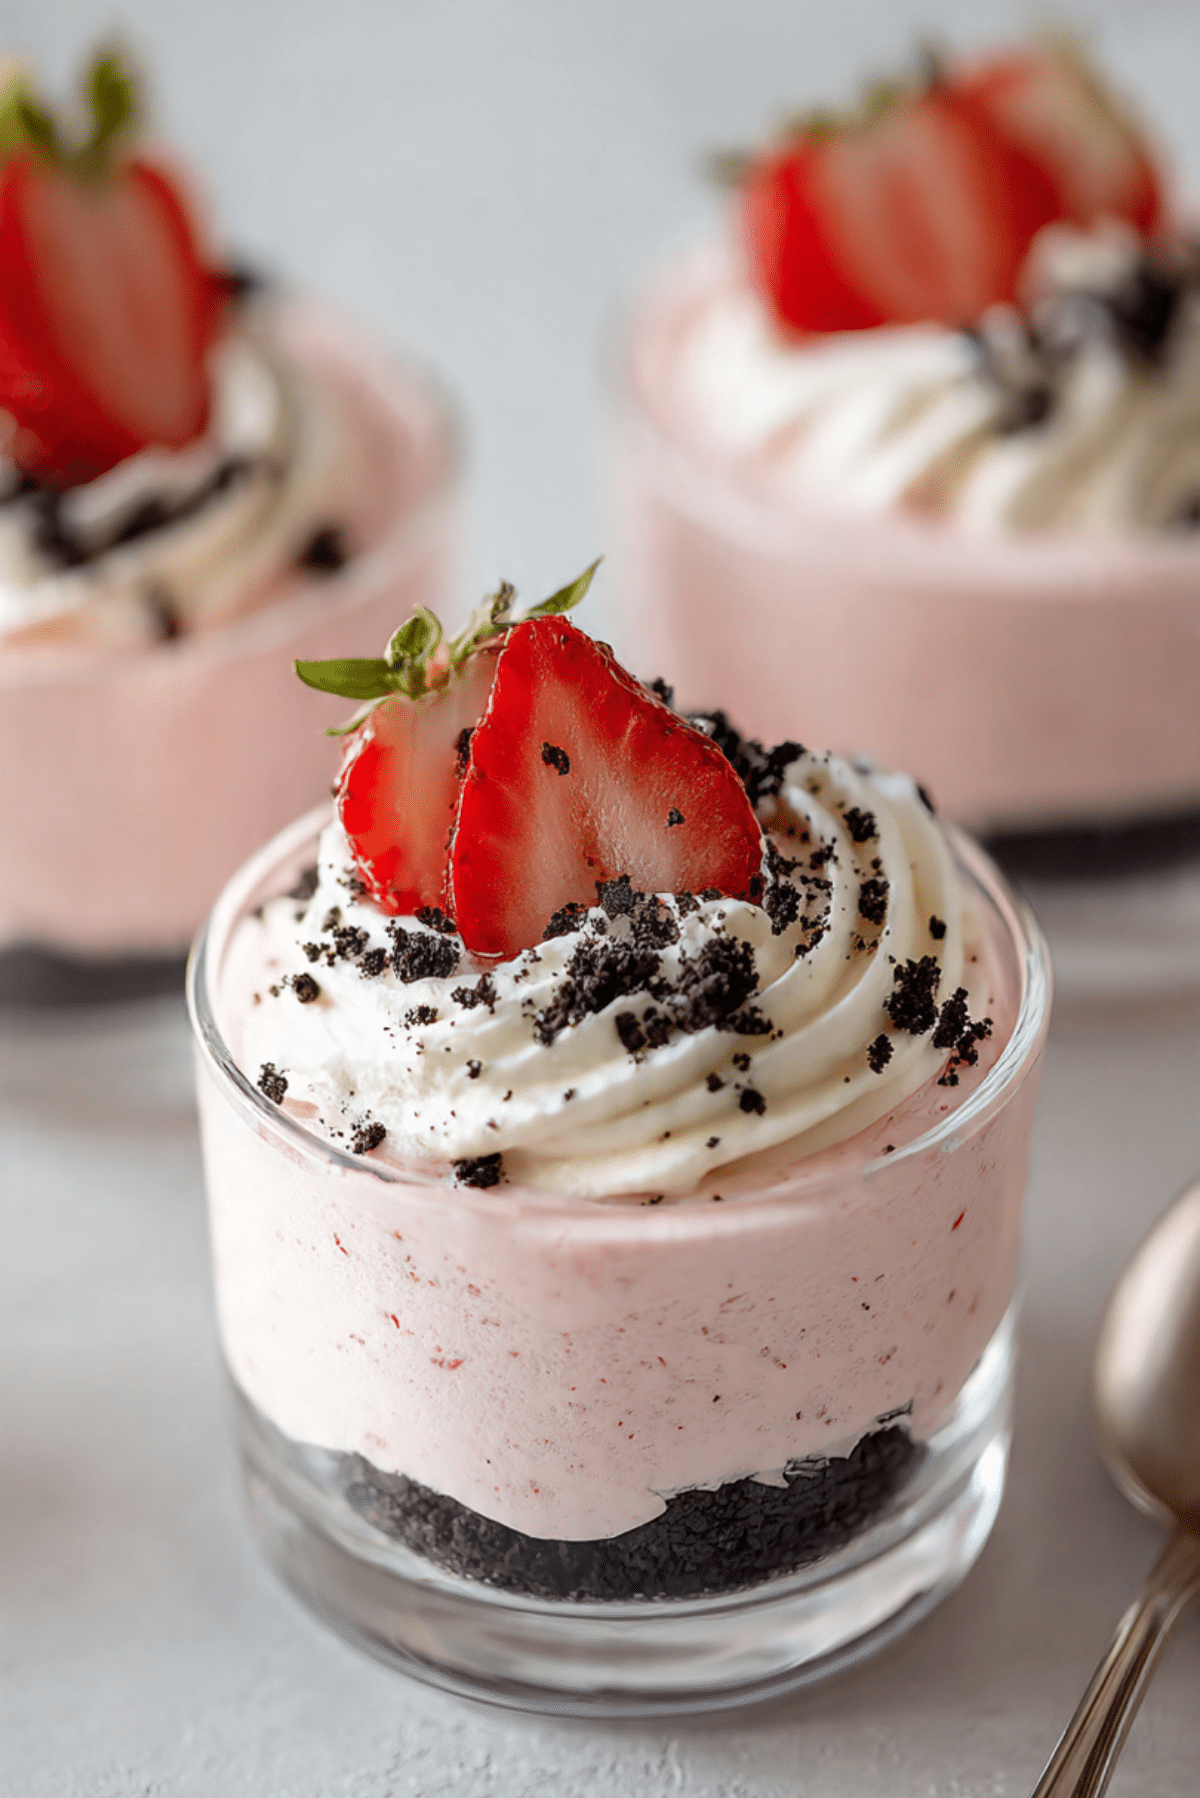
Strawberry Oreo Cheesecake Cup
There is something so fun about a dessert that looks fancy, tastes rich, and still comes together without turning on the oven. These creamy little cups bring together chocolatey Oreo crumbs, soft strawberry cheesecake filling, and a fresh berry finish that feels light enough for spring but indulgent enough for any sweet craving. Trust me, you’re going to love this, because every spoonful gives you that mix of crunchy, creamy, fruity, and sweet that makes people go quiet for a second just to enjoy it.
Why This Sweet Treat Deserves a Spot in Your Fridge
Some desserts are beautiful but fussy, and others are easy but forgettable. This one lands right in that sweet spot where it feels special without asking too much from you. The crushed cookies create a deep cocoa base, the filling stays silky and soft, and the strawberries brighten everything up with their juicy flavor and cheerful color.
What makes these cups even better is how naturally they fit into real life. They work for birthdays, date nights, showers, potlucks, or just one of those evenings when dinner was ordinary and dessert needs to save the day. Let me tell you, it’s worth every bite.
A Little Backstory Behind This Creamy Strawberry Favorite
Cheesecake cups are really a playful spin on classic no bake cheesecake, which became especially popular because home cooks wanted all the rich flavor of cheesecake without the longer baking and cooling process. Layered dessert cups also have that easy entertaining charm, since they can be made ahead and served individually with almost no stress at the end.
The strawberry and chocolate combination has been loved for ages, and it makes perfect sense here. Oreo cookies bring that familiar cookies and cream vibe, while strawberries soften the richness with a fresh, slightly tangy note. The result feels nostalgic, modern, and just a little bit flirty all at once.
The Reasons These Cups Always Turn Out So Well
Before we get into the mixing and layering, it helps to know exactly why this dessert is such a keeper. It is one of those recipes that earns its spot fast.
Versatile: These cups fit almost any occasion, from casual family dinners to holiday dessert tables. Dress them up in pretty glasses or keep them simple in small jars, and they still feel special.
Budget-Friendly: The ingredient list is short, familiar, and easy to find. You get a dessert that looks bakery-worthy without spending bakery money.
Quick and Easy: The hands-on work is simple and straightforward. Once the layers are made, the refrigerator does most of the heavy lifting.
Customizable: You can adjust the topping, sweetness, or even swap the fruit if needed. It is the kind of dessert that welcomes little personal touches.
Crowd-Pleasing: Chocolate cookies, cheesecake filling, and strawberries are hard to resist. This one’s a total game-changer when you need something almost everyone will say yes to.
Make-Ahead Friendly: These cups actually benefit from a little chill time. That means less last-minute rushing and more time to enjoy the moment.
Great for Leftovers: Since they are already portioned, storing them is easy. Just cover and chill, then grab one when the next sweet craving hits.
Smart Tips That Make the Whole Process Easier
Now that the charm of the dessert has done its work, let’s make sure the technique does too. A few simple details make a big difference here.
- Soften the cream cheese well: Let it sit at room temperature before mixing so the filling turns smooth instead of lumpy.
- Mash part of the strawberries: This helps distribute strawberry flavor through the filling while still leaving a bit of fresh fruit texture.
- Fold gently: Once the whipped topping goes in, use a light hand so the filling stays airy and mousse-like.
- Press the crust lightly: You want the Oreo base to hold together, but not become hard as a rock.
- Chill before serving: Even a short chill helps the layers set and makes the flavor come together beautifully.
The Simple Kitchen Tools That Help Everything Flow
The good news is that you do not need a long list of gadgets for this one. A few basic tools will get you there with ease.
Mixing bowl: You will need one medium bowl for the Oreo crust and one larger bowl for the cheesecake filling.
Hand mixer: This helps create a smooth, fluffy filling without much effort.
Rubber spatula: Perfect for folding in the whipped topping and scraping down the bowl.
Small serving cups or jars: Clear cups show off the layers beautifully, which makes the final dessert feel extra inviting.
Measuring cups and spoons: Helpful for keeping the texture balanced and the sweetness just right.
Everything That Goes Into These Creamy Dessert Cups
And now let’s dive into the heart of it, because the ingredient list is where this dessert starts to feel real. Every ingredient has a job, and together they create that dreamy contrast of crunch, creaminess, and berry brightness.
- Oreo cookies: 12 cookies, crushed, these create the rich chocolate cookie base and add a familiar cookies and cream flavor.
- Unsalted butter: 3 tablespoons, melted, this binds the crushed cookies so the base holds together nicely.
- Fresh strawberries: 1 cup, finely diced, these bring juicy sweetness, color, and a fresh fruity lift to the filling.
- Granulated sugar: 1/4 cup, this sweetens the berries and helps them release a little juice for extra flavor.
- Cream cheese: 8 ounces, softened, this is the rich and tangy backbone of the cheesecake layer.
- Vanilla extract: 1/2 teaspoon, this rounds out the filling and adds warm bakery-style flavor.
- Whipped topping: 8 ounces, thawed, this lightens the filling and gives it that soft, fluffy texture.
- Whipped cream: 1/2 cup, for topping, this adds a soft cloud-like finish to each cup.
- Extra strawberries: 1/2 cup, sliced, for topping, these make the finished dessert look fresh and bright.
- Extra Oreo crumbs: 2 tablespoons, for topping, these add a final little crunch and a pretty finish.
Easy Swaps If You Need to Improvise
Sometimes you have most of what you need and just want a few flexible options. That is part of the fun too.
Oreo cookies: Chocolate sandwich cookies.
Unsalted butter: Melted salted butter, just reduce any extra salt elsewhere if serving with salted toppings.
Fresh strawberries: Raspberries or finely chopped cherries.
Granulated sugar: Powdered sugar, use slightly less and taste as you go.
Cream cheese: Full-fat mascarpone for a softer, more delicate finish.
Whipped topping: Fresh whipped cream, whipped to medium peaks.
Vanilla extract: Almond extract, use only a tiny amount for a different twist.
The Star Ingredients That Make Every Bite Pop
By now the flavors are starting to come together in your mind, and two ingredients really carry the magic here.
Strawberries: They bring freshness, juiciness, and a natural brightness that keeps the cheesecake filling from feeling too heavy. Their color also makes the dessert look instantly cheerful.
Oreo cookies: These give the cups a dark chocolate contrast that makes the creamy filling taste even richer. That little bittersweet cookie edge is exactly what balances the sweetness.
Let’s Build These Dreamy Little Cups Step by Step
This is the part where the dessert really starts to come alive. The process is simple, but it feels satisfying from the first stir to the final chilled spoonful.
- Preheat Your Equipment: Since this is a no-bake dessert, there is no oven to preheat. Instead, set out 6 small dessert cups and make sure your cream cheese is softened and your whipped topping is thawed.
- Combine Ingredients: Crush the Oreo cookies into fine crumbs and stir them with the melted butter in a medium bowl until evenly moistened. In a separate bowl, toss the diced strawberries with the granulated sugar and let them sit for 10 minutes, then mash them lightly with a fork. In a large bowl, beat the softened cream cheese until smooth, then mix in the mashed strawberry mixture and vanilla extract until creamy.
- Prepare Your Cooking Vessel: Spoon the buttered Oreo crumbs evenly into the bottoms of the 6 dessert cups. Press the crumbs down gently with the back of a spoon to form a neat base.
- Assemble the Dish: Fold the whipped topping gently into the strawberry cream cheese mixture until fully combined and fluffy. Spoon or pipe the cheesecake filling over the Oreo crust in each cup, smoothing the tops as needed.
- Cook to Perfection: Cover the cups and chill them in the refrigerator for 2 hours so the filling can firm up and the flavors can settle together.
- Finishing Touches: Right before serving, top each cup with whipped cream, sliced strawberries, and a sprinkle of extra Oreo crumbs for texture and that pretty bakery-style finish.
- Serve and Enjoy: Serve cold with a spoon and enjoy every creamy, crunchy, berry-filled bite. This one always disappears faster than expected.
The Texture and Flavor Story in Every Spoonful
What makes these cups so memorable is the contrast. The base is slightly firm and chocolatey, the filling is cool and velvety, and the strawberry pieces bring little pops of juicy freshness. Then the topping adds that final soft and crisp combination that keeps every bite interesting.
The flavor develops in layers too. First you get the deep cocoa note from the cookies, then the tang of cream cheese, then the sweetness of strawberry and vanilla, and finally that fluffy topping that softens everything into one easy, irresistible dessert.
Handy Tricks for Even Better Results
Once you make them once, you will already feel more confident. Still, a few extra tips can make your next batch even better.
- Use clear cups: The layers look gorgeous, and presentation does half the work for you.
- Chill the cups longer for cleaner layers: If you want a firmer texture, give them a little extra refrigerator time.
- Pipe the filling for a neater finish: A piping bag or zip bag with the tip snipped off makes the layers look polished.
- Add toppings just before serving: This keeps the strawberries fresh-looking and the cookie crumbs crisp.
A Few Things That Can Trip You Up, and How to Fix Them
Even easy desserts have their little quirks, so it helps to know what to watch for before you begin.
- Using cold cream cheese: This can leave lumps in the filling. Let it soften first so the texture turns silky.
- Overmixing after adding whipped topping: This can flatten the filling. Fold gently to keep it light.
- Skipping the chill time: The dessert will taste good, but the texture will be softer and less set.
- Adding wet strawberries on top too early: They can water down the finish. Pat sliced berries dry before topping.
A Quick Look at the Nutrition
It is always nice to know what you are serving, especially with rich desserts like this one. These numbers are approximate, but they give a helpful picture.
Servings: 6
Calories per serving: 340
Note: These are approximate values.
Timing That Helps You Plan Ahead
One of the best things about this dessert is how easy it is to fit into a busy day. Most of the time is hands-off.
Prep Time: 20 minutes
Cook Time: 2 hours
Total Time: 2 hours 20 minutes
Make-Ahead and Storage Tips That Keep Things Easy
If you are planning for a party or just like being ahead of schedule, these cups are your friend. You can make them several hours in advance, or even the night before, and let them chill until serving time. In fact, the flavor gets even better after resting in the refrigerator for a while.
Store the finished cups covered in the refrigerator for up to 3 days. For the freshest look, add the whipped cream, strawberry slices, and extra crumbs shortly before serving. Freezing is possible, though the texture of the strawberries may soften a bit once thawed. If frozen, thaw overnight in the refrigerator before serving.
The Best Ways to Serve These Sweet Little Cups
By the time these are chilled and topped, they already look lovely, so serving can stay simple. They are especially pretty in clear glasses, mini trifle cups, or short jars where the layers can shine. A small dessert spoon and a few extra strawberry slices on the side make them feel restaurant-worthy with almost no extra effort.
These cups pair beautifully with coffee, tea, or even a cold glass of milk. If you are serving a dessert spread, they sit nicely alongside brownies, fruit platters, or simple butter cookies.
Fun Ways to Reinvent Any Leftovers
On the rare chance you have leftovers, they do not have to stay exactly the same. That is where things get extra fun.
You can crumble one into a bowl and top it with extra berries for a quick parfait-style dessert. You can spoon the filling into a crepe or spread it between graham crackers for a little dessert sandwich. You can even freeze leftover portions for a more ice-cream-like treat on warmer days.
Extra Little Details That Make a Big Difference
Sometimes the smallest touches are the ones people remember. A pinch of extra Oreo crumbs right before serving adds texture and makes the top look finished. A tiny swirl of whipped cream gives height and softness. Using ripe strawberries also matters more than you might think, because they bring natural sweetness and fuller flavor.
If you want a slightly tangier finish, add just a small spoonful of mashed berries with a bit more juice into the filling. If you want a sweeter result, taste the cream cheese mixture before folding in the whipped topping and adjust gently.
How to Make Them Look Truly Special
Presentation is part of the joy here, and these cups make that easy. Use glasses with straight sides so the layers show clearly. Spoon the crust in neatly, smooth the filling, and wipe the inside edges of the cup if needed for a cleaner finish.
Top each one with a soft swirl of whipped cream, one or two strawberry slices, and a dusting of Oreo crumbs. If you are making them for guests, serve them on a tray with a few fresh berries around the cups for a simple but lovely table moment.
Delicious Variations Worth Trying
Once you see how easy the base recipe is, it opens the door to a bunch of fun twists.
Chocolate Drizzle Version: Add a little chocolate syrup over the whipped cream topping for a more decadent finish.
Berry Mix Version: Use half strawberries and half raspberries for a brighter, slightly tangier flavor.
Mini Party Cup Version: Divide the dessert into smaller shot glasses for bite-sized party servings.
Cookies and Cream Twist: Fold a few extra crushed Oreo pieces into the cheesecake filling for more crunch throughout.
Lemon Strawberry Version: Add 1 teaspoon of lemon zest to the filling for a fresher, sunnier flavor.
FAQ’s
Q1: Can I make these a day ahead?
Yes, absolutely. They hold up very well in the refrigerator overnight, which makes them perfect for entertaining.
Q2: Do I have to use whipped topping?
No, you can use freshly whipped cream instead. Just whip it to medium peaks so it folds in nicely.
Q3: Can I use frozen strawberries?
Fresh is best for the brightest texture and flavor, but thawed frozen strawberries can work if you drain them well.
Q4: How do I crush the Oreo cookies easily?
You can pulse them in a food processor or place them in a zip bag and crush them with a rolling pin.
Q5: Can I make this in one big dish instead of cups?
Yes, you can layer everything in a small serving dish and spoon it out like a no-bake cheesecake trifle.
Q6: How long do they need to chill?
About 2 hours is enough for a soft set, though longer chilling gives a firmer texture.
Q7: Can I use low-fat cream cheese?
You can, but the texture will be a little less rich and creamy than full-fat cream cheese.
Q8: What kind of cups work best?
Clear dessert cups, jars, or small glasses are ideal because they show off the layers so nicely.
Q9: Can I add more strawberry flavor?
Yes, you can stir in a bit more mashed strawberry, just avoid too much extra liquid so the filling stays thick.
Q10: Is this a good dessert for parties?
It really is. Individual servings are easy to make, easy to store, and easy to serve, which makes hosting feel so much easier.
Conclusion
This dessert brings together everything people love in one sweet little cup, creamy cheesecake texture, rich Oreo crunch, and bright strawberries that keep every bite feeling fresh. It is simple enough for a weekday treat and pretty enough for a celebration, which is exactly why it is so easy to come back to again and again. Trust me, once you make these, they are going to earn a regular place in your dessert rotation.
Print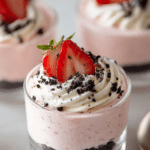
Strawberry Oreo Cheesecake Cup
- Prep Time: 20 minutes
- Cook Time: 2 hours
- Total Time: 2 hours 20 minutes
- Yield: 6 servings 1x
- Category: Dessert
- Method: No-Bake
- Cuisine: American
- Diet: Vegetarian
Description
Creamy no-bake strawberry cheesecake layered over a buttery Oreo crust and finished with whipped cream, fresh strawberries, and Oreo crumbs. These individual dessert cups are easy, pretty, and perfect for parties or make-ahead treats.
Ingredients
- 12 Oreo cookies, crushed
- 3 tablespoons unsalted butter, melted
- 1 cup fresh strawberries, finely diced
- 1/4 cup granulated sugar
- 8 ounces cream cheese, softened
- 1/2 teaspoon vanilla extract
- 8 ounces whipped topping, thawed
- 1/2 cup whipped cream, for topping
- 1/2 cup extra strawberries, sliced, for topping
- 2 tablespoons extra Oreo crumbs, for topping
Instructions
- Set out 6 small dessert cups. Make sure the cream cheese is softened and the whipped topping is thawed.
- In a medium bowl, combine the crushed Oreo cookies and melted butter until the crumbs are evenly moistened.
- Divide the Oreo mixture among the dessert cups and press lightly into the bottoms to form the crust.
- In a small bowl, toss the diced strawberries with the granulated sugar. Let them sit for 10 minutes, then mash lightly with a fork.
- In a large bowl, beat the softened cream cheese until smooth. Mix in the mashed strawberry mixture and vanilla extract until creamy.
- Gently fold in the whipped topping until the filling is light and fully combined.
- Spoon or pipe the cheesecake filling over the Oreo crust in each cup and smooth the tops.
- Cover and refrigerate for 2 hours.
- Before serving, top each cup with whipped cream, sliced strawberries, and extra Oreo crumbs.
- Serve chilled.
Notes
- Let the cream cheese soften fully for the smoothest filling.
- Pat the topping strawberries dry before adding them so the cups stay fresh-looking.
- For a firmer texture, chill the cups a little longer before serving.
- Add the whipped cream and toppings just before serving for the best finish.
Nutrition
- Serving Size: 1 cup
- Calories: 340
- Sugar: 20g
- Sodium: 230mg
- Fat: 24g
- Saturated Fat: 13g
- Unsaturated Fat: 9g
- Trans Fat: 0g
- Carbohydrates: 29g
- Fiber: 1g
- Protein: 4g
- Cholesterol: 45mg
Keywords: strawberry oreo cheesecake cup, no bake cheesecake cups, strawberry dessert cups, oreo cheesecake dessert, easy no bake dessert