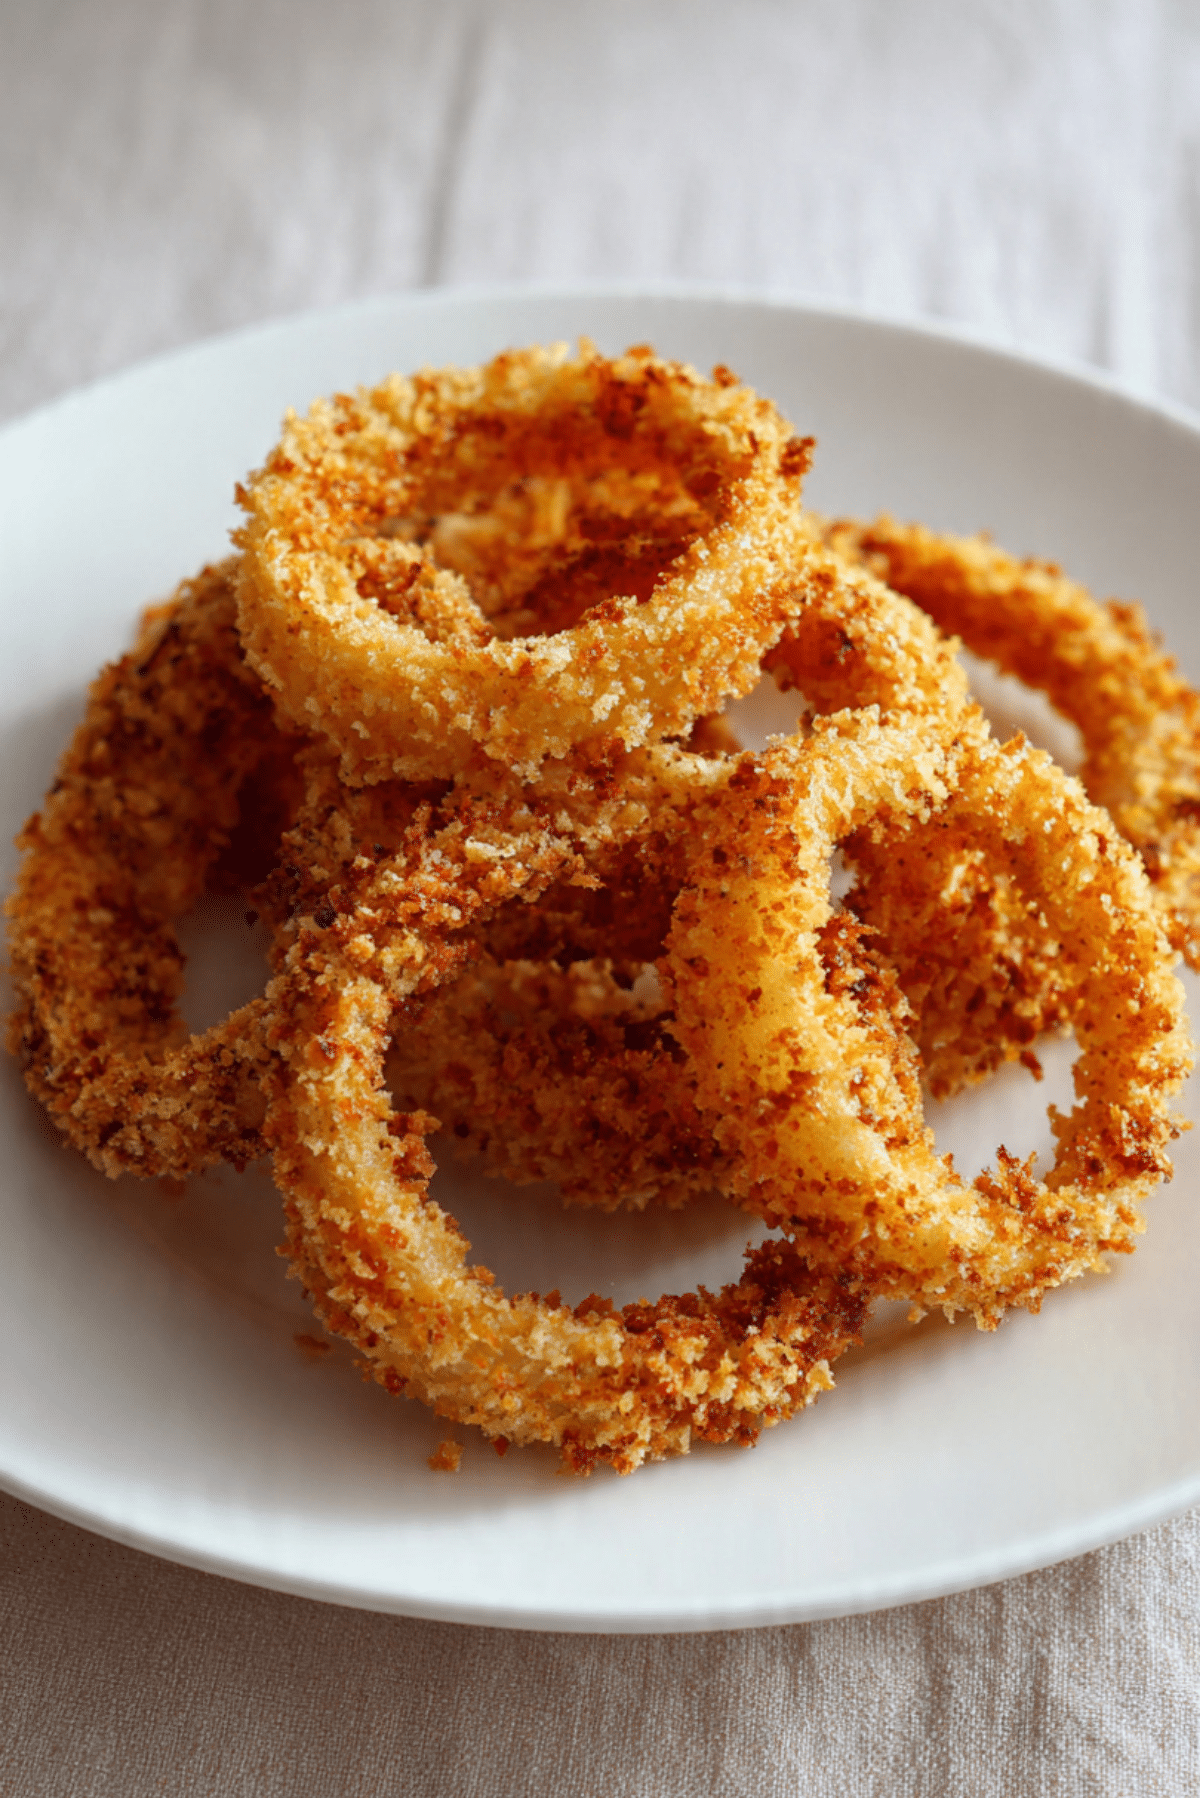
Baked Onion Rings
There is something so comforting about biting into a perfectly crisp onion ring, especially when you know it came straight out of your own oven. These Baked Onion Rings are golden, crunchy on the outside, tender and sweet on the inside, and honestly, they disappear the moment they hit the table. Trust me, you’re going to love this. The smell alone, warm onions wrapped in seasoned crumbs and parmesan, drifting through your kitchen, is enough to make everyone wander in and ask when they can taste one.
Why These Crispy Oven Rings Are About to Become Your Favorite Snack
We all crave that classic crunch, but sometimes we want it without deep frying. That is exactly where this version shines. You still get that satisfying crisp coating and soft onion center, but everything is baked to golden perfection in the oven. It feels lighter, cleaner, and somehow just as indulgent. This one’s a total game changer for weeknight snacks, party platters, or even as a fun side dish.
A Little Backstory Behind This Classic Favorite
Onion rings have long been a staple in American diners and burger joints, often served piled high next to sandwiches and fries. Their popularity grew in the early twentieth century, when battered and fried vegetables became trendy comfort food. Over time, home cooks started experimenting with lighter versions, baking instead of frying. And let me tell you, the oven method holds its own. You still get that nostalgic crunch, but with a homemade touch that feels extra special.
What Makes This Recipe So Reliable and Irresistible
Before we dive into the details, let me share why this recipe works so beautifully every single time.
Versatile: These rings are perfect as a snack, appetizer, or side dish. Pair them with burgers, salads, or serve them solo with your favorite dip.
Budget-Friendly: Onions, flour, eggs, and breadcrumbs are simple pantry staples, which makes this recipe easy on the wallet.
Quick and Easy: The prep is straightforward, and the oven does most of the work for you.
Customizable: You can tweak the seasoning, add a little heat, or swap cheeses to match your taste.
Crowd-Pleasing: Crispy, golden, and savory, they are always the first thing to disappear at gatherings.
Make-Ahead Friendly: You can bread the rings in advance and bake them when ready.
Great for Leftovers: If you somehow have extras, they reheat beautifully in the oven.
Chef Secrets for Extra Crunch and Flavor
Let’s level things up just a bit.
- Use Panko Breadcrumbs: They are lighter and flakier, which gives you that extra crunch.
- Season Every Layer: Add a little salt and spice to both the flour and breadcrumb mixture for deeper flavor.
- Lightly Spray with Oil: A gentle mist of olive oil helps them turn beautifully golden in the oven.
- Do Not Overcrowd the Pan: Give each ring space so hot air can circulate properly.
Essential Tools for Perfect Results
Before we start cooking, gather your tools.
Baking Sheet: A large sheet ensures the rings bake evenly.
Wire Rack: Placing the rings on a rack helps air circulate for better crispness.
Mixing Bowls: You will need separate bowls for flour, eggs, and breadcrumbs.
Tongs: Helpful for dipping and coating without making a mess.
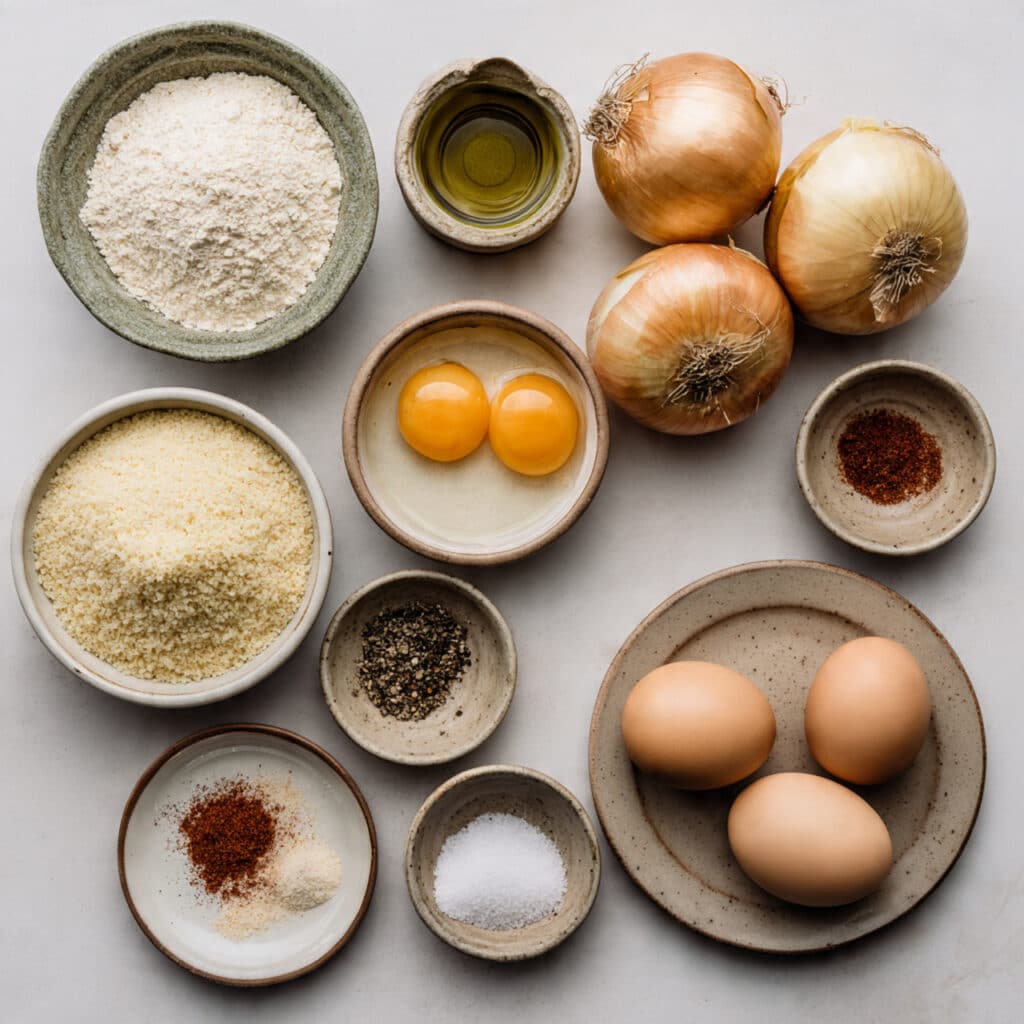
Ingredients You Will Need For These Crispy Rings
When simple ingredients come together in the right way, magic happens in the oven.
- Large Yellow Onions: 2 large onions, sliced into 1/2 inch thick rings, they provide sweetness and structure.
- All Purpose Flour: 1 cup, creates the base coating that helps everything stick.
- Large Eggs: 2 eggs, beaten, they bind the coating to the onions.
- Panko Breadcrumbs: 1 1/2 cups, for a light and crunchy crust.
- Grated Parmesan Cheese: 1/2 cup, adds salty, nutty depth.
- Paprika: 1 teaspoon, gives warmth and subtle color.
- Garlic Powder: 1 teaspoon, enhances savory notes.
- Salt: 1 teaspoon, balances and brightens flavors.
- Black Pepper: 1/2 teaspoon, adds gentle heat.
- Olive Oil: 2 tablespoons, for lightly spraying or brushing before baking.
Easy Ingredient Swaps If You Need Them
Sometimes you work with what you have, and that is perfectly fine.
All Purpose Flour: Whole wheat flour for a nuttier flavor.
Panko Breadcrumbs: Regular breadcrumbs, though they will be slightly less crispy.
Parmesan Cheese: Pecorino Romano for a sharper taste.
Paprika: Smoked paprika for a deeper, smoky note.
Spotlight on the Stars of the Show
A couple of ingredients truly make these shine.
Yellow Onions: When baked, they turn tender and slightly sweet, creating a beautiful contrast with the crunchy coating.
Panko Breadcrumbs: Their airy texture is what gives these rings that irresistible crisp bite.
Let’s Get Cooking Together
Now let dive into the fun part. This is where everything comes together and your kitchen starts to smell incredible.
- Preheat Your Equipment: Preheat your oven to 425 degrees Fahrenheit and place a wire rack over a baking sheet. Lightly coat the rack with olive oil.
- Combine Ingredients: In one bowl, place the flour. In a second bowl, add the beaten eggs. In a third bowl, mix the panko breadcrumbs, grated parmesan cheese, paprika, garlic powder, salt, and black pepper.
- Prepare Your Cooking Vessel: Make sure your wire rack is lightly greased so the rings do not stick while baking.
- Assemble the Dish: Dip each onion ring first into the flour, then into the beaten eggs, and finally into the breadcrumb mixture. Press gently so the coating adheres well. Place each coated ring onto the prepared rack.
- Cook to Perfection: Lightly brush or spray the tops with olive oil. Bake for 20 to 25 minutes, flipping halfway through, until golden brown and crispy.
- Finishing Touches: Remove from the oven and sprinkle with a tiny pinch of salt while still hot if desired.
- Serve and Enjoy: Serve immediately while warm and crunchy with your favorite dipping sauce.
The Magic of Texture and Flavor
What makes these so special is the contrast. The outside turns beautifully crisp and golden, thanks to the parmesan and panko, while the inside becomes soft and sweet. As they bake, the spices bloom and mingle with the cheese, creating layers of flavor in every bite. Let me tell you, it’s worth every bite.
Helpful Kitchen Tips for Even Better Results
If you want to make them absolutely perfect, keep these in mind.
- Flip the rings gently halfway through baking for even browning.
- Use evenly sliced onions so they cook at the same rate.
- Serve immediately for maximum crispness.
- Preheat the oven fully before placing the rings inside.
Common Mistakes and How to Avoid Them
Even simple recipes have a few traps.
- Skipping the wire rack can lead to soggy bottoms, so always elevate the rings.
- Overcrowding the pan prevents crisping, so bake in batches if needed.
- Not pressing the coating firmly can cause it to fall off during baking.
Nutrition Snapshot Per Serving
Servings: 4
Calories per serving: 280
Note: These are approximate values.
Time Breakdown at a Glance
Prep Time: 20 minutes
Cook Time: 25 minutes
Total Time: 45 minutes
Make-Ahead and Storage Tips
You can slice the onions and prepare the coating mixtures a few hours in advance. Store everything separately in the refrigerator. Leftover rings can be kept in an airtight container in the fridge for up to 3 days. Reheat in a 400 degree Fahrenheit oven for about 8 minutes to restore crispness. Freezing is possible after baking, just reheat directly from frozen until hot and crisp.
Delicious Ways to Serve Them
Pile them next to a juicy burger, serve alongside grilled chicken, or add them to a party platter with dips like ranch, honey mustard, or spicy yogurt sauce. They also make a fun topping for salads, adding crunch and savory depth.
Turn Leftovers Into Something New
Chop leftover rings and add them to wraps or sandwiches for extra crunch. You can even crumble them over mac and cheese for a crispy topping.
Extra Tips for Flavor and Freshness
Add a pinch of cayenne if you like heat. Freshly grated parmesan always melts and browns better. And always use fresh onions for the sweetest flavor.
Make Them Look Bakery Perfect
Arrange the rings in a neat circular pattern on a white plate and sprinkle with a tiny bit of fresh parsley for color. Serve with small dipping bowls in the center for a restaurant style presentation.
Fun Variations to Try Next Time
Try adding Italian seasoning to the breadcrumb mix. Swap parmesan for cheddar for a sharper twist. Use red onions for a slightly milder sweetness. Add a little chili powder for a smoky kick.
FAQ’s
Q1: Can I make these gluten free?
Yes, simply use gluten free flour and gluten free breadcrumbs.
Q2: Can I air fry them instead?
Absolutely, cook at 400 degrees Fahrenheit for about 12 to 15 minutes, flipping halfway.
Q3: Why are my rings not crispy?
They may be overcrowded or not baked at a high enough temperature.
Q4: Can I prepare them ahead of time?
Yes, bread them and refrigerate for a few hours before baking.
Q5: Can I skip the cheese?
You can, but the cheese adds extra flavor and browning.
Q6: What onions work best?
Yellow onions are ideal for sweetness and structure.
Q7: How thick should I slice them?
About 1/2 inch thick for the perfect balance of crisp and tender.
Q8: Can I use cooking spray instead of brushing oil?
Yes, a light spray works very well.
Q9: Do I need to flip them?
Flipping helps them brown evenly on both sides.
Q10: What dipping sauces pair well?
Ranch, garlic aioli, spicy ketchup, or honey mustard are all delicious options.
Conclusion
There is just something so satisfying about pulling a tray of golden, crispy onion rings from your oven and hearing that gentle crunch as you bite in. These Baked Onion Rings bring all the comfort of a classic favorite, with a lighter homemade twist that feels just right. Give them a try, share them with someone you love, and watch how quickly they disappear.
Print
Baked Onion Rings
- Prep Time: 20 minutes
- Cook Time: 25 minutes
- Total Time: 45 minutes
- Yield: 4 servings 1x
- Category: Appetizer
- Method: Baking
- Cuisine: American
- Diet: Vegetarian
Description
Golden and crispy baked onion rings with a crunchy parmesan panko coating and a tender, sweet onion center. A lighter alternative to the classic fried version, perfect as a snack, appetizer, or side dish.
Ingredients
- 2 large yellow onions, sliced into 1/2 inch thick rings
- 1 cup all purpose flour
- 2 large eggs, beaten
- 1 1/2 cups panko breadcrumbs
- 1/2 cup grated parmesan cheese
- 1 teaspoon paprika
- 1 teaspoon garlic powder
- 1 teaspoon salt
- 1/2 teaspoon black pepper
- 2 tablespoons olive oil
Instructions
- Preheat oven to 425 degrees Fahrenheit and place a wire rack over a baking sheet. Lightly coat the rack with olive oil.
- Place flour in one bowl. In a second bowl add the beaten eggs. In a third bowl mix panko breadcrumbs, grated parmesan cheese, paprika, garlic powder, salt, and black pepper.
- Dip each onion ring into the flour, then into the beaten eggs, and finally into the breadcrumb mixture, pressing gently so the coating adheres well.
- Arrange coated onion rings on the prepared wire rack in a single layer without overcrowding.
- Lightly brush or spray the tops with olive oil.
- Bake for 20 to 25 minutes, flipping halfway through, until golden brown and crispy.
- Remove from oven and serve immediately while warm and crunchy.
Notes
- Use panko breadcrumbs for extra crisp texture.
- Do not overcrowd the baking sheet to ensure even browning.
- Flip the rings halfway through baking for balanced crispness.
- Serve immediately for best texture.
Nutrition
- Serving Size: 1 serving
- Calories: 280
- Sugar: 6g
- Sodium: 480mg
- Fat: 11g
- Saturated Fat: 3g
- Unsaturated Fat: 7g
- Trans Fat: 0g
- Carbohydrates: 36g
- Fiber: 3g
- Protein: 9g
- Cholesterol: 95mg
Keywords: baked onion rings, crispy onion rings, oven baked appetizer, healthy onion rings, parmesan onion rings