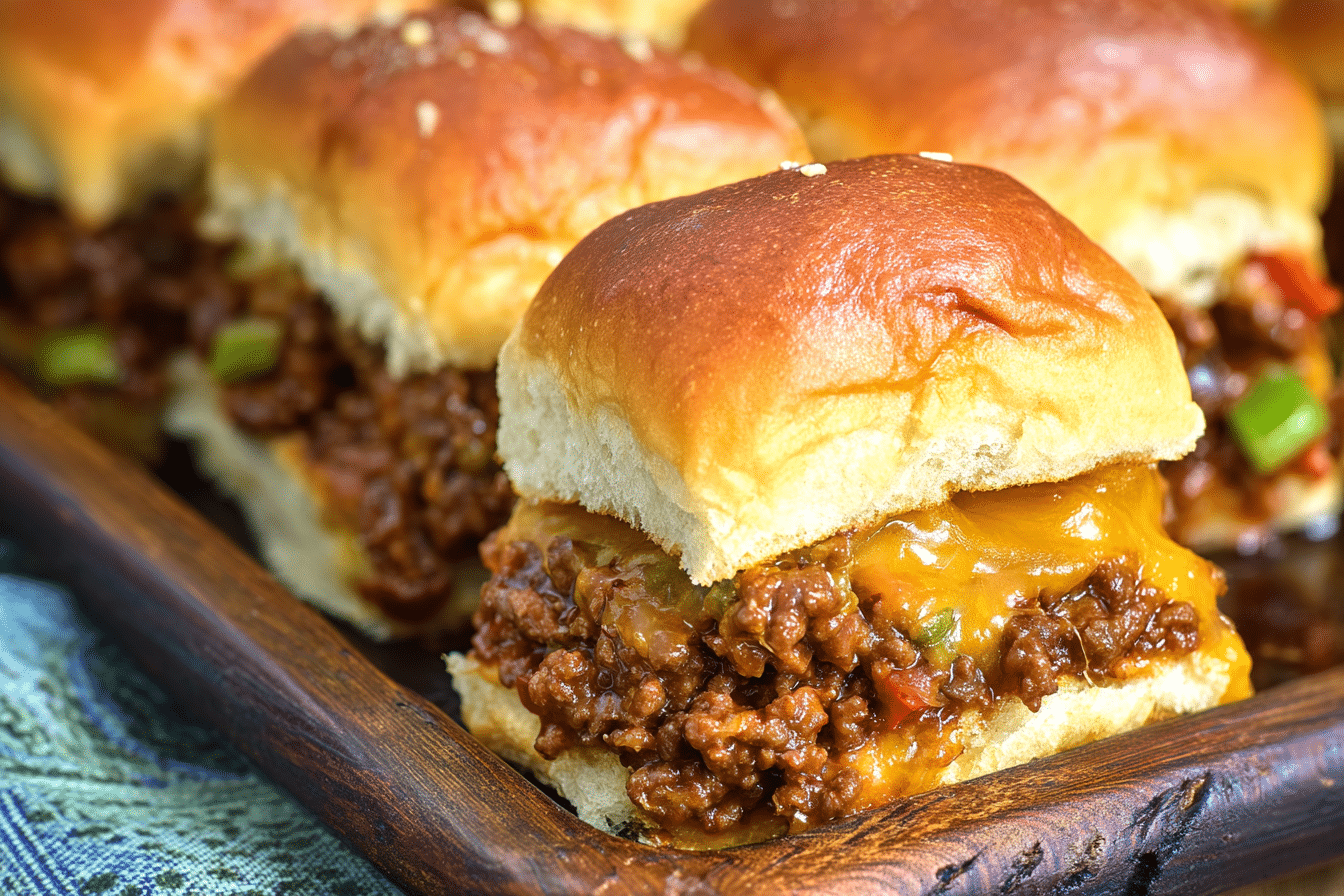
Chili Cheese Beef Sliders
Imagine biting into a warm, golden bun that gives way to juicy, seasoned beef, smothered in melty cheddar cheese and kissed with a touch of chili heat. That’s the magic of Chili Cheese Beef Sliders—a flavor-packed punch in a mini sandwich that’s as irresistible as it is satisfying. Whether you’re feeding a crowd on game day or looking for a fun weeknight dinner, these sliders are pure comfort with a bold attitude.
Behind the Recipe
This recipe was born on a chilly Sunday afternoon during football season. I wanted something hearty, cheesy, and snackable—something that could bring everyone to the table without missing a play. I remembered my dad’s classic chili, always simmering away with rich spices and tender beef. Combine that memory with my love for sliders and a craving for something cheesy, and these chili cheese beef sliders came to life. Trust me, they were an instant hit—and they’ve stayed a favorite ever since.
Recipe Origin or Trivia
Sliders, as we know them today, have roots in American diner culture—particularly from the iconic White Castle, which introduced the concept of tiny, flavorful burgers in the 1920s. But what happens when you marry that with chili, a dish steeped in Southwestern and Tex-Mex traditions? You get a flavor fusion that delivers heat, heartiness, and a whole lot of cheesy goodness. These sliders are a nod to comfort food traditions, reimagined for today’s busy kitchens.
Why You’ll Love Chili Cheese Beef Sliders
Mini but mighty, these sliders bring the best of comfort food in a few easy bites.
Versatile: Great as a snack, party platter, or main dish for casual dinners.
Budget-Friendly: Uses simple, affordable ingredients that stretch far.
Quick and Easy: Comes together in under an hour with minimal fuss.
Customizable: Swap the cheese, spice level, or toppings to suit your crew.
Crowd-Pleasing: Always the first to disappear at gatherings—big flavor in every bite.
Make-Ahead Friendly: Prep the filling ahead and assemble just before baking.
Great for Leftovers: Reheat beautifully for lunch the next day or snack time.
Chef’s Pro Tips for Perfect Results
To make your sliders truly unforgettable, here are a few insider tricks to keep in your apron pocket:
- Toast the buns slightly before assembling to keep them from getting soggy.
- Use freshly grated cheese for the best melt and flavor—it makes a big difference.
- Cook the beef with seasoning first before adding any sauce to deepen the flavor base.
- Don’t overstuff the sliders, or you risk soggy buns and messy bites.
- Finish with a butter-brushed top for that golden, glossy slider crown.
Kitchen Tools You’ll Need
Before we jump into the kitchen, let’s make sure your tools are ready:
Large Skillet: For browning beef and cooking the chili mixture.
Baking Dish or Sheet Pan: Ideal for baking the assembled sliders.
Chef’s Knife: For chopping onions, garlic, and optional toppings.
Grater: For freshly shredding cheese.
Pastry Brush: To glaze slider tops with butter.
Foil: To keep things warm and melty without drying out.
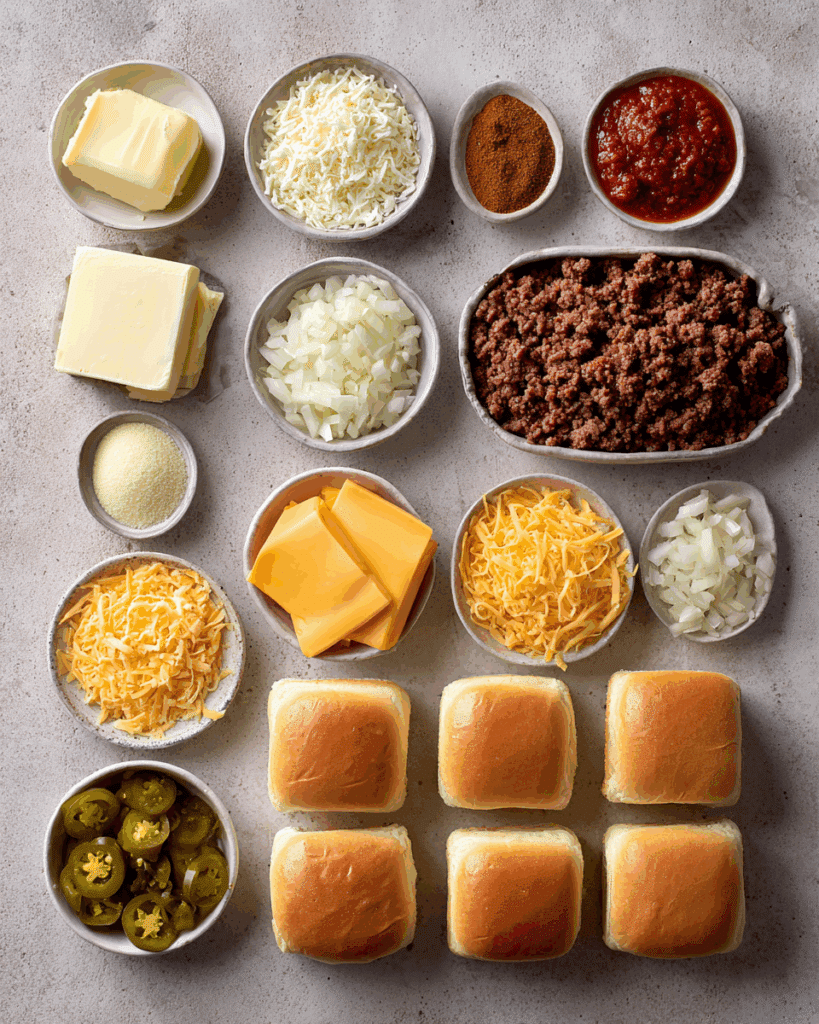
Ingredients in Chili Cheese Beef Sliders
These ingredients come together in perfect harmony, creating sliders that hit every craving note—from savory and spicy to melty and satisfying.
- Ground Beef: 1 pound – The hearty base, rich and full of flavor.
- Yellow Onion: 1 small, finely chopped – Adds sweetness and depth to the beef.
- Garlic: 2 cloves, minced – Brings aromatic warmth and kick.
- Tomato Paste: 2 tablespoons – Adds richness and body to the chili base.
- Chili Powder: 1 tablespoon – The star seasoning with smoky heat.
- Cumin: 1 teaspoon – Earthy spice that deepens the chili flavor.
- Salt: 1 teaspoon – Essential for seasoning the beef just right.
- Black Pepper: 1/2 teaspoon – Adds mild bite to balance the richness.
- Cheddar Cheese: 2 cups, shredded – Melty, gooey, and sharp for perfect coverage.
- Slider Buns: 12 soft dinner rolls – The vehicle for all that goodness.
- Unsalted Butter: 2 tablespoons, melted – Brushed on top for golden finish.
- Optional Pickled Jalapeños: For a tangy, spicy contrast.
Ingredient Substitutions
Need to swap an ingredient? No problem—here’s how to keep the flavor party going.
Ground Beef: Ground turkey or plant-based ground “beef.”
Cheddar Cheese: Monterey Jack, Colby, or Pepper Jack for extra heat.
Tomato Paste: Crushed tomatoes or tomato sauce, reduced.
Slider Buns: Mini brioche buns or Hawaiian rolls.
Chili Powder: Use a taco seasoning blend in a pinch.
Ingredient Spotlight
Cheddar Cheese: This cheese is a classic for good reason. It melts beautifully and delivers just the right tangy sharpness to cut through the richness of the beef.
Chili Powder: More than just heat, chili powder brings layers of smokiness and warmth that give this dish its signature kick.
Instructions for Making Chili Cheese Beef Sliders
This recipe comes together like a dream. Here are the steps you’re going to follow to slider heaven:
- Preheat Your Equipment:
Preheat your oven to 350°F (175°C). Lightly grease your baking dish or line it with parchment paper. - Combine Ingredients:
In a large skillet over medium heat, sauté the chopped onion until translucent. Add garlic and cook until fragrant. Stir in ground beef and cook until browned. Drain excess fat, then add tomato paste, chili powder, cumin, salt, and pepper. Mix well and simmer for 5 minutes. - Prepare Your Cooking Vessel:
Slice the slider buns in half horizontally, keeping the top and bottom halves intact. Place the bottom halves in the baking dish. - Assemble the Dish:
Evenly spread the chili beef mixture over the buns. Sprinkle generously with shredded cheese. Top with pickled jalapeños if using, then place the top buns over the filling. - Cook to Perfection:
Brush the tops of the buns with melted butter. Cover loosely with foil and bake for 15 minutes. Remove foil and bake an additional 5 minutes until tops are golden and cheese is bubbly. - Finishing Touches:
Let rest for 5 minutes before slicing. Garnish with extra cheese or fresh herbs if desired. - Serve and Enjoy:
Slice into individual sliders and serve warm. Prepare for happy faces and empty plates.
Texture & Flavor Secrets
These sliders are all about contrast. The tender, juicy beef plays beautifully against the soft, warm rolls. The melted cheddar stretches into gooey perfection, while the chili spices awaken every bite with depth and a touch of heat. Add a few pickled jalapeños, and you’ve got a zingy pop to keep things exciting.
Cooking Tips & Tricks
Let’s make sure your sliders come out just right:
- Use a serrated knife to slice through the buns cleanly.
- Don’t skip draining the beef to avoid soggy sliders.
- Let the sliders rest a few minutes after baking to hold their shape better.
What to Avoid
A few simple missteps can take your sliders from fab to flop—let’s sidestep them:
- Overcooking the beef: It will dry out and lose flavor.
- Too much sauce: Leads to soggy buns and messiness.
- Skipping the butter brush: You’ll miss out on that golden slider crown.
Nutrition Facts
Servings: 6
Calories per serving: 410
Note: These are approximate values.
Preparation Time
Prep Time: 15 minutes
Cook Time: 25 minutes
Total Time: 40 minutes
Make-Ahead and Storage Tips
You can prepare the beef mixture up to two days in advance—just store it in an airtight container in the fridge. Assemble the sliders when ready to bake. Leftovers? Wrap them individually and refrigerate for up to 3 days. To reheat, bake at 300°F until warmed through. These also freeze beautifully—just wrap tightly and reheat from frozen for a quick snack.
How to Serve Chili Cheese Beef Sliders
Serve these with a side of crispy fries, a fresh slaw, or even a big bowl of guacamole and chips. For drinks, think cold soda, sweet tea, or sparkling water with lime. They shine brightest as part of a game day spread or casual dinner party.
Creative Leftover Transformations
Got extras? Turn them into something new:
- Cheesy beef quesadillas: Use the filling in a tortilla with extra cheese.
- Stuffed bell peppers: Scoop into halved peppers and bake.
- Slider nachos: Crumble the beef mix over tortilla chips and broil with cheese.
Additional Tips
- Add a dash of smoked paprika to deepen the chili profile.
- Sprinkle sesame seeds on top of the buns before baking for texture.
- Use parchment under the sliders for easy cleanup.
Make It a Showstopper
Presentation counts—especially when sliders are the star. Use a wooden board lined with parchment for rustic charm. Add ramekins of dipping sauces, jalapeños, and pickles. Finish with a sprinkle of fresh herbs or red pepper flakes on top for color pop.
Variations to Try
- Spicy Kick: Add diced chipotle peppers in adobo to the beef.
- Tex-Mex Style: Mix in black beans and corn for a southwest twist.
- Loaded Sliders: Top with crispy onions or shredded lettuce after baking.
- Extra Cheesy: Layer in mozzarella or Pepper Jack with the cheddar.
- Sweet Heat: Use Hawaiian rolls and drizzle with honey before serving.
FAQ’s
Q1: Can I make these vegetarian?
A1: Yes, substitute the beef with plant-based ground meat or lentils.
Q2: Can I use store-bought chili?
A2: Absolutely, just make sure it’s thick enough not to soak the buns.
Q3: How do I keep sliders warm for a party?
A3: Wrap in foil and place in a low oven (around 200°F) until ready to serve.
Q4: What cheese melts best for sliders?
A4: Cheddar is classic, but Monterey Jack or Gouda work beautifully too.
Q5: Can I prep these a day ahead?
A5: Yes, assemble and refrigerate unbaked. Bake fresh when ready.
Q6: Do I need to toast the buns first?
A6: Not required, but toasting helps prevent sogginess.
Q7: Can I make these gluten-free?
A7: Use gluten-free buns and double-check seasoning mixes.
Q8: Are they freezer-friendly?
A8: Definitely. Freeze baked sliders individually and reheat in the oven.
Q9: What side dishes pair well?
A9: Fries, coleslaw, chips and salsa, or even a simple salad.
Q10: Can I double the recipe?
A10: Yes! Just use a larger baking pan and scale up ingredients accordingly.
Conclusion
Chili Cheese Beef Sliders are more than just a snack—they’re a warm, cheesy hug in a bun. Whether you’re making them for a party or a quiet night in, they promise to deliver bold flavors and serious satisfaction. Give them a try and let the sliders steal the show at your table.
Print
Chili Cheese Beef Sliders
- Prep Time: 15 minutes
- Cook Time: 25 minutes
- Total Time: 40 minutes
- Yield: 6 servings
- Category: Main Dish
- Method: Baking
- Cuisine: American
- Diet: Halal
Description
These Chili Cheese Beef Sliders are mini sandwiches packed with juicy ground beef, rich chili spices, and melty cheddar cheese, all baked to golden perfection inside soft slider buns. Perfect for game day, parties, or a fun family dinner!
Ingredients
- Ground Beef: 1 pound – The hearty base, rich and full of flavor.
- Yellow Onion: 1 small, finely chopped – Adds sweetness and depth to the beef.
- Garlic: 2 cloves, minced – Brings aromatic warmth and kick.
- Tomato Paste: 2 tablespoons – Adds richness and body to the chili base.
- Chili Powder: 1 tablespoon – The star seasoning with smoky heat.
- Cumin: 1 teaspoon – Earthy spice that deepens the chili flavor.
- Salt: 1 teaspoon – Essential for seasoning the beef just right.
- Black Pepper: 1/2 teaspoon – Adds mild bite to balance the richness.
- Cheddar Cheese: 2 cups, shredded – Melty, gooey, and sharp for perfect coverage.
- Slider Buns: 12 soft dinner rolls – The vehicle for all that goodness.
- Unsalted Butter: 2 tablespoons, melted – Brushed on top for golden finish.
- Optional Pickled Jalapeños: For a tangy, spicy contrast.
Instructions
- Preheat Your Equipment: Preheat your oven to 350°F (175°C). Lightly grease your baking dish or line it with parchment paper.
- Combine Ingredients: In a large skillet over medium heat, sauté the chopped onion until translucent. Add garlic and cook until fragrant. Stir in ground beef and cook until browned. Drain excess fat, then add tomato paste, chili powder, cumin, salt, and pepper. Mix well and simmer for 5 minutes.
- Prepare Your Cooking Vessel: Slice the slider buns in half horizontally, keeping the top and bottom halves intact. Place the bottom halves in the baking dish.
- Assemble the Dish: Evenly spread the chili beef mixture over the buns. Sprinkle generously with shredded cheese. Top with pickled jalapeños if using, then place the top buns over the filling.
- Cook to Perfection: Brush the tops of the buns with melted butter. Cover loosely with foil and bake for 15 minutes. Remove foil and bake an additional 5 minutes until tops are golden and cheese is bubbly.
- Finishing Touches: Let rest for 5 minutes before slicing. Garnish with extra cheese or fresh herbs if desired.
- Serve and Enjoy: Slice into individual sliders and serve warm.
Notes
- Use freshly grated cheese for the best melt and flavor.
- Let sliders rest after baking to help them hold their shape.
- Toast buns lightly beforehand to prevent sogginess.
- Freeze baked sliders individually for future quick meals.
Nutrition
- Serving Size: 2 sliders
- Calories: 410
- Sugar: 4g
- Sodium: 580mg
- Fat: 24g
- Saturated Fat: 11g
- Unsaturated Fat: 10g
- Trans Fat: 0g
- Carbohydrates: 30g
- Fiber: 2g
- Protein: 23g
- Cholesterol: 75mg
Keywords: chili cheese sliders, beef sliders, game day snacks, mini burgers, cheesy sliders, party food, quick dinner