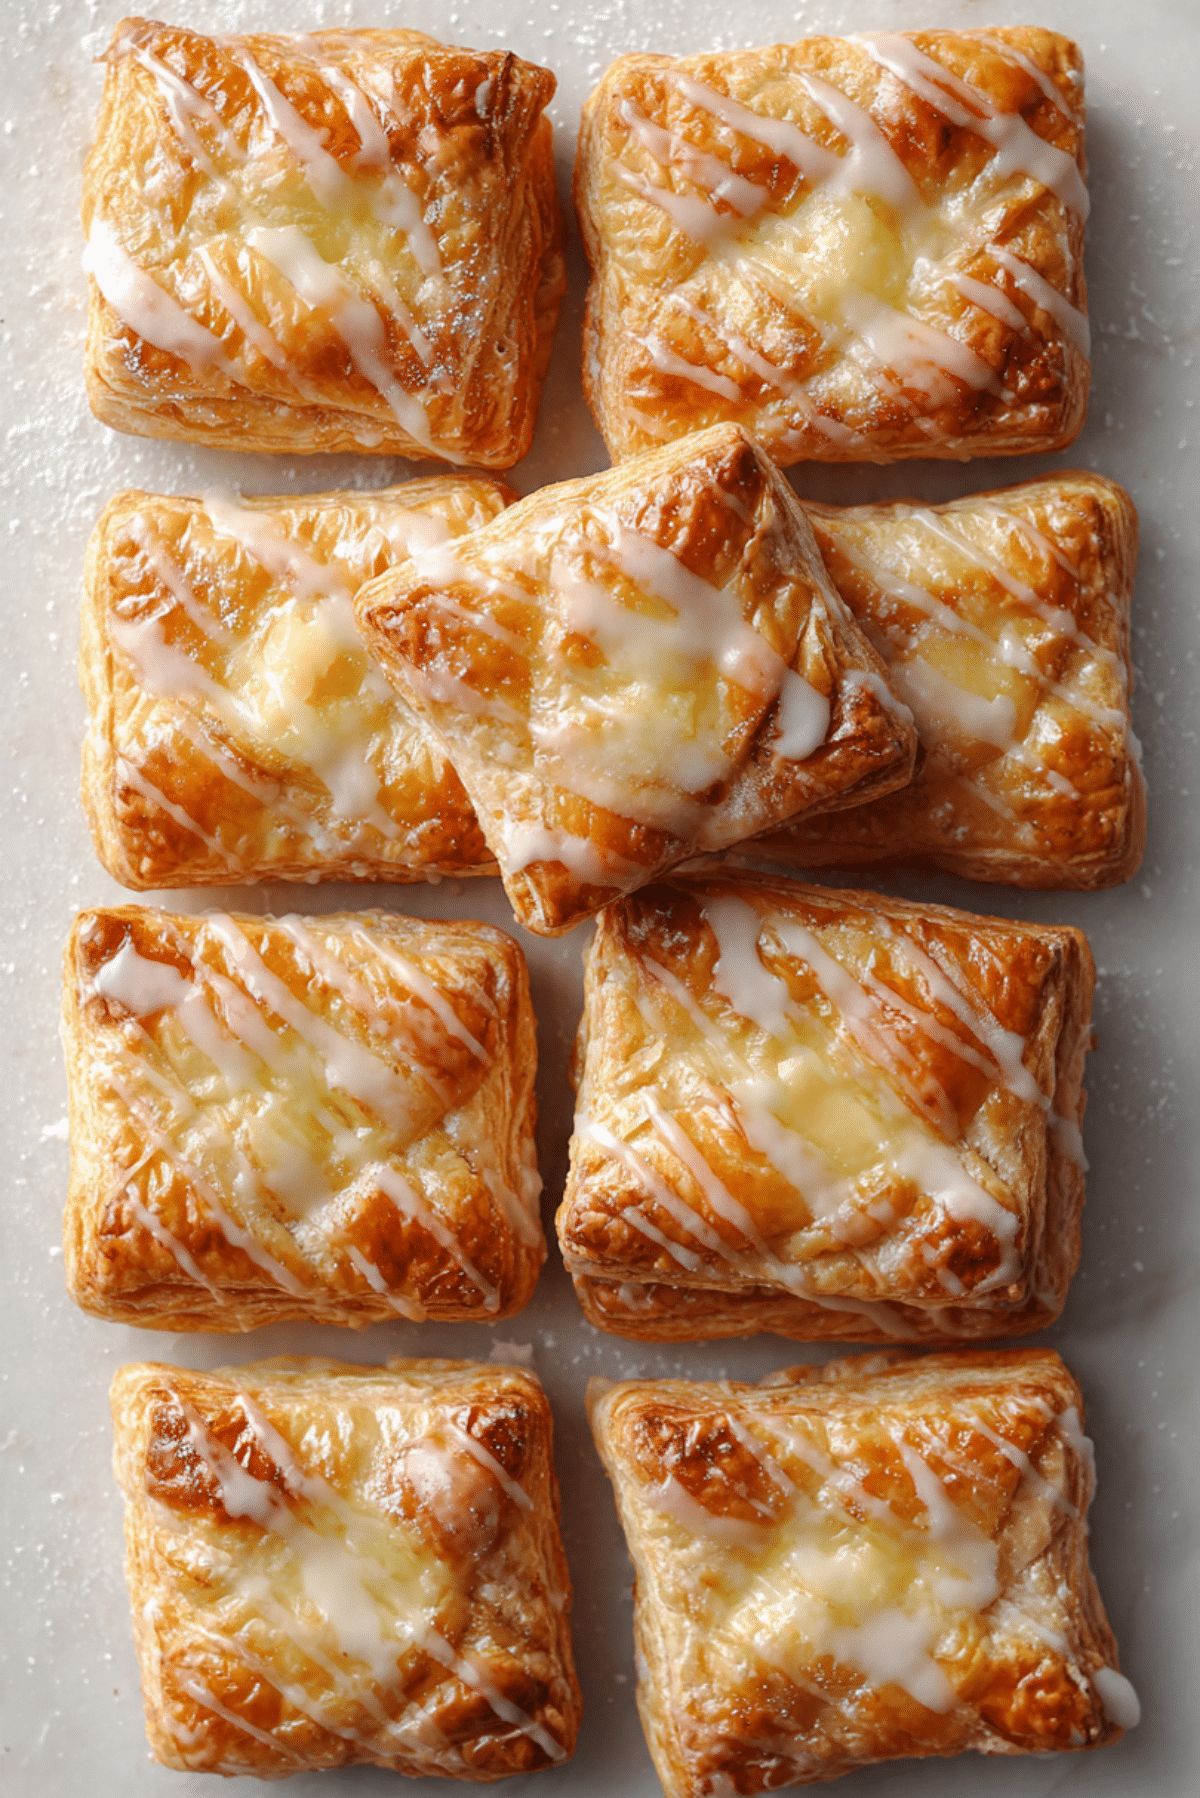
Easy Cheese Danish
There is something almost magical about pulling a tray of golden, flaky pastries out of the oven, especially when you know they took barely any effort. Easy Cheese Danish is one of those treats that looks like it came straight from a bakery window, yet you made it in your own kitchen with simple ingredients and a little love. The buttery layers puff up beautifully, the creamy center turns silky and just slightly sweet, and that delicate glaze on top catches the light in the most tempting way. Trust me, you’re going to love this.
Why This Sweet Little Pastry Feels Like a Bakery Secret
You know those mornings when you crave something special but do not want to spend hours baking from scratch? This is exactly where this recipe shines. The contrast between crisp pastry and smooth cream cheese filling makes every bite feel indulgent without being heavy. It is sweet but not overwhelming, rich but still light enough for breakfast or brunch. This one’s a total game-changer when you want impressive results without complicated steps.
A Little Background on This Classic Pastry
Cheese danishes trace their roots back to European baking traditions, particularly in Denmark and Austria, where laminated dough pastries became a staple in bakeries. Over time, the concept traveled and evolved, especially in American kitchens where convenience ingredients like ready made puff pastry made the process far more approachable. What once required careful dough folding and hours of chilling can now be recreated easily at home. Let me tell you, it is worth every bite.
Why You’ll Keep Coming Back to This Recipe
Before we even step into the kitchen, let’s talk about why this Easy Cheese Danish deserves a permanent spot in your baking rotation.
Versatile: It works for breakfast, brunch, dessert, or even an afternoon coffee break. You can dress it up or keep it simple.
Budget-Friendly: The ingredients are simple and easy to find, which means no expensive specialty items.
Quick and Easy: Using puff pastry cuts down prep time dramatically while still delivering flaky layers.
Customizable: Add fruit, a hint of citrus zest, or a drizzle of extra glaze to make it your own.
Crowd-Pleasing: Creamy filling and buttery pastry are a combination that rarely disappoints.
Make-Ahead Friendly: You can prepare the filling ahead of time and assemble when ready to bake.
Great for Leftovers: They store well and reheat beautifully, which means tomorrow’s breakfast is already sorted.
Pro Tips for Bakery-Level Results
A few small details can take your Easy Cheese Danish from good to unforgettable.
- Use room temperature cream cheese so it blends smoothly without lumps.
- Do not overfill the center, a generous spoonful is enough to keep the pastry crisp.
- Chill the assembled pastries for 10 minutes before baking if your kitchen is warm.
- Bake until deeply golden, not pale, because color equals flavor.
Kitchen Tools That Make It Effortless
You do not need anything fancy, but a few reliable tools help.
Baking Sheet: Provides even heat for crisp bottoms.
Parchment Paper: Prevents sticking and makes cleanup easier.
Mixing Bowl: For blending the filling until silky smooth.
Whisk or Hand Mixer: Ensures the cream cheese mixture is lump free.
Pastry Brush: Perfect for applying egg wash evenly.
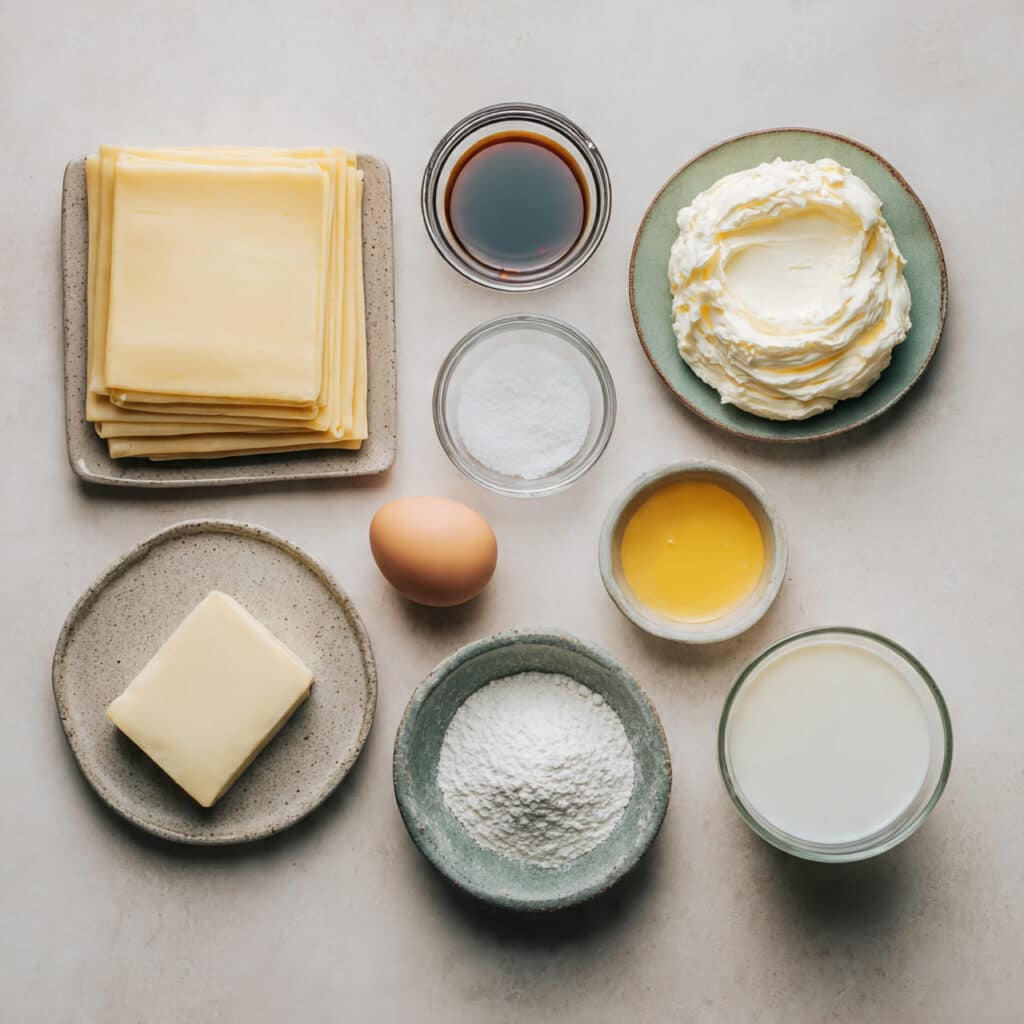
Ingredients That Bring It All Together
The beauty of this Easy Cheese Danish lies in how a few simple ingredients work in harmony.
- Puff Pastry Sheets: 2 sheets, thawed. These create the flaky, buttery layers that puff up in the oven.
- Cream Cheese: 8 ounces, softened. This forms the rich, creamy base of the filling.
- Granulated Sugar: 1/3 cup. Adds balanced sweetness to the cheese mixture.
- Vanilla Extract: 1 teaspoon. Enhances flavor with warm, sweet notes.
- Egg: 1 large. Used for egg wash to give the pastry a golden finish.
- Lemon Juice: 1 teaspoon. Brightens the filling and balances sweetness.
- Powdered Sugar: 1/2 cup. Creates the smooth glaze.
- Milk: 1 to 2 tablespoons. Thins the glaze to a drizzle consistency.
Simple Swaps If You Need Them
Sometimes you work with what you have, and that is perfectly fine.
Cream Cheese: Mascarpone for a slightly richer filling.
Lemon Juice: A splash of orange juice for a softer citrus note.
Milk: Heavy cream for a thicker glaze.
Vanilla Extract: Almond extract for a subtle nutty aroma.
Spotlight on the Star Ingredients
Puff Pastry: When baked properly, it transforms into dozens of delicate, crisp layers that shatter slightly with each bite.
Cream Cheese: Smooth, tangy, and creamy, it balances the sweetness and keeps the center luscious.
Let’s Bake This Together
Now let’s dive into the fun part, bringing everything together step by step.
- Preheat Your Equipment: Preheat your oven to 400°F and line a baking sheet with parchment paper.
- Combine Ingredients: In a mixing bowl, beat the softened cream cheese with granulated sugar, vanilla extract, and lemon juice until smooth and creamy.
- Prepare Your Cooking Vessel: Unfold the puff pastry sheets and cut each into equal squares, then place them on the prepared baking sheet.
- Assemble the Dish: Gently score a smaller square inside each pastry, spoon the cream cheese mixture into the center, and brush the borders with beaten egg.
- Cook to Perfection: Bake for 15 to 18 minutes until the pastry is puffed and golden brown.
- Finishing Touches: Whisk powdered sugar with milk until smooth, then drizzle over slightly cooled pastries.
- Serve and Enjoy: Serve warm or at room temperature, and savor that flaky, creamy goodness.
The Texture and Flavor Experience
As the pastry bakes, the layers rise and crisp, creating a delicate crunch that contrasts beautifully with the soft, velvety filling. The slight tang from the cream cheese meets the gentle sweetness of sugar and vanilla, while the glaze adds a final touch of smooth sweetness on top. Every bite gives you crisp edges, creamy center, and a hint of citrus brightness.
Helpful Tips for Perfect Results
A few friendly reminders before you get started.
- Do not skip the egg wash, it gives that bakery style shine.
- Let pastries cool slightly before glazing so the drizzle stays visible.
- Rotate the baking sheet halfway through for even browning.
Common Mistakes and How to Avoid Them
Even simple recipes have small traps, but they are easy to avoid.
- Overfilling the center, which can cause spilling during baking. Use moderate amounts.
- Underbaking the pastry, which leaves it soft instead of crisp. Wait for deep golden color.
- Using cold cream cheese, which leads to lumpy filling. Always soften first.
Nutrition Overview
Servings: 8 pastries
Calories per serving: 320
Note: These are approximate values.
Time Breakdown
Prep Time: 15 minutes
Cook Time: 18 minutes
Total Time: 33 minutes
Make-Ahead and Storage Tips
You can prepare the filling up to two days in advance and store it covered in the refrigerator. Baked pastries keep well in an airtight container for up to three days. Reheat in a 300°F oven for about 5 to 7 minutes to restore crispness. You can also freeze unglazed baked pastries for up to one month and glaze after reheating.
Serving Ideas That Feel Extra Special
Serve these with fresh berries and hot coffee for brunch, or pair them with tea for a cozy afternoon break. They also look beautiful arranged on a platter with a light dusting of powdered sugar.
Creative Ways to Use Leftovers
Slice and toast them lightly for a crisp breakfast treat. Crumble pieces over vanilla yogurt for a sweet parfait. You can even warm and top with a spoonful of fruit compote.
Extra Tips for Flavor and Freshness
Store them uncovered for the first hour after baking to prevent sogginess. If adding fruit, pat it dry to avoid excess moisture. A tiny pinch of salt in the filling can enhance sweetness.
Make It Look Bakery Worthy
Drizzle glaze in thin lines for a professional look. Serve on a white plate to highlight the golden pastry. A light dusting of powdered sugar just before serving makes them look irresistible.
Fun Variations to Try
Add a spoonful of raspberry jam beneath the cheese filling.
Sprinkle sliced almonds on the edges before baking.
Mix a little cinnamon into the filling for warmth.
Top with fresh blueberries before baking.
FAQ’s
Q1: Can I use homemade puff pastry?
Yes, if you have time, homemade pastry will work beautifully.
Q2: Can I prepare them the night before?
You can assemble and refrigerate, then bake fresh in the morning.
Q3: How do I keep the pastry crisp?
Bake until deeply golden and avoid overfilling.
Q4: Can I freeze them?
Yes, freeze without glaze and reheat before serving.
Q5: What if I do not have lemon juice?
You can skip it or use a splash of orange juice.
Q6: Can I make them smaller?
Yes, cut the pastry into smaller squares and adjust baking time slightly.
Q7: Is this suitable for vegetarians?
Yes, it contains no meat products.
Q8: Can I reduce the sugar?
You can slightly reduce it, but it may affect sweetness balance.
Q9: Why did my filling spread?
It may have been overmixed or overfilled.
Q10: Can I add fruit?
Absolutely, just avoid adding too much moisture.
Conclusion
There is something deeply satisfying about baking a pastry that looks impressive yet feels completely doable. Easy Cheese Danish brings flaky layers, creamy filling, and sweet glaze together in the most comforting way. It is simple, reliable, and honestly hard to resist. Go ahead and make a batch, your kitchen is about to smell amazing.
Print
Easy Cheese Danish
- Prep Time: 15 minutes
- Cook Time: 18 minutes
- Total Time: 33 minutes
- Yield: 8 pastries 1x
- Category: Breakfast
- Method: Baking
- Cuisine: Danish-inspired
- Diet: Vegetarian
Description
Flaky, golden puff pastry filled with a smooth, lightly sweetened cream cheese center and finished with a delicate vanilla glaze. This easy bakery-style treat is perfect for breakfast, brunch, or dessert.
Ingredients
- 2 sheets puff pastry, thawed
- 8 ounces cream cheese, softened
- 1/3 cup granulated sugar
- 1 teaspoon vanilla extract
- 1 large egg
- 1 teaspoon lemon juice
- 1/2 cup powdered sugar
- 1 to 2 tablespoons milk
Instructions
- Preheat oven to 400°F and line a baking sheet with parchment paper.
- In a mixing bowl, beat softened cream cheese with granulated sugar, vanilla extract, and lemon juice until smooth and creamy.
- Unfold puff pastry sheets and cut each sheet into equal squares. Place them on the prepared baking sheet.
- Lightly score a smaller square inside each pastry without cutting through. Spoon the cream cheese mixture into the center of each square. Beat the egg and brush the pastry borders with egg wash.
- Bake for 15 to 18 minutes, until puffed and golden brown.
- Whisk powdered sugar with milk until smooth to create a glaze. Adjust milk for desired consistency.
- Allow pastries to cool slightly, then drizzle glaze over the top. Serve warm or at room temperature.
Notes
- Make sure cream cheese is fully softened to avoid lumps.
- Do not overfill the centers to prevent spilling during baking.
- For extra flavor, add a spoonful of jam beneath the cream cheese filling.
- Store leftovers in an airtight container and reheat briefly in the oven for best texture.
Nutrition
- Serving Size: 1 pastry
- Calories: 320
- Sugar: 14g
- Sodium: 210mg
- Fat: 20g
- Saturated Fat: 10g
- Unsaturated Fat: 8g
- Trans Fat: 0g
- Carbohydrates: 30g
- Fiber: 1g
- Protein: 5g
- Cholesterol: 55mg
Keywords: Easy Cheese Danish, puff pastry danish, cream cheese pastry, easy breakfast pastry, homemade danish