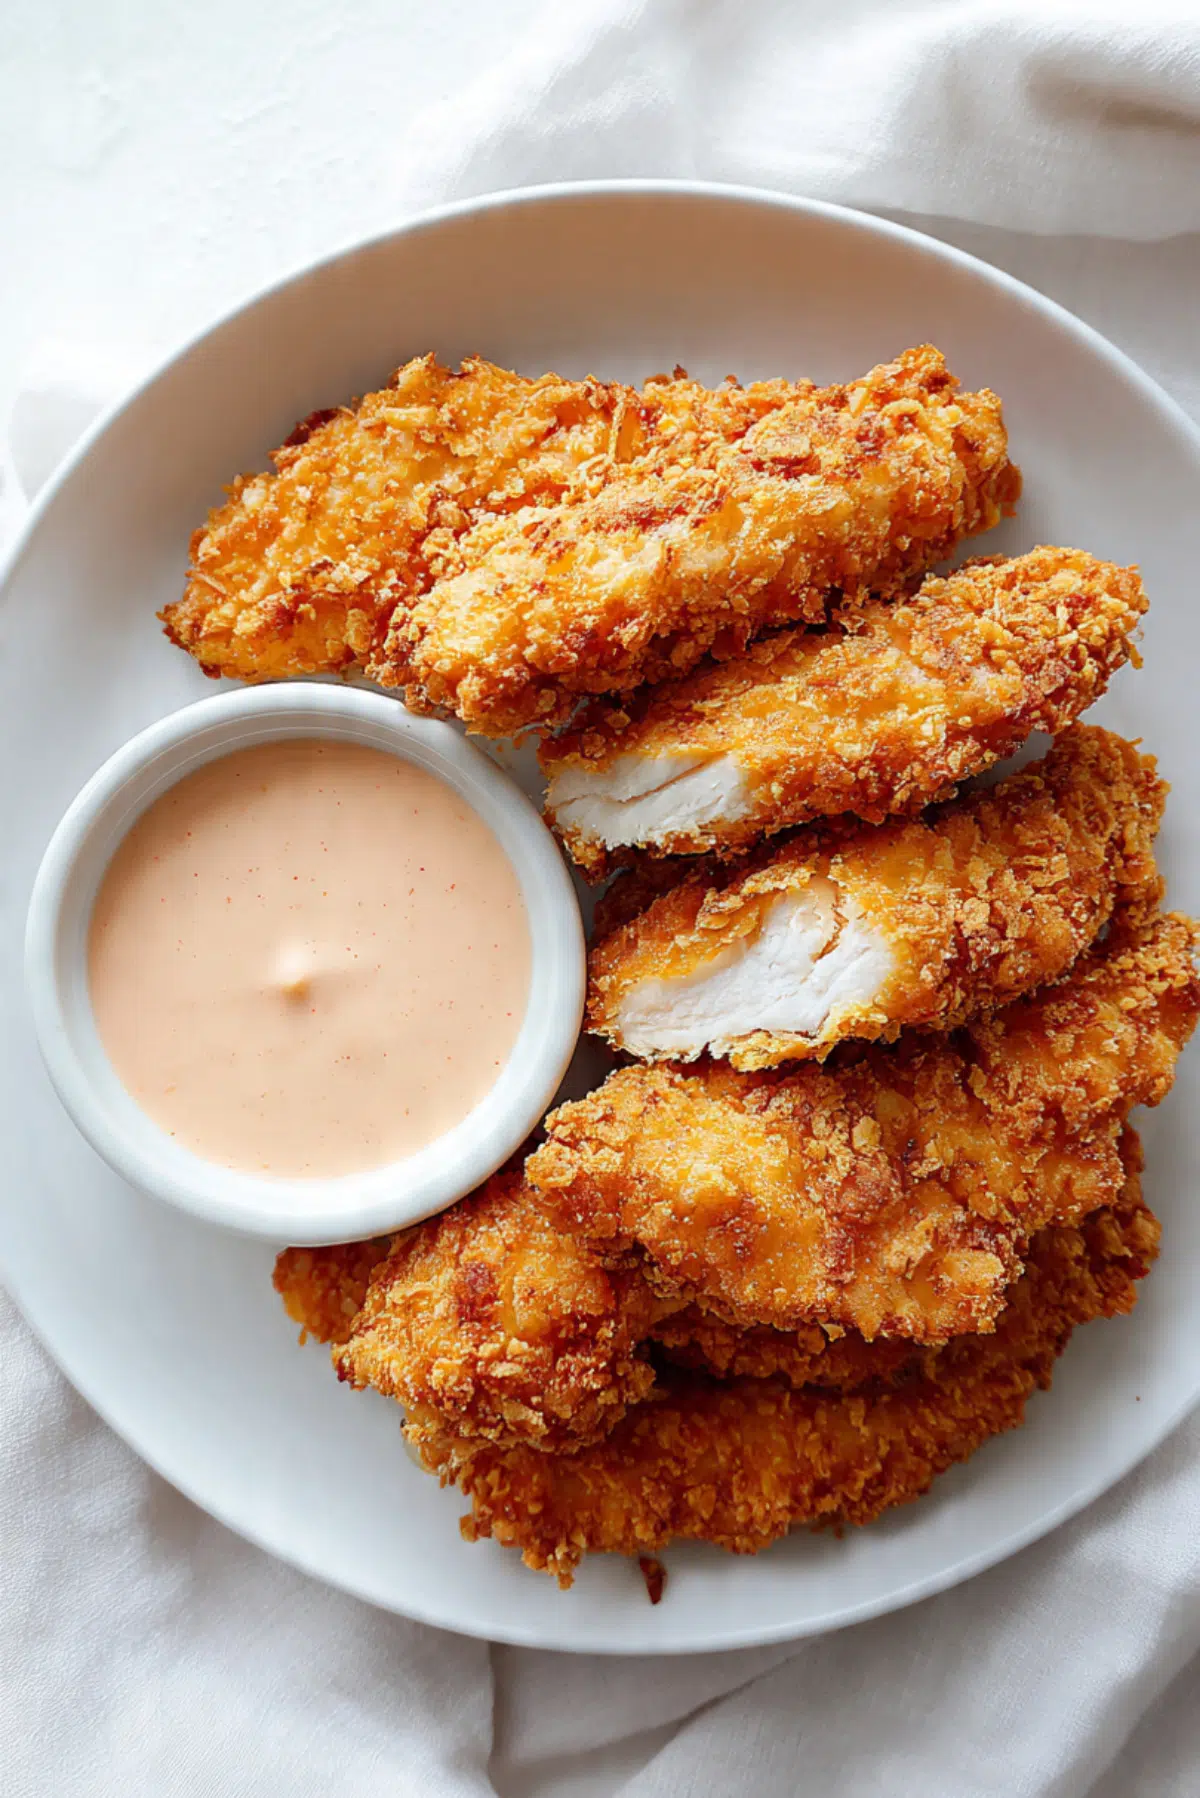
Raising Cane’s Crispy Chicken Tenders
There is something wildly comforting about a basket of hot, crunchy chicken tenders, especially when the crust shatters just a little with each bite and the inside stays tender and juicy. This homemade version brings that same craveable magic to your kitchen, complete with a peppery dipping sauce that makes every bite feel like a treat. Trust me, you’re going to love this.
Why These Crispy Tenders Always Hit the Spot
Some recipes are good, and then there are the ones that make everyone hover near the stove waiting for the next batch. These tenders fall right into that second category. They are deeply golden, wonderfully crunchy, and packed with the kind of simple savory flavor that keeps you coming back for one more piece.
What makes them stand out is the balance. The chicken stays moist from a buttermilk soak, the seasoned flour coating fries up crisp and craggy, and the dipping sauce brings creamy, tangy, peppery flavor that ties everything together. This one’s a total game-changer when you want something fun, satisfying, and seriously crowd-friendly.
The Fast Food Inspiration Behind This Favorite
Before we get into the flour and frying, it helps to know why this style of tender has such a loyal following. The restaurant version is known for keeping things simple, focusing on hand-battered chicken fingers cooked to order, which is part of why the texture is so memorable and the flavor feels so clean and familiar.
That simplicity is exactly what makes a homemade version so appealing. You are not chasing a complicated restaurant secret here. You are recreating the experience, that juicy chicken, that crunchy coating, and that addictive sauce, with pantry staples and a little kitchen confidence. And now that we have the backstory, let’s dive into what makes this version such a keeper.
What Makes This Recipe Worth Making Again and Again
This recipe is easy to fall for, and once you make it once, it tends to sneak into your regular dinner rotation.
Versatile: These tenders work for dinner, game day, family gatherings, or even a snack board. They are just as welcome beside fries as they are tucked into wraps or salads.
Budget-Friendly: You get that restaurant-style feel without paying for takeout. Chicken tenderloins and pantry staples do the heavy lifting here.
Quick and Easy: The process is straightforward and approachable. Once the chicken has marinated, the rest moves along nicely.
Customizable: You can tweak the seasoning, adjust the sauce, or even make the tenders a little spicier. It is easy to shape the flavor to your taste.
Crowd-Pleasing: Crispy chicken is one of those almost universal wins. Kids love it, adults love it, and nobody complains when there is extra sauce.
Make-Ahead Friendly: The sauce can be mixed in advance, and the chicken can marinate ahead of time, which makes dinner feel much easier.
Great for Leftovers: Leftover tenders reheat beautifully in the oven or air fryer, and they are fantastic in sandwiches the next day.
Pro Tips That Make a Big Difference
Once you see how simple the method is, a few little details can take the final result from good to unforgettable.
- Use chicken tenderloins if possible: They cook evenly and naturally give you that classic shape and tenderness.
- Let the chicken rest in the marinade: Even a couple of hours helps the meat stay juicy and well-seasoned inside.
- Press the flour coating onto the chicken: This helps create those rugged crispy bits that make fried chicken so irresistible.
- Fry in batches: Overcrowding lowers the oil temperature and can turn crisp coating into soggy coating.
- Let the sauce sit before serving: A little resting time gives the flavors a chance to blend and deepen.
The Kitchen Tools That Make It Easy
Before the oil starts heating, it helps to have everything ready and within reach. A few basic tools make the whole process smoother.
Mixing bowls: You will need one for the marinade, one for the flour coating, and one for the sauce.
Whisk: Perfect for blending the buttermilk marinade and making the sauce smooth.
Heavy pot or deep skillet: This helps maintain steady heat while frying.
Tongs: They make it easier to coat the chicken and safely turn it in the hot oil.
Wire rack or paper towel lined tray: This keeps the tenders crisp after frying instead of trapping steam underneath.
Instant-read thermometer: Helpful for checking both oil temperature and doneness without guessing.
Everything You’ll Need to Build That Signature Crunch
The beauty of this recipe is how familiar the ingredient list feels. Nothing fancy, just the right combination of creamy, savory, and crispy elements working together.
- Chicken tenderloins: 2 pounds, these are the heart of the recipe and cook up tender and juicy with very little fuss.
- Buttermilk: 1 1/2 cups, it gently tenderizes the chicken and helps the coating cling beautifully.
- Large egg: 1, this adds body to the marinade and helps create a more cohesive crust.
- Kosher salt: 2 teaspoons, divided, this seasons both the marinade and the flour mixture for flavor in every layer.
- Black pepper: 1 1/2 teaspoons, divided, this gives the tenders and sauce that familiar peppery edge.
- All-purpose flour: 2 cups, this forms the base of the crispy coating.
- Cornstarch: 1/2 cup, this is the secret to a lighter, crunchier crust.
- Paprika: 1 1/2 teaspoons, it adds warm color and gentle smoky sweetness.
- Garlic powder: 1 teaspoon, this brings savory depth without overpowering the chicken.
- Onion powder: 1/2 teaspoon, it rounds out the seasoning and adds that subtle takeout-style flavor.
- Vegetable oil: 4 cups, for frying, this gives the tenders their crisp golden finish.
- Mayonnaise: 1/2 cup, this is the creamy base for the dipping sauce.
- Ketchup: 1/4 cup, it adds tang, sweetness, and that classic rosy color.
- Worcestershire sauce: 1 teaspoon, this deepens the sauce with savory richness.
- Garlic salt: 1/2 teaspoon, this gives the sauce a punchy, craveable finish.
- Paprika: 1/4 teaspoon, for the sauce, it adds a little warmth and color.
Easy Swaps If You Need Them
Even a dependable recipe can use a little flexibility, especially when you are working with what is already in the kitchen.
Buttermilk: Whole milk mixed with 1 1/2 tablespoons lemon juice or white vinegar.
Chicken tenderloins: Boneless skinless chicken breasts, sliced into strips.
Cornstarch: Potato starch for a similarly crisp coating.
Vegetable oil: Canola oil or peanut oil.
Worcestershire sauce: Soy sauce with a tiny splash of lemon juice for a different but still savory effect.
The Ingredients That Quietly Do the Heavy Lifting
Now that the full list is on the table, a couple of ingredients deserve a little spotlight because they shape the final result more than you might expect.
Buttermilk: This is what helps the chicken stay juicy and flavorful inside. It also gives the coating something to grip, which means more crispiness in the end.
Cornstarch: This is the ingredient that makes the crust feel lighter, crisper, and a little more delicate than flour alone. Let me tell you, it’s worth every bite.

Let’s Fry Up a Batch
This is the fun part, where the kitchen starts smelling amazing and everything comes together in layers of crunch and flavor.
- Preheat Your Equipment: Heat the vegetable oil in a deep skillet or heavy pot to 350°F. Set a wire rack over a tray or line a tray with paper towels for draining.
- Combine Ingredients: In a large bowl, whisk together the buttermilk, egg, 1 teaspoon kosher salt, and 1/2 teaspoon black pepper. Add the chicken tenderloins, toss well, cover, and refrigerate for at least 2 hours or up to overnight. In a separate shallow bowl, whisk together the flour, cornstarch, paprika, garlic powder, onion powder, remaining 1 teaspoon kosher salt, and remaining 1 teaspoon black pepper. In another small bowl, stir together the mayonnaise, ketchup, Worcestershire sauce, garlic salt, and 1/4 teaspoon paprika until smooth.
- Prepare Your Cooking Vessel: Once the oil reaches 350°F, remove the chicken from the marinade one piece at a time. Let excess marinade drip off lightly, then press each piece into the flour mixture until well coated.
- Assemble the Dish: For extra crunch, dip each coated piece back lightly into the marinade, then back into the flour mixture for a second coating. Press gently so the breading sticks well and creates those craggy bits.
- Cook to Perfection: Fry the chicken in batches for 4 to 6 minutes, turning as needed, until deeply golden and cooked through to 165°F inside. Avoid crowding the pan so the coating stays crisp.
- Finishing Touches: Transfer the fried pieces to the prepared rack and let them rest for a couple of minutes. This keeps the crust crisp and lets the juices settle inside the meat.
- Serve and Enjoy: Pile the hot tenders onto a plate and serve with the prepared dipping sauce. Add fries, toast, or slaw if you want the full takeout-inspired experience.
That Crunch, That Juiciness, That Savory Finish
The first thing you notice is the texture. The outside is craggy and crisp, with little ridges that catch extra golden color and crunch. Then you bite through to the center and get that juicy, tender chicken that feels perfectly cooked and satisfying.
Flavor-wise, it is all about layering. The marinade seasons the chicken from within, the flour mixture adds savory warmth, and the sauce brings creamy tang with a peppery finish that lingers just enough. It is simple, but every element earns its place.
Smart Little Tips for Even Better Results
As you make this recipe your own, these little tricks can help you get an even more reliable result.
- Keep one hand dry and one hand wet: This makes breading less messy and keeps the coating from clumping on your fingers.
- Check the oil temperature often: If it gets too hot, the outside browns too fast. If it gets too cool, the coating can absorb too much oil.
- Rest the breaded chicken briefly before frying: Even 5 minutes helps the coating cling a little better.
- Make the sauce first: It tastes even better after sitting for a bit in the fridge.
Common Mistakes That Are Easy to Avoid
Fried chicken feels simple, but a few small mistakes can get in the way of that ideal crunchy finish. Luckily, they are easy to avoid.
- Skipping the marinating time: The chicken will still cook, but it will not have the same juicy texture or deeper flavor.
- Not pressing the coating on firmly: A loose coating can slide off during frying, so take a second to really pat it into place.
- Crowding the pan: This lowers the oil temperature and leads to pale, soggy tenders.
- Serving immediately from the oil without a short rest: A brief rest helps preserve crispness and keeps the chicken from losing juices too quickly.
A Quick Look at the Nutrition
Before you grab another piece, here is a rough idea of the nutritional breakdown for this homemade version.
Servings: 4
Calories per serving: 620
Note: These are approximate values.
Timing It All Out
One of the nicest things about this recipe is that most of the effort is simple and hands-on. Once your chicken has marinated, the rest moves quickly.
Prep Time: 20 minutes, plus marinating time
Cook Time: 20 minutes
Total Time: 40 minutes, plus marinating time
Make-Ahead and Storage Tips
If you are planning ahead, this recipe makes life easier than you might expect. The sauce can be mixed a day in advance and kept chilled, which actually improves the flavor. The chicken can also marinate overnight, so when it is time to cook, most of the flavor work is already done.
For leftovers, store the cooled tenders in an airtight container in the refrigerator for up to 3 days. Reheat in a 400°F oven or air fryer until hot and crisp again. You can freeze cooked tenders too, just let them cool completely first, then freeze in a single layer before transferring to a container or bag.
The Best Ways to Serve Them
Once the tenders are ready, the fun really begins. They are excellent with fries, slaw, toast, and extra sauce for that full comfort-food plate. They also work beautifully on a platter with pickles and a few dipping options if you are feeding a group.
For a lighter spin, serve them over a crunchy salad or in a wrap with lettuce and sauce. They can even become the star of a casual dinner board with roasted potatoes, sliced veggies, and little bowls of dip.
Leftovers That Deserve a Second Round
If by some miracle you have leftovers, do not let them go to waste. These tenders are too good for that.
Slice them into strips and tuck them into a sandwich with lettuce and sauce. Chop them over a salad for an easy lunch. Wrap them in a tortilla with slaw for a crispy chicken wrap. You can even dice them and pile them onto loaded fries for a weekend-style snack dinner.
A Few More Helpful Notes Before You Cook
As good as this recipe is on day one, a little extra attention can make it feel even smoother and more rewarding.
Season every layer: That means marinade, flour, and sauce. This is what keeps the final result from tasting flat.
Let the oil recover between batches: Give it a minute or two so every batch fries at the right temperature.
Serve the sauce chilled: The cool, creamy contrast against hot crispy chicken is part of what makes the whole thing so satisfying.
How to Make It Look Restaurant-Worthy
A little presentation goes a long way here. Stack the tenders loosely instead of laying them flat so all that crunchy texture shows off. Serve the sauce in a small bowl at the center or side of the plate so it looks inviting and generous.
Add a few fries or a slice of toast for a fuller plate, but keep the scene simple so the tenders stay the star. Golden crust, creamy sauce, clean plate, that is the look you want.
Fun Variations to Try Next Time
Once you have mastered the base recipe, there are plenty of tasty ways to switch it up without losing that crispy charm.
Spicy version: Add 1/2 teaspoon cayenne to the flour mixture and a pinch to the sauce for a gentle kick.
Extra peppery version: Increase the black pepper in the sauce and coating for a bolder finish.
Sandwich style: Serve the tenders on toasted buns with lettuce, pickles, and extra sauce.
Air fryer finish: Spray breaded tenders lightly with oil and air fry at 400°F until crisp and cooked through, turning halfway.
Party platter version: Cut larger pieces into bite-sized strips and serve them with several dipping sauces for a crowd.
FAQ’s
1. Can I use chicken breast instead of tenderloins?
Yes, you can. Just slice boneless skinless chicken into even strips so they cook at the same pace.
2. How long should I marinate the chicken?
At least 2 hours is ideal, but overnight gives the best flavor and texture.
3. Do I really need cornstarch?
It makes a noticeable difference in crispness. You can still make the recipe without it, but the coating will be a little less light and crunchy.
4. What oil is best for frying?
Vegetable, canola, or peanut oil all work well because they have a neutral flavor and handle high heat nicely.
5. Can I make the sauce ahead of time?
Absolutely. In fact, it tastes even better after sitting in the fridge for a few hours.
6. How do I know when the chicken is done?
The coating should be deep golden, and the inside should reach 165°F on an instant-read thermometer.
7. Why is my coating falling off?
Usually that happens if the chicken is too wet, the coating was not pressed on firmly, or the oil temperature is off.
8. Can I freeze these after cooking?
Yes. Let them cool completely, freeze them in a single layer, then store them in a freezer-safe container.
9. How do I reheat them without losing crunch?
Use an oven or air fryer rather than the microwave. Dry heat helps bring the crisp texture back.
10. What can I serve with them besides fries?
Slaw, salad, wraps, roasted potatoes, corn, or even mac and cheese all work beautifully.
Conclusion
There is a reason crispy chicken tenders never really go out of style. They are comforting, crunchy, juicy, and just plain satisfying in a way that feels instantly familiar. This homemade version brings all of that to your table with simple ingredients and a method that is easy to trust.
So the next time you are craving something golden, crispy, and dip-worthy, give these a try. Trust me, once that first batch hits the plate, you will understand exactly why everyone reaches for seconds.
Print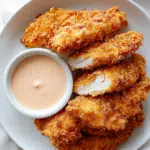
Raising Cane’s Crispy Chicken Tenders
- Prep Time: 20 minutes, plus marinating time
- Cook Time: 20 minutes
- Total Time: 40 minutes, plus marinating time
- Yield: 4 servings 1x
- Category: Main Course
- Method: Fried
- Cuisine: American
- Diet: Hindu
Description
Crispy, juicy chicken tenders marinated in buttermilk, double coated in a seasoned flour mixture, and fried until golden, served with a creamy peppery dipping sauce.
Ingredients
- 2 pounds chicken tenderloins
- 1 1/2 cups buttermilk
- 1 large egg
- 2 teaspoons kosher salt, divided
- 1 1/2 teaspoons black pepper, divided
- 2 cups all-purpose flour
- 1/2 cup cornstarch
- 1 1/2 teaspoons paprika
- 1 teaspoon garlic powder
- 1/2 teaspoon onion powder
- 4 cups vegetable oil, for frying
- 1/2 cup mayonnaise
- 1/4 cup ketchup
- 1 teaspoon Worcestershire sauce
- 1/2 teaspoon garlic salt
- 1/4 teaspoon paprika
Instructions
- In a large bowl, whisk together the buttermilk, egg, 1 teaspoon kosher salt, and 1/2 teaspoon black pepper. Add the chicken tenderloins, toss to coat, cover, and refrigerate for at least 2 hours or up to overnight.
- In a shallow bowl, whisk together the flour, cornstarch, 1 1/2 teaspoons paprika, garlic powder, onion powder, the remaining 1 teaspoon kosher salt, and the remaining 1 teaspoon black pepper.
- In a small bowl, stir together the mayonnaise, ketchup, Worcestershire sauce, garlic salt, and 1/4 teaspoon paprika until smooth. Refrigerate until ready to serve.
- Heat the vegetable oil in a deep skillet or heavy pot to 350°F.
- Remove the chicken from the marinade one piece at a time. Coat each piece in the flour mixture, dip lightly back into the marinade, then coat again in the flour mixture for a second layer.
- Fry the chicken in batches for 4 to 6 minutes, turning as needed, until golden brown and cooked through to 165°F.
- Transfer to a wire rack or paper towel lined tray and let rest for 2 minutes before serving.
- Serve hot with the prepared dipping sauce.
Notes
- For the crispiest coating, do not overcrowd the pan while frying.
- Let the sauce chill before serving for the best flavor.
- An instant-read thermometer helps keep both the oil and the chicken at the right temperature.
- Leftovers reheat best in the oven or air fryer.
Nutrition
- Serving Size: 1/4 of recipe
- Calories: 620
- Sugar: 6 g
- Sodium: 980 mg
- Fat: 34 g
- Saturated Fat: 6 g
- Unsaturated Fat: 25 g
- Trans Fat: 0 g
- Carbohydrates: 39 g
- Fiber: 2 g
- Protein: 38 g
- Cholesterol: 135 mg
Keywords: crispy chicken tenders, copycat chicken tenders, buttermilk fried chicken, pepper sauce, homemade fried chicken