Fruity Vintage Cheesecake Tacos
There’s something so nostalgic and joyful about these fruity vintage cheesecake tacos. The crispy sweet taco shells, the silky cheesecake filling, and those bright fresh berries all come together in a way that feels playful yet surprisingly elegant. The first bite gives you that creamy richness you expect from cheesecake, followed by a light crunch and juicy bursts of fruit that instantly make you want another.
This dessert feels like something straight from an old family gathering table, the kind of treat everyone talks about long after dessert is gone. Trust me, you’re going to love this because it balances creamy, crunchy, fresh, and sweet all in one beautiful little taco shell. And honestly, they look absolutely stunning on a dessert table.
Why Everyone Falls in Love With These Sweet Dessert Tacos
Desserts that combine texture and flavor this well always stand out, and these cheesecake tacos are no exception. They’re fun to make, easy to customize, and they instantly make any gathering feel more festive. The crispy shell almost tastes like a cinnamon sugar pastry, while the filling stays cool, rich, and creamy.
And now as we dive deeper into what makes this dessert so memorable, you’ll see why it has become such a crowd favorite for birthdays, brunches, holidays, and summer parties alike.
A Little Nostalgia Behind This Fun Dessert
Cheesecake-inspired desserts have been around for generations, but dessert tacos became especially popular when creative home bakers started combining nostalgic diner-style cheesecake flavors with playful handheld treats. This recipe brings together vintage dessert charm with modern presentation.
The sweet taco shell gives a subtle nod to classic fried pastries, while the creamy filling feels rich and timeless. Add colorful berries on top, and suddenly it becomes a dessert that looks both retro and trendy at the same time. Let me tell you, it’s worth every bite.
What Makes This Recipe So Reliable and Delicious
These little tacos are more than just pretty desserts. They’re practical, flexible, and surprisingly simple to make.
Versatile: These work beautifully for brunches, baby showers, birthdays, summer cookouts, or even casual movie nights at home.
Budget-Friendly: Most of the ingredients are simple pantry and refrigerator staples, which makes this dessert affordable without sacrificing flavor.
Quick and Easy: The filling comes together fast, and the shells crisp up beautifully in just minutes.
Customizable: You can switch up the fruits, add chocolate drizzle, or even use flavored cheesecake fillings.
Crowd-Pleasing: Kids absolutely love them, and adults always go back for seconds because they’re light yet indulgent.
Make-Ahead Friendly: The filling can easily be prepared ahead of time, making party prep so much easier.
Great for Leftovers: Extra filling tastes amazing as a fruit dip or spread for graham crackers the next day.
Insider Tricks That Make These Even Better
A few small details can completely transform the final result, and these tips really help create bakery-style dessert tacos.
- Chill the cheesecake filling before assembling so it pipes neatly into the shells.
- Coat the taco shells while they’re still warm so the cinnamon sugar sticks properly.
- Use fresh berries that are completely dry to avoid making the filling watery.
- Don’t overfill the tacos or the shells may crack when serving.
- Assemble just before serving for the perfect crispy texture.
Kitchen Tools That Make Everything Easier
Before getting started, gathering the right tools makes the process smooth and stress-free.
Mixing Bowls: You’ll need medium bowls for the filling and topping preparation.
Hand Mixer: Helps create an ultra smooth cheesecake filling without lumps.
Baking Sheet: Perfect for shaping and crisping the taco shells evenly.
Piping Bag: Makes filling the shells cleaner and prettier.
Cooling Rack: Helps the taco shells cool while staying crisp.
Ingredients That Bring These Cheesecake Tacos to Life
The beauty of this dessert comes from simple ingredients working together perfectly. Every ingredient adds either texture, flavor, sweetness, or freshness.
- Flour Tortillas: 6 small tortillas, these create the crispy taco shell base.
- Granulated Sugar: 1/2 cup, adds sweetness and helps coat the shells.
- Ground Cinnamon: 1 teaspoon, gives the shells warm vintage dessert flavor.
- Butter: 3 tablespoons melted, helps crisp and flavor the tortillas.
- Cream Cheese: 8 ounces softened, creates the rich cheesecake filling.
- Powdered Sugar: 3/4 cup, sweetens the filling while keeping it silky smooth.
- Vanilla Extract: 1 teaspoon, adds warmth and depth.
- Heavy Whipping Cream: 1 cup cold, whipped for a light fluffy texture.
- Strawberries: 1 cup sliced, adds juicy sweetness and bright color.
- Blueberries: 1/2 cup, gives fresh tart bursts of flavor.
- Raspberries: 1/2 cup, balances the sweetness beautifully.
- Powdered Sugar for Garnish: 1 tablespoon, lightly dusted over the top before serving.
Easy Ingredient Swaps You Can Try
Sometimes it’s fun to change things up depending on what you have at home.
Strawberries: Swap with sliced peaches or mango.
Blueberries: Use blackberries for a richer berry flavor.
Raspberries: Replace with cherries or pomegranate seeds.
Vanilla Extract: Almond extract creates a more bakery-style flavor.
Heavy Whipping Cream: Store-bought whipped topping works in a pinch.
The Ingredients That Truly Steal the Show
Some ingredients quietly hold the whole dessert together, and these are the stars here.
Cream Cheese: This gives the filling its classic cheesecake flavor and smooth luxurious texture.
Fresh Berries: The fruit adds brightness and freshness that keeps the dessert from feeling too heavy.
Let’s Make These Irresistible Dessert Tacos
Now comes the fun part, and honestly this recipe is such a satisfying one to make. The kitchen starts smelling sweet and warm from the cinnamon sugar shells, while the filling becomes impossibly creamy and fluffy.
- Preheat Your Equipment: Preheat the oven to 375°F and prepare a baking sheet lined with parchment paper.
- Combine Ingredients: Mix the granulated sugar and cinnamon in a shallow bowl. Brush both sides of each tortilla with melted butter, then coat evenly in the cinnamon sugar mixture.
- Prepare Your Cooking Vessel: Fold the tortillas gently and place them between the bars of an upside-down muffin tin or oven rack to hold their taco shape while baking.
- Assemble the Dish: Bake for 8 to 10 minutes until golden and crisp. Let the shells cool completely. Meanwhile, beat the cream cheese, powdered sugar, and vanilla extract until smooth. In a separate bowl whip the heavy cream until stiff peaks form, then gently fold it into the cream cheese mixture.
- Cook to Perfection: Pipe or spoon the cheesecake filling into each cooled taco shell, filling them generously but neatly.
- Finishing Touches: Top with sliced strawberries, blueberries, and raspberries. Finish with a light dusting of powdered sugar.
- Serve and Enjoy: Serve immediately while the shells are crisp and the filling is cool and creamy.
The Texture and Flavor Combination Is Unreal
One of the best parts of this dessert is how every bite changes slightly. First you get that crisp cinnamon sugar shell, then the creamy cheesecake filling melts smoothly across your tongue. Right after that, the berries bring freshness and a little tartness that balances everything beautifully.
The contrast is what makes these unforgettable. Sweet, creamy, crunchy, cool, and fruity all at once. This one’s a total game-changer for dessert lovers.
Helpful Tricks for the Best Results Every Time
A few thoughtful touches can make these look and taste even more impressive.
- Use cold heavy cream so it whips faster and stays fluffy.
- Chill the filling for 20 minutes before piping if your kitchen is warm.
- Slice berries evenly for prettier presentation.
- Add fruit right before serving to keep everything fresh.
Mistakes That Are Easy to Avoid
Even simple desserts have a few sneaky pitfalls, but thankfully these are easy fixes.
- Overbaking the shells can make them too hard instead of crisp.
- Filling warm shells can soften them too quickly.
- Wet berries can water down the filling.
- Overmixing whipped cream into the filling can flatten the texture.
Nutrition Information You Should Know
Servings: 6 tacos
Calories per serving: 340
Note: These are approximate values.
Timing Everything Perfectly
This dessert comes together surprisingly quickly, which makes it ideal for parties or last-minute cravings.
Prep Time: 20 minutes
Cook Time: 10 minutes
Total Time: 30 minutes
Smart Make-Ahead and Storage Ideas
If you’re planning ahead, the cheesecake filling can be made up to two days in advance and stored covered in the refrigerator. The taco shells can also be baked a day early and kept in an airtight container once fully cooled.
For leftovers, store assembled tacos in the refrigerator for up to one day, though the shells soften over time. If freezing, freeze only the filling because the shells lose their crisp texture after thawing.
Fun Ways to Serve These Beautiful Tacos
These dessert tacos look stunning on a large serving tray with extra berries scattered in small bowls nearby. You can also drizzle melted chocolate or caramel over the top for extra indulgence.
They pair beautifully with iced coffee, fruit tea, or even vanilla milkshakes for a fun dessert spread.
Creative Ways to Use Leftovers
Extra cheesecake filling makes an incredible dip for graham crackers, vanilla wafers, or sliced apples.
You can also layer leftover filling and fruit into small jars for mini cheesecake parfaits the next day.
Extra Tips That Make a Big Difference
Small details always elevate homemade desserts.
- Use full-fat cream cheese for the richest flavor.
- Let cream cheese soften naturally for smoother mixing.
- Pipe the filling using a star tip for bakery-style presentation.
- Keep shells uncovered while cooling so they stay crisp.
Turn These Into a True Dessert Showpiece
Presentation makes these even more irresistible. Arrange them upright on a serving platter and alternate berry colors for a vibrant display. A tiny dusting of powdered sugar right before serving instantly gives them that elegant bakery look.
Fresh mint leaves nearby can also make the colors pop beautifully without overwhelming the dessert.
Fun Variations Worth Trying
These tacos are incredibly adaptable, which makes them even more exciting to make repeatedly.
- Chocolate Berry Version: Add mini chocolate chips and drizzle melted chocolate on top.
- Tropical Twist: Use mango, kiwi, and toasted coconut.
- Cookies and Cream Style: Fold crushed chocolate sandwich cookies into the filling.
- Lemon Berry Flavor: Add lemon zest to the cheesecake mixture for brightness.
- Caramel Apple Version: Top with diced apples and caramel drizzle during fall.
FAQ’s
1. Can I make these ahead of time?
Yes, but it’s best to assemble them shortly before serving so the shells stay crisp.
2. Can I use frozen berries?
Fresh berries work best because frozen berries release too much moisture.
3. How do I keep the taco shells crispy?
Let them cool completely before filling and avoid refrigerating assembled tacos too long.
4. Can I use whipped topping instead of whipped cream?
Absolutely, though homemade whipped cream gives the filling a fresher flavor.
5. What tortillas work best?
Small flour tortillas crisp up beautifully and hold their shape well.
6. Can I add chocolate sauce?
Definitely. Chocolate drizzle tastes incredible with the berries and cheesecake filling.
7. Do I need a piping bag?
No, you can spoon the filling in, though piping creates a cleaner presentation.
8. Can I make these gluten free?
Yes, simply use gluten free tortillas.
9. How long will leftovers last?
They’re best eaten the same day, but leftovers can stay refrigerated for about 24 hours.
10. Can kids help make these?
Absolutely. Kids usually love coating the tortillas and adding fruit toppings.
Conclusion
These fruity vintage cheesecake tacos are one of those desserts that instantly make people smile. They’re playful, creamy, colorful, and packed with texture in every bite. From the crispy cinnamon sugar shell to the rich cheesecake filling and fresh berries, every layer works together beautifully.
Whether you’re making them for a party, a family dessert night, or just because you want something fun and sweet, this recipe delivers every single time. Trust me, once you make them, they’ll become one of those desserts everyone keeps requesting again and again.
Print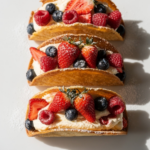
Fruity Vintage Cheesecake Tacos
- Prep Time: 20 minutes
- Cook Time: 10 minutes
- Total Time: 30 minutes
- Yield: 6 tacos 1x
- Category: Dessert
- Method: Baking
- Cuisine: American
- Diet: Vegetarian
Description
Crispy cinnamon sugar taco shells filled with fluffy cheesecake filling and topped with fresh berries for a playful and nostalgic dessert everyone loves.
Ingredients
- 6 small flour tortillas
- 1/2 cup granulated sugar
- 1 teaspoon ground cinnamon
- 3 tablespoons melted butter
- 8 ounces cream cheese, softened
- 3/4 cup powdered sugar
- 1 teaspoon vanilla extract
- 1 cup heavy whipping cream, cold
- 1 cup sliced strawberries
- 1/2 cup blueberries
- 1/2 cup raspberries
- 1 tablespoon powdered sugar for garnish
Instructions
- Preheat oven to 375°F and line a baking sheet with parchment paper.
- Mix granulated sugar and cinnamon in a shallow bowl.
- Brush tortillas with melted butter and coat both sides in the cinnamon sugar mixture.
- Fold tortillas gently and place between the bars of an upside-down muffin tin or oven rack to form taco shapes.
- Bake for 8 to 10 minutes until golden and crisp. Cool completely.
- Beat cream cheese, powdered sugar, and vanilla extract until smooth.
- Whip heavy cream until stiff peaks form, then gently fold into the cream cheese mixture.
- Pipe or spoon cheesecake filling into cooled taco shells.
- Top with strawberries, blueberries, and raspberries.
- Dust lightly with powdered sugar and serve immediately.
Notes
- Assemble just before serving for the crispiest shells.
- Dry berries well before topping the tacos.
- The cheesecake filling can be made up to 2 days ahead.
- Store leftover filling separately in the refrigerator.
Nutrition
- Serving Size: 1 taco
- Calories: 340
- Sugar: 21g
- Sodium: 240mg
- Fat: 20g
- Saturated Fat: 11g
- Unsaturated Fat: 7g
- Trans Fat: 0g
- Carbohydrates: 35g
- Fiber: 3g
- Protein: 5g
- Cholesterol: 55mg
Keywords: fruity cheesecake tacos, vintage dessert tacos, berry cheesecake tacos, cheesecake taco recipe, crispy dessert tacos