Fudgy Brownie Bottom Cheesecake Recipe
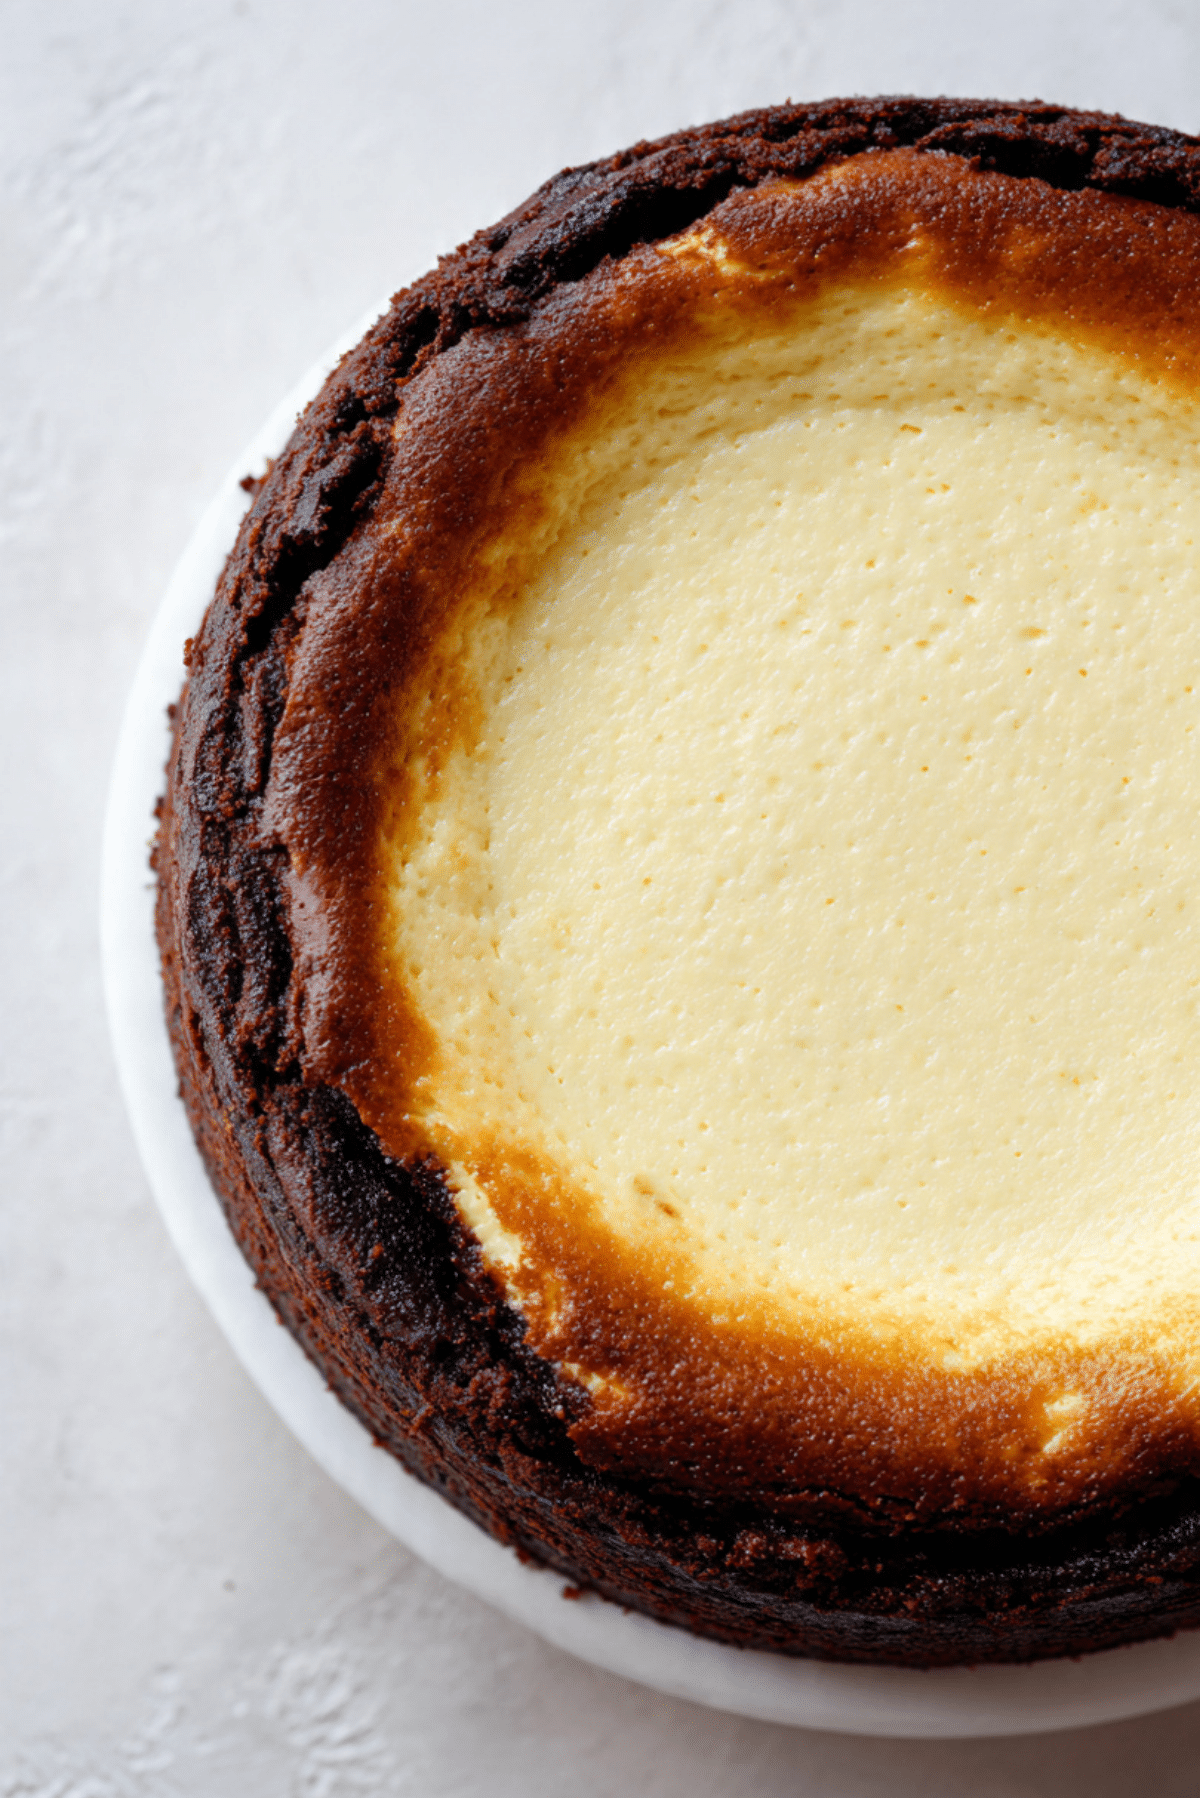
There is something almost magical about slicing into a dessert and seeing two perfect layers staring back at you. A rich, dark chocolate brownie base and a creamy, velvety cheesecake top, all in one bite. This fudgy brownie bottom cheesecake recipe is the kind of dessert that makes everyone pause at the table. Trust me, you’re going to love this. It is indulgent, comforting, and honestly worth every single bite.
Why This Decadent Dessert Always Steals the Show
Some desserts are good, and then some are unforgettable. This one belongs in that second category. The moment you press your fork through the smooth cheesecake layer and hit that dense, chocolatey brownie base, you realize this is not just another cake.
It feels luxurious, yet familiar. The chocolate is deep and slightly bittersweet, while the cheesecake is creamy with just the right touch of tang from the sour cream. It is the kind of dessert you bring out when you want to impress without saying a word.
A Sweet Blend of Two Classic Favorites
Cheesecake has roots that go back centuries, with variations appearing across Europe long before it became a staple in American bakeries. Brownies, on the other hand, are a proud American creation, known for their fudgy centers and crackly tops.
Bringing these two together feels like the best kind of culinary mashup. This fudgy brownie bottom cheesecake recipe combines the dense richness of a classic chocolate brownie with the smooth elegance of a traditional baked cheesecake. It is a little bit old world, a little bit modern comfort, and completely irresistible.
Why You Can Trust This Recipe Every Time
Before we step into the kitchen, let me tell you why this one’s a total game-changer.
Versatile: You can dress it up with berries, chocolate ganache, or keep it simple and let the layers shine.
Budget-Friendly: Most ingredients are pantry staples like flour, sugar, cocoa powder, eggs, and cream cheese.
Quick and Easy: The steps are straightforward and approachable, even if you are new to baking.
Customizable: Add chocolate chips to the brownie base or swirl in a little extra cocoa for a twist.
Crowd-Pleasing: Chocolate and cheesecake together rarely disappoint. It is a guaranteed hit at gatherings.
Make-Ahead Friendly: It actually tastes better after chilling, which makes it perfect for planning ahead.
Great for Leftovers: The texture stays beautiful for days when stored properly.
Pro Tips From My Kitchen to Yours
Before you tie on your apron, let me share a few insider tricks.
- Use room temperature cream cheese. It blends smoothly and prevents lumps.
- Do not overmix the cheesecake batter once the eggs are added, which helps avoid cracks.
- Line your pan with parchment for easy removal and clean slices.
- Let the cheesecake cool gradually in the oven with the door slightly open to minimize cracking.
Essential Tools for Perfect Layers
Having the right tools makes everything smoother.
9 inch springform pan: This allows easy removal without damaging the delicate cheesecake layer.
Mixing bowls: You will need separate bowls for the brownie base and cheesecake filling.
Electric mixer: Helps create a silky, lump-free cheesecake batter.
Spatula: Perfect for scraping down the sides and smoothing the top.
Measuring cups and spoons: Accurate measurements keep the texture just right.
Ingredients You Will Need For This Show-Stopping Dessert
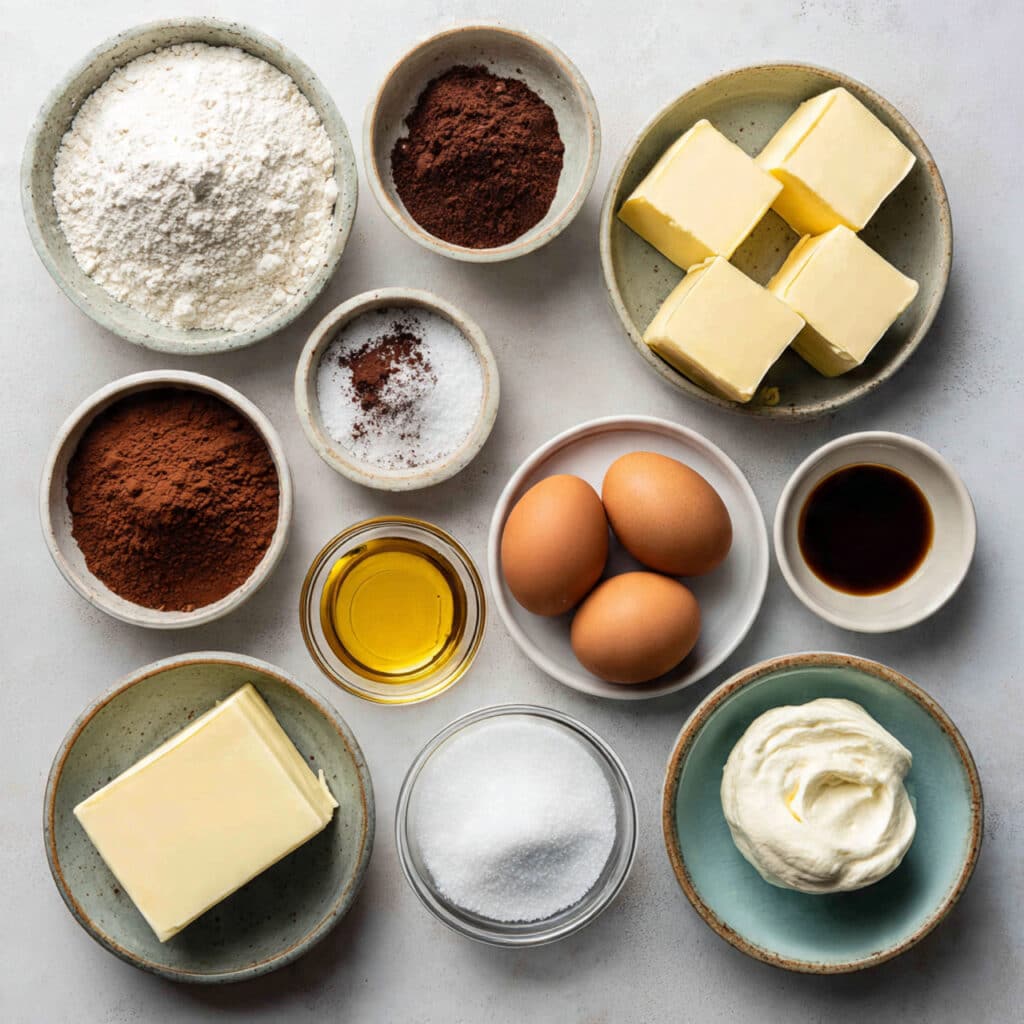
Each ingredient plays its part in building those beautiful layers and balanced flavors.
- All-Purpose Flour: 1 cup, gives structure to the brownie base.
- Granulated Sugar: 1 cup for the brownie layer and 1 cup for the cheesecake layer, adds sweetness and helps with texture.
- Unsweetened Cocoa Powder: 1/2 cup, brings deep chocolate flavor to the base.
- Salt: 1/2 teaspoon, enhances both chocolate and creaminess.
- Unsalted Butter: 1/2 cup, melted for the brownie base, adds richness.
- Large Eggs: 3 total, 1 for the brownie base and 2 for the cheesecake layer, provide structure and creaminess.
- Vanilla Extract: 1 teaspoon for the brownie and 1 teaspoon for the cheesecake, adds warmth and depth.
- Cream Cheese: 16 ounces, softened, forms the heart of the cheesecake layer.
- Sour Cream: 1/2 cup, adds tang and creates a smooth texture.
Easy Swaps If You Need Them
Sometimes you work with what you have, and that is perfectly fine.
All-Purpose Flour: You can use a 1:1 gluten free baking flour blend.
Granulated Sugar: Coconut sugar can be used, though the flavor will be slightly deeper.
Sour Cream: Plain full fat Greek yogurt works beautifully.
Unsalted Butter: You may use salted butter, just reduce the added salt slightly.
Spotlight on the Stars of the Show
Let’s take a moment to appreciate the heroes here.
Cream Cheese: This is what gives the cheesecake its silky, luxurious texture. When properly softened and blended, it creates that smooth bite we all crave.
Unsweetened Cocoa Powder: This ingredient brings bold chocolate flavor without extra sweetness, which keeps the dessert balanced and rich rather than cloying.
Let’s Bake It Together Step by Step
Now let’s dive into the fun part, because this is where the magic happens.
- Preheat Your Equipment: Preheat your oven to 325 degrees Fahrenheit. Lightly grease and line a 9 inch springform pan with parchment paper.
- Combine Ingredients: In a bowl, mix the melted butter, 1 cup granulated sugar, 1 egg, and 1 teaspoon vanilla extract. Stir in the cocoa powder, flour, and salt until just combined to form the brownie batter. In a separate bowl, beat the softened cream cheese with 1 cup granulated sugar until smooth. Add the 2 eggs one at a time, then mix in 1 teaspoon vanilla extract and sour cream until creamy.
- Prepare Your Cooking Vessel: Press the brownie batter evenly into the bottom of the prepared springform pan, smoothing the surface with a spatula.
- Assemble the Dish: Carefully pour the cheesecake mixture over the brownie base, spreading it evenly to the edges.
- Cook to Perfection: Bake for 50 to 60 minutes, until the center is slightly jiggly but set around the edges.
- Finishing Touches: Turn off the oven and let the cheesecake sit inside with the door slightly open for about 1 hour. Then refrigerate for at least 4 hours or overnight to fully set.
- Serve and Enjoy: Slice with a clean, warm knife for neat layers. This is the moment when everyone gathers close.
The Texture and Flavor Experience
The first bite is pure contrast. The brownie base is dense, moist, and deeply chocolatey. Above it, the cheesecake layer is smooth, creamy, and slightly tangy. As the flavors mingle, the sweetness balances the cocoa’s richness. The edges are slightly firmer, while the center remains soft and luscious.
Let me tell you, it is worth every bite.
Extra Cooking Tips for Best Results
A few small details make a big difference.
- Chill thoroughly before slicing, which helps achieve clean, sharp layers.
- Use a hot knife and wipe it clean between cuts.
- Avoid opening the oven frequently during baking.
- Let ingredients come to room temperature before mixing.
Common Mistakes and How to Fix Them
Even experienced bakers run into small hiccups, so here is what to watch for.
- Overbaking, which can cause a dry texture. Pull it out when the center still has a gentle jiggle.
- Overmixing the batter after adding eggs, which can create cracks.
- Skipping chill time, which results in messy slices.
- Using cold cream cheese, which leads to lumps in the filling.
Nutrition Facts at a Glance
Servings: 12
Calories per serving: 420
Note: These are approximate values.
Time Breakdown for Planning
Prep Time: 20 minutes
Cook Time: 55 minutes
Total Time: 1 hour 15 minutes plus chilling time
Make-Ahead and Storage Guide
This dessert is actually better the next day. You can bake it a day in advance and let it chill overnight. Store leftovers tightly covered in the refrigerator for up to 4 days. You can also freeze individual slices wrapped well in plastic wrap and stored in an airtight container for up to 2 months. Thaw overnight in the fridge before serving.
Serving Ideas That Elevate Every Slice
Serve it plain for a classic presentation, or add fresh berries for a pop of color and brightness. A drizzle of warm chocolate sauce makes it even more indulgent. A small dollop of whipped cream on the side never hurts either.
Creative Ways to Use Leftovers
If you somehow have leftovers, here are fun ideas.
Crumble a slice over vanilla ice cream for a layered sundae. Blend small pieces into a milkshake for an ultra rich treat. You can even cube it and layer it into parfait glasses with fruit and whipped cream.
Extra Tips for Flavor and Ease
For a stronger chocolate flavor, add a tablespoon of espresso powder to the brownie base. If you love a tangier cheesecake, increase the sour cream slightly. Always let the cheesecake rest before slicing, patience really pays off here.
Make It Look Bakery Worthy
For clean edges, run a knife around the inside of the pan before releasing the springform. Wipe the knife between slices. A light dusting of cocoa powder or powdered sugar on top creates a beautiful finish.
Fun Variations to Try Next Time
Add chocolate chips to the brownie layer for extra texture.
Swirl a little melted chocolate into the cheesecake batter before baking.
Top with a simple chocolate ganache for a glossy finish.
Add a layer of chopped nuts to the brownie base for crunch.
Mix in a tablespoon of instant coffee granules to deepen the chocolate flavor.
FAQ’s
Q1: Can I use low fat cream cheese?
Yes, but the texture will be slightly less rich and creamy.
Q2: How do I prevent cracks?
Do not overmix, and allow the cheesecake to cool gradually in the oven.
Q3: Can I make this gluten free?
Yes, use a 1:1 gluten free flour blend in place of regular flour.
Q4: How long should it chill?
At least 4 hours, but overnight is best.
Q5: Can I freeze the whole cheesecake?
Yes, wrap it tightly and freeze for up to 2 months.
Q6: Why is my brownie layer too hard?
It may have been overbaked. Check your oven temperature accuracy.
Q7: Can I add fruit on top?
Absolutely. Fresh strawberries or raspberries pair beautifully.
Q8: What if I do not have a springform pan?
You can use a deep cake pan lined well with parchment, though removal will be trickier.
Q9: Can I double the recipe?
Yes, use a larger pan and adjust baking time accordingly.
Q10: How do I get clean slices?
Use a sharp knife dipped in hot water and wipe between each cut.
Conclusion
This fudgy brownie bottom cheesecake recipe brings together the best of two worlds in one stunning dessert. It is rich, creamy, chocolatey, and just indulgent enough to feel special. Whether you are baking for a celebration or simply craving something extraordinary, this one delivers every time. Trust me, once you make it, it will become a favorite in your kitchen too.
Print
Fudgy Brownie Bottom Cheesecake Recipe
- Prep Time: 20 minutes
- Cook Time: 55 minutes
- Total Time: 1 hour 15 minutes
- Yield: 12 servings 1x
- Category: Dessert
- Method: Baking
- Cuisine: American
- Diet: Vegetarian
Description
A rich and indulgent dessert that layers a dense, chocolatey brownie base with a smooth and creamy cheesecake topping. This fudgy brownie bottom cheesecake recipe delivers the perfect balance of deep cocoa flavor and silky vanilla sweetness in every bite.
Ingredients
- 1 cup all-purpose flour
- 2 cups granulated sugar, divided
- 1/2 cup unsweetened cocoa powder
- 1/2 teaspoon salt
- 1/2 cup unsalted butter, melted
- 3 large eggs, divided
- 2 teaspoons vanilla extract, divided
- 16 ounces cream cheese, softened
- 1/2 cup sour cream
Instructions
- Preheat oven to 325 degrees Fahrenheit. Lightly grease and line a 9 inch springform pan with parchment paper.
- In a mixing bowl, combine melted butter, 1 cup granulated sugar, 1 egg, and 1 teaspoon vanilla extract. Stir in cocoa powder, flour, and salt until just combined to form the brownie batter.
- Press the brownie batter evenly into the bottom of the prepared springform pan.
- In a separate bowl, beat softened cream cheese with the remaining 1 cup granulated sugar until smooth. Add the remaining 2 eggs one at a time, mixing gently. Stir in the remaining 1 teaspoon vanilla extract and sour cream until creamy and well combined.
- Pour the cheesecake mixture over the brownie base and spread evenly.
- Bake for 50 to 60 minutes, until the edges are set and the center is slightly jiggly.
- Turn off the oven and let the cheesecake cool inside with the door slightly open for 1 hour. Refrigerate for at least 4 hours or overnight before slicing and serving.
Notes
- Use room temperature cream cheese for a smooth filling.
- Avoid overmixing after adding eggs to prevent cracks.
- Chill thoroughly for clean, neat slices.
- Use a warm knife and wipe between cuts for perfect layers.
Nutrition
- Serving Size: 1 slice
- Calories: 420
- Sugar: 32g
- Sodium: 320mg
- Fat: 28g
- Saturated Fat: 16g
- Unsaturated Fat: 10g
- Trans Fat: 0g
- Carbohydrates: 38g
- Fiber: 2g
- Protein: 7g
- Cholesterol: 110mg
Keywords: fudgy brownie bottom cheesecake recipe, brownie cheesecake, layered cheesecake dessert, chocolate cheesecake bars, baked cheesecake